
Written by Gavin Morrice on Jul 24th, 2020
Jekyll is a framework for quickly building static HTML websites that supports SASS, reusable templates, and layouts. It’s built in Ruby and can be extended with third-party plugins and your own code.
Amazon’s AWS offers super-simple, super-cheap, and efficient static website hosting.
CircleCI is a continuous integration platform that can automatically build and deploy your code any time you push out changes to GitHub.
In this post, I’ll talk you through the steps for hosting your static Jekyll website on AWS, and setting it to automatically deploy every time you push changes to your git repo.
Before we get started
This post assumes you already have:
- created your Jekyll website (if not, you can follow this tutorial)
- set up a Git repository for your website on GitHub
- purchased a domain for your website (if not, a subdomain will do, or you can buy a domain here)
- some familiarity with AWS and CircleCI
Once those items are in place, we’re ready to get deployin’…
Creating an S3 bucket
If you haven’t already created an AWS account, you can do so here. If you have, sign in to your account and navigate to the S3 section within the console.
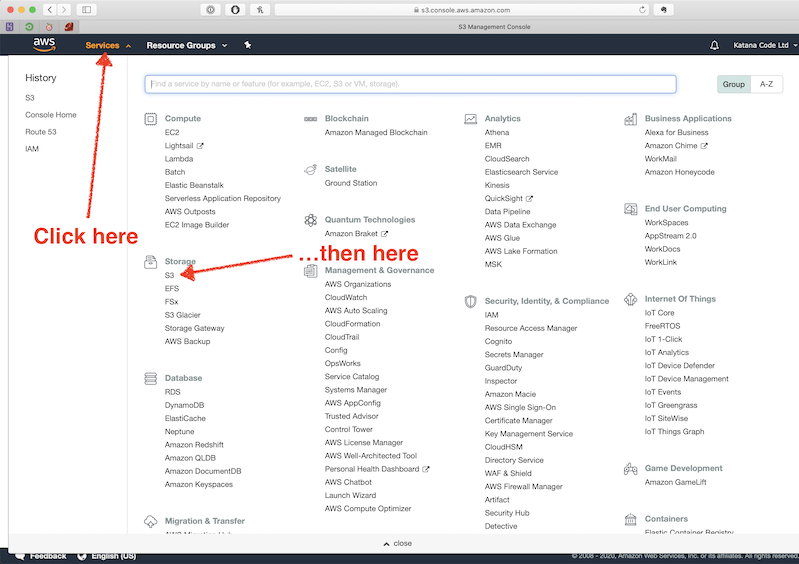
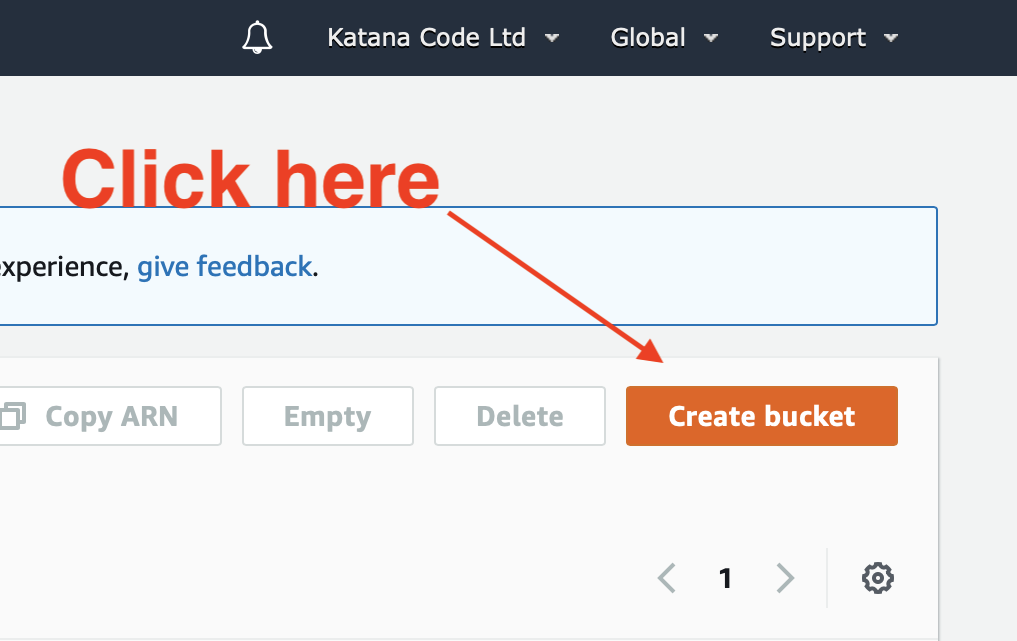
Create a new Bucket by clicking on the “Create bucket” button
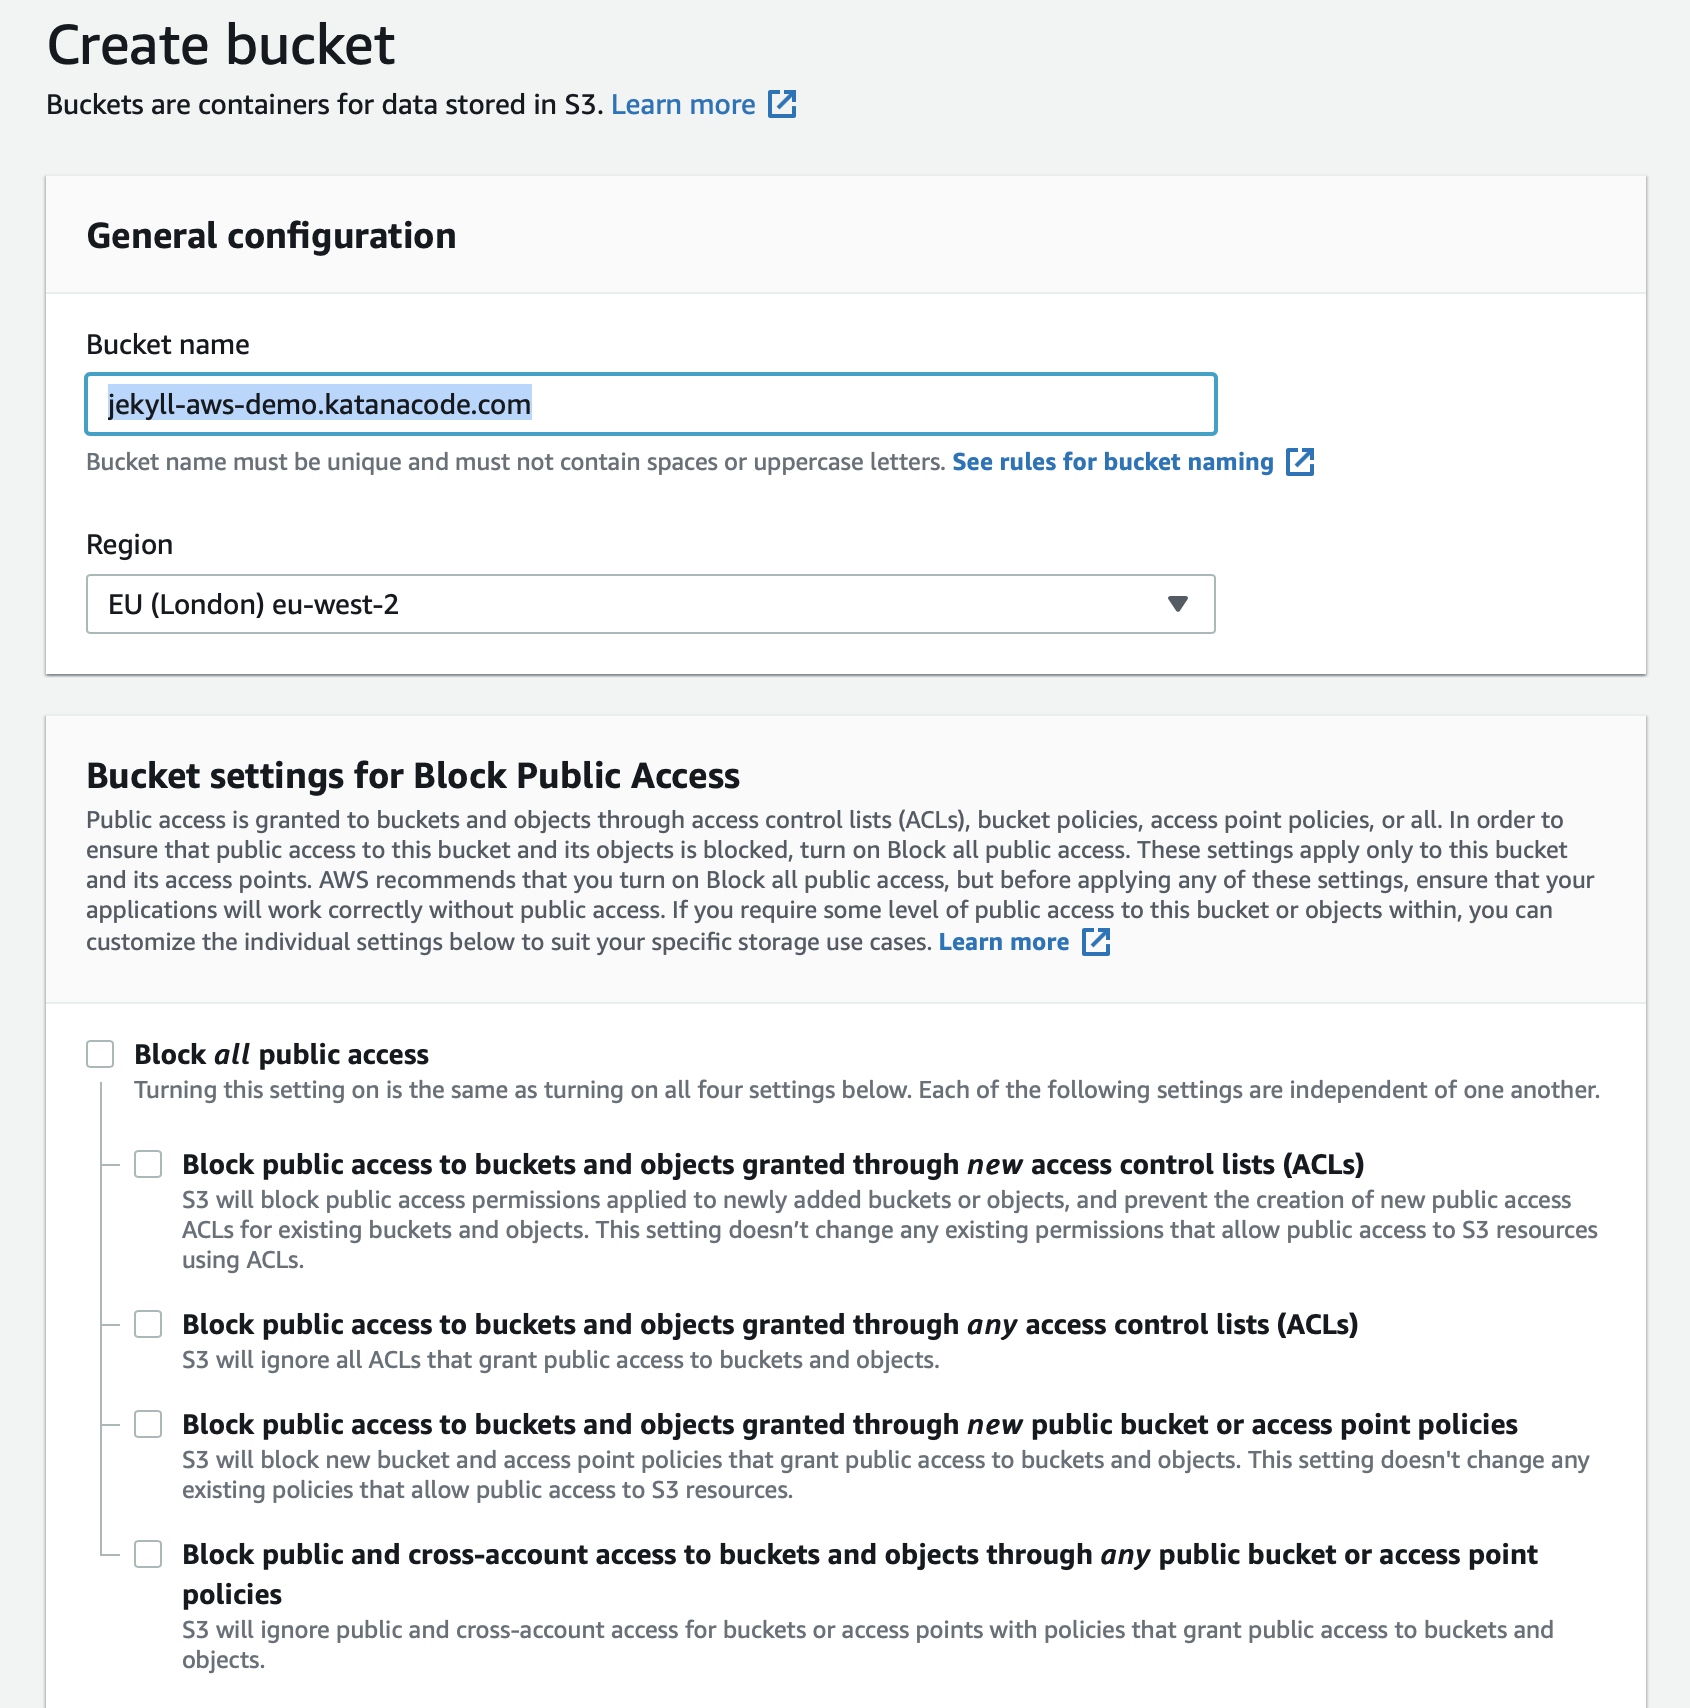
Configure your bucket as shown below. Be sure to name your bucket as the domain name that you’re hosting your website on. This is a requirement set by AWS, and the hosting won’t work without it.
Choose the region that makes the most sense for you. For us, this is the eu-west-2 (London) region, because we’re based in Scotland and so are most of our clients. This part isn’t super important if you’re using a CDN like CloudFlare though, since a distributed network will have cache locations close to your visitors, wherever they might be.
You’ll notice I’ve unchecked the public access checkboxes. This is because your bucket will require public access in order to make the HTML, CSS, JS and other asset files of your website visible to the public. AWS will ask you to confirm this before creating the bucket. It’s important that you do not store any sensitive documents in this bucket since they will be openly available to the public for viewing.
Leave all of the other settings as their default values for now, and click the “Create bucket” button to proceed.
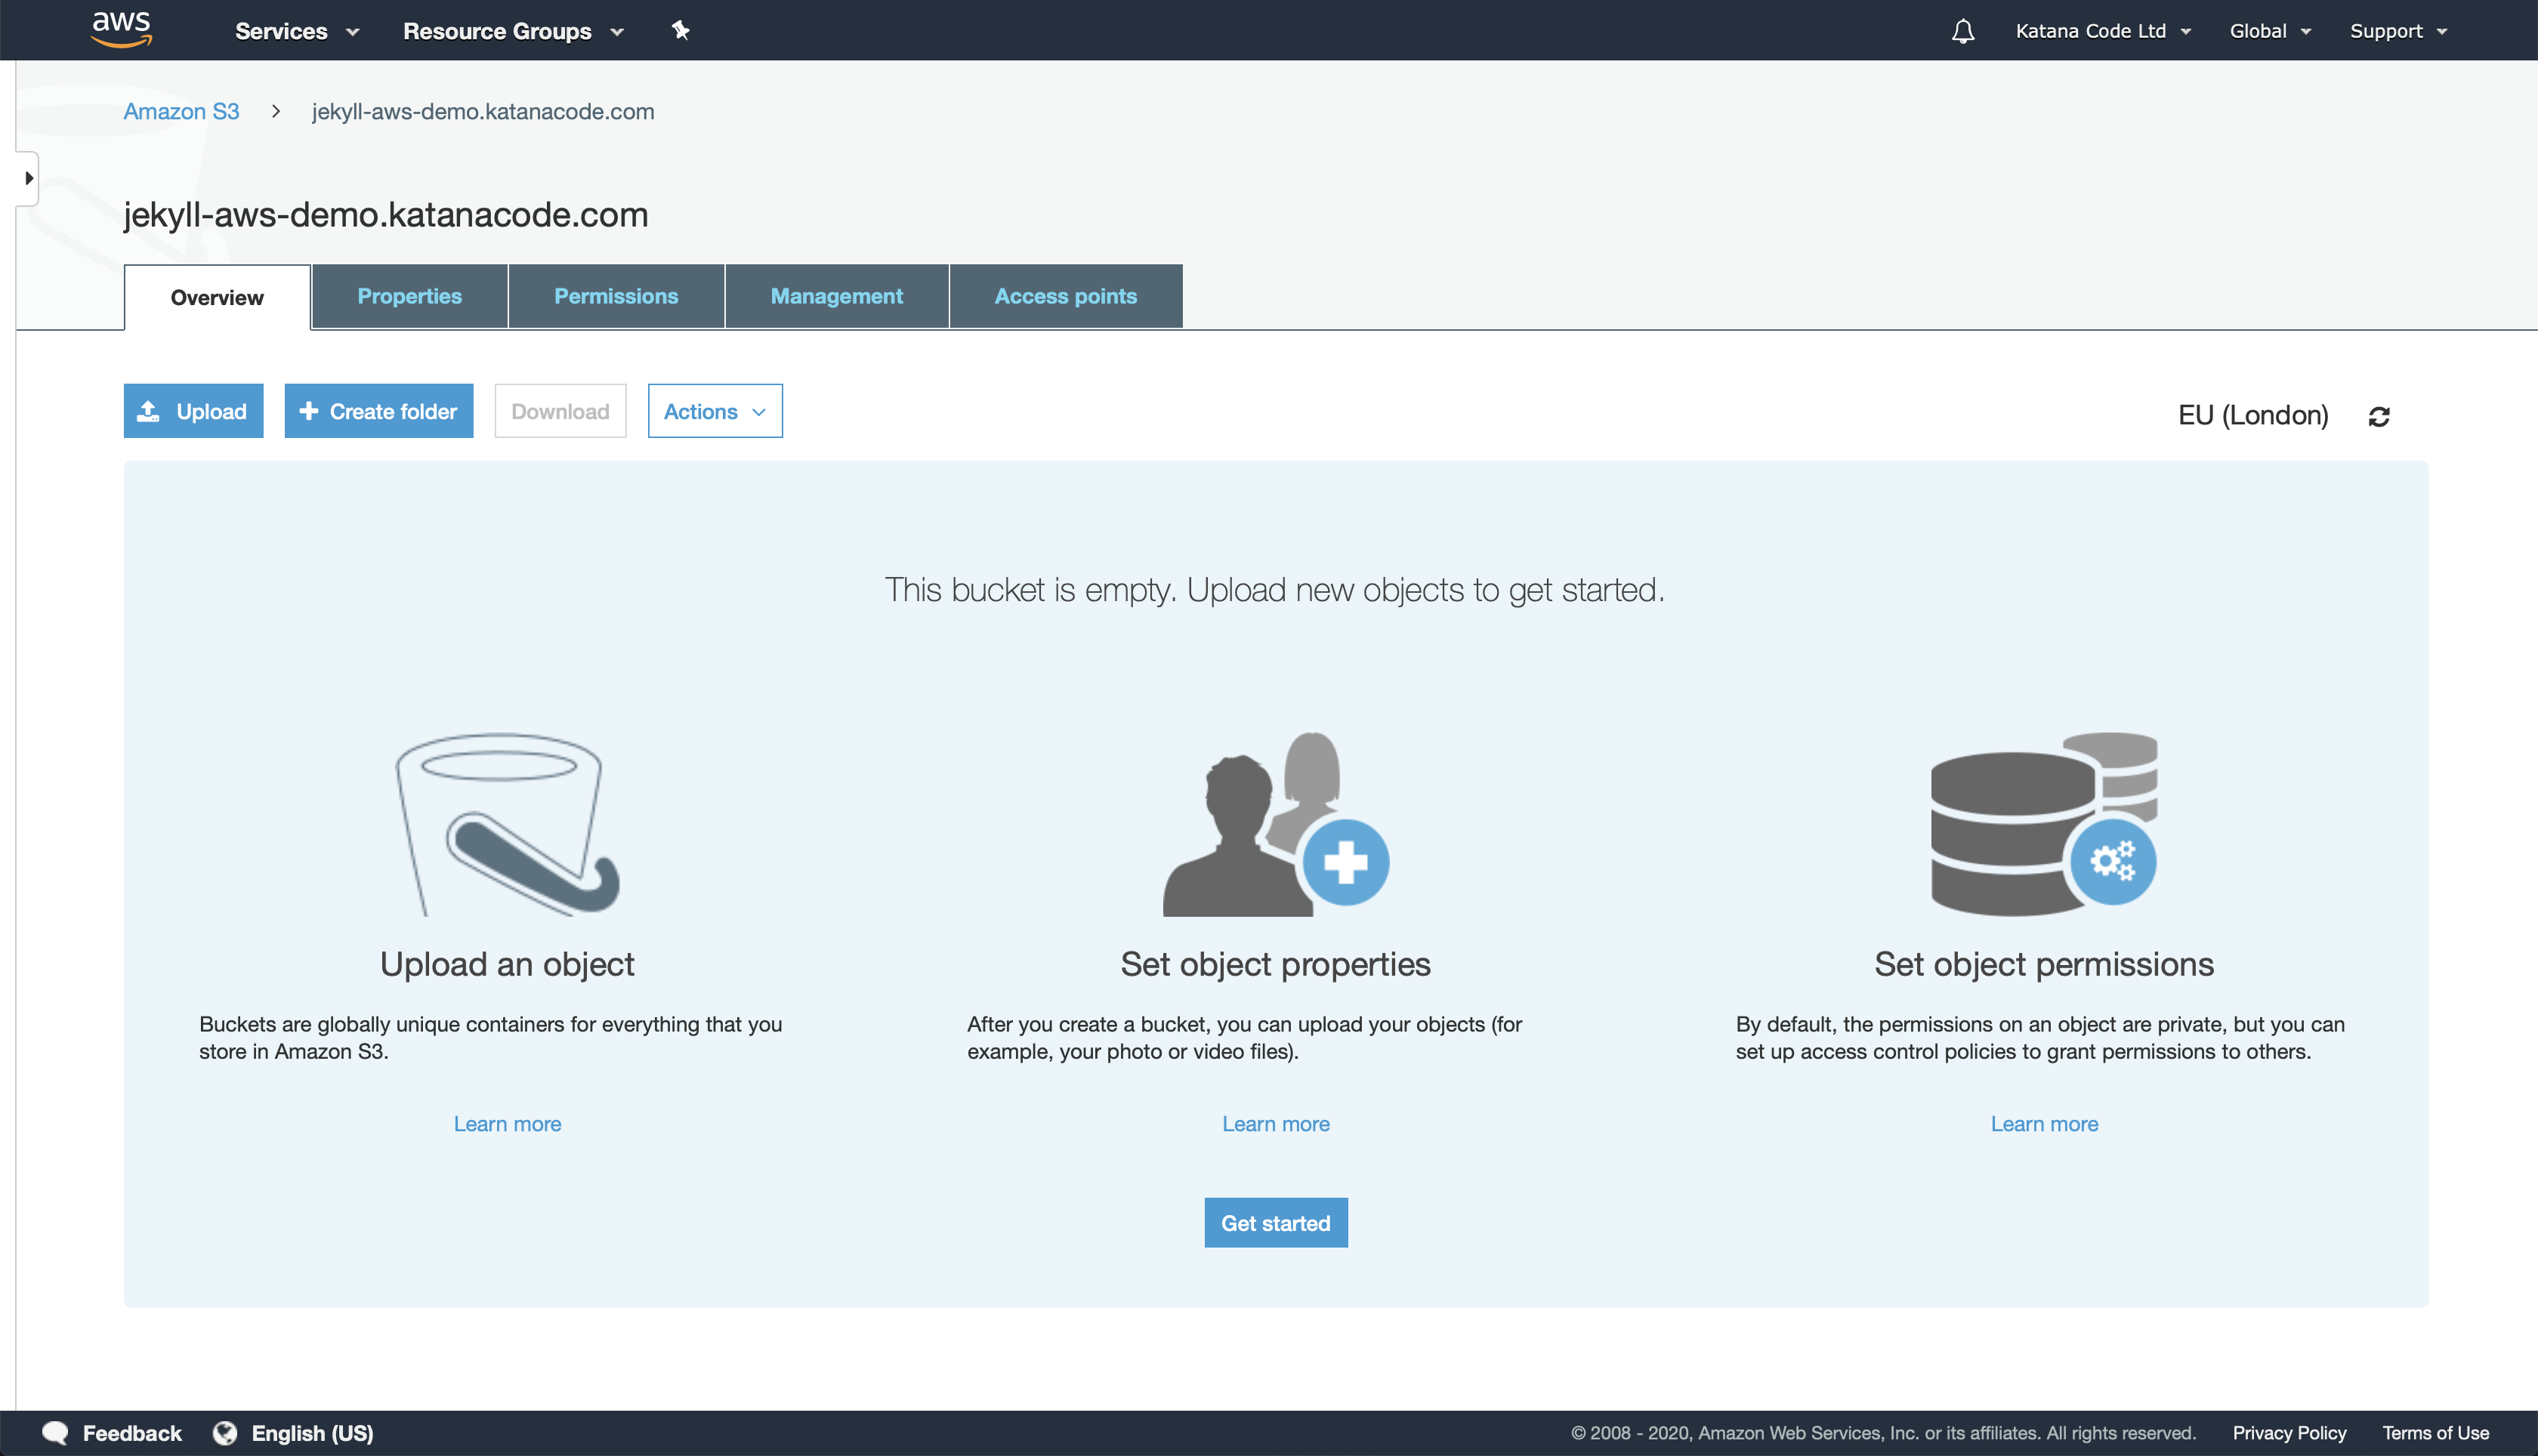
Now click on your new bucket in the list of all your buckets. The empty bucket page should look something like this:
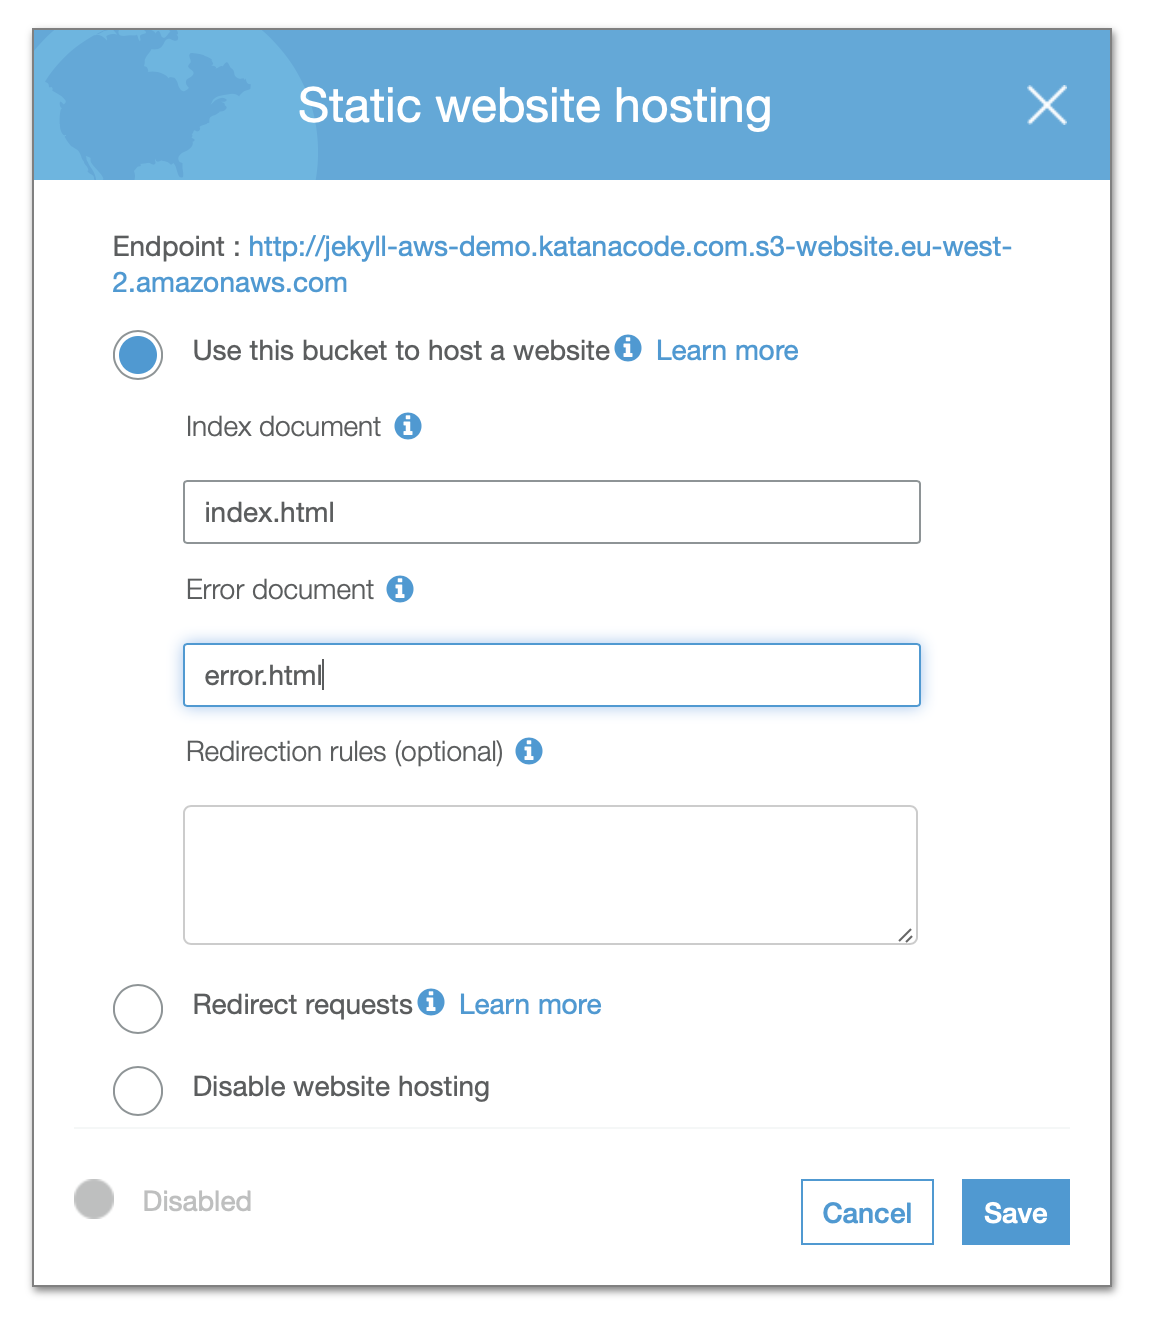
Next, we want to tell AWS that we intend to use this bucket to host a static website. Do that by clicking on the “Properties” tab and then clicking “Static website hosting”.
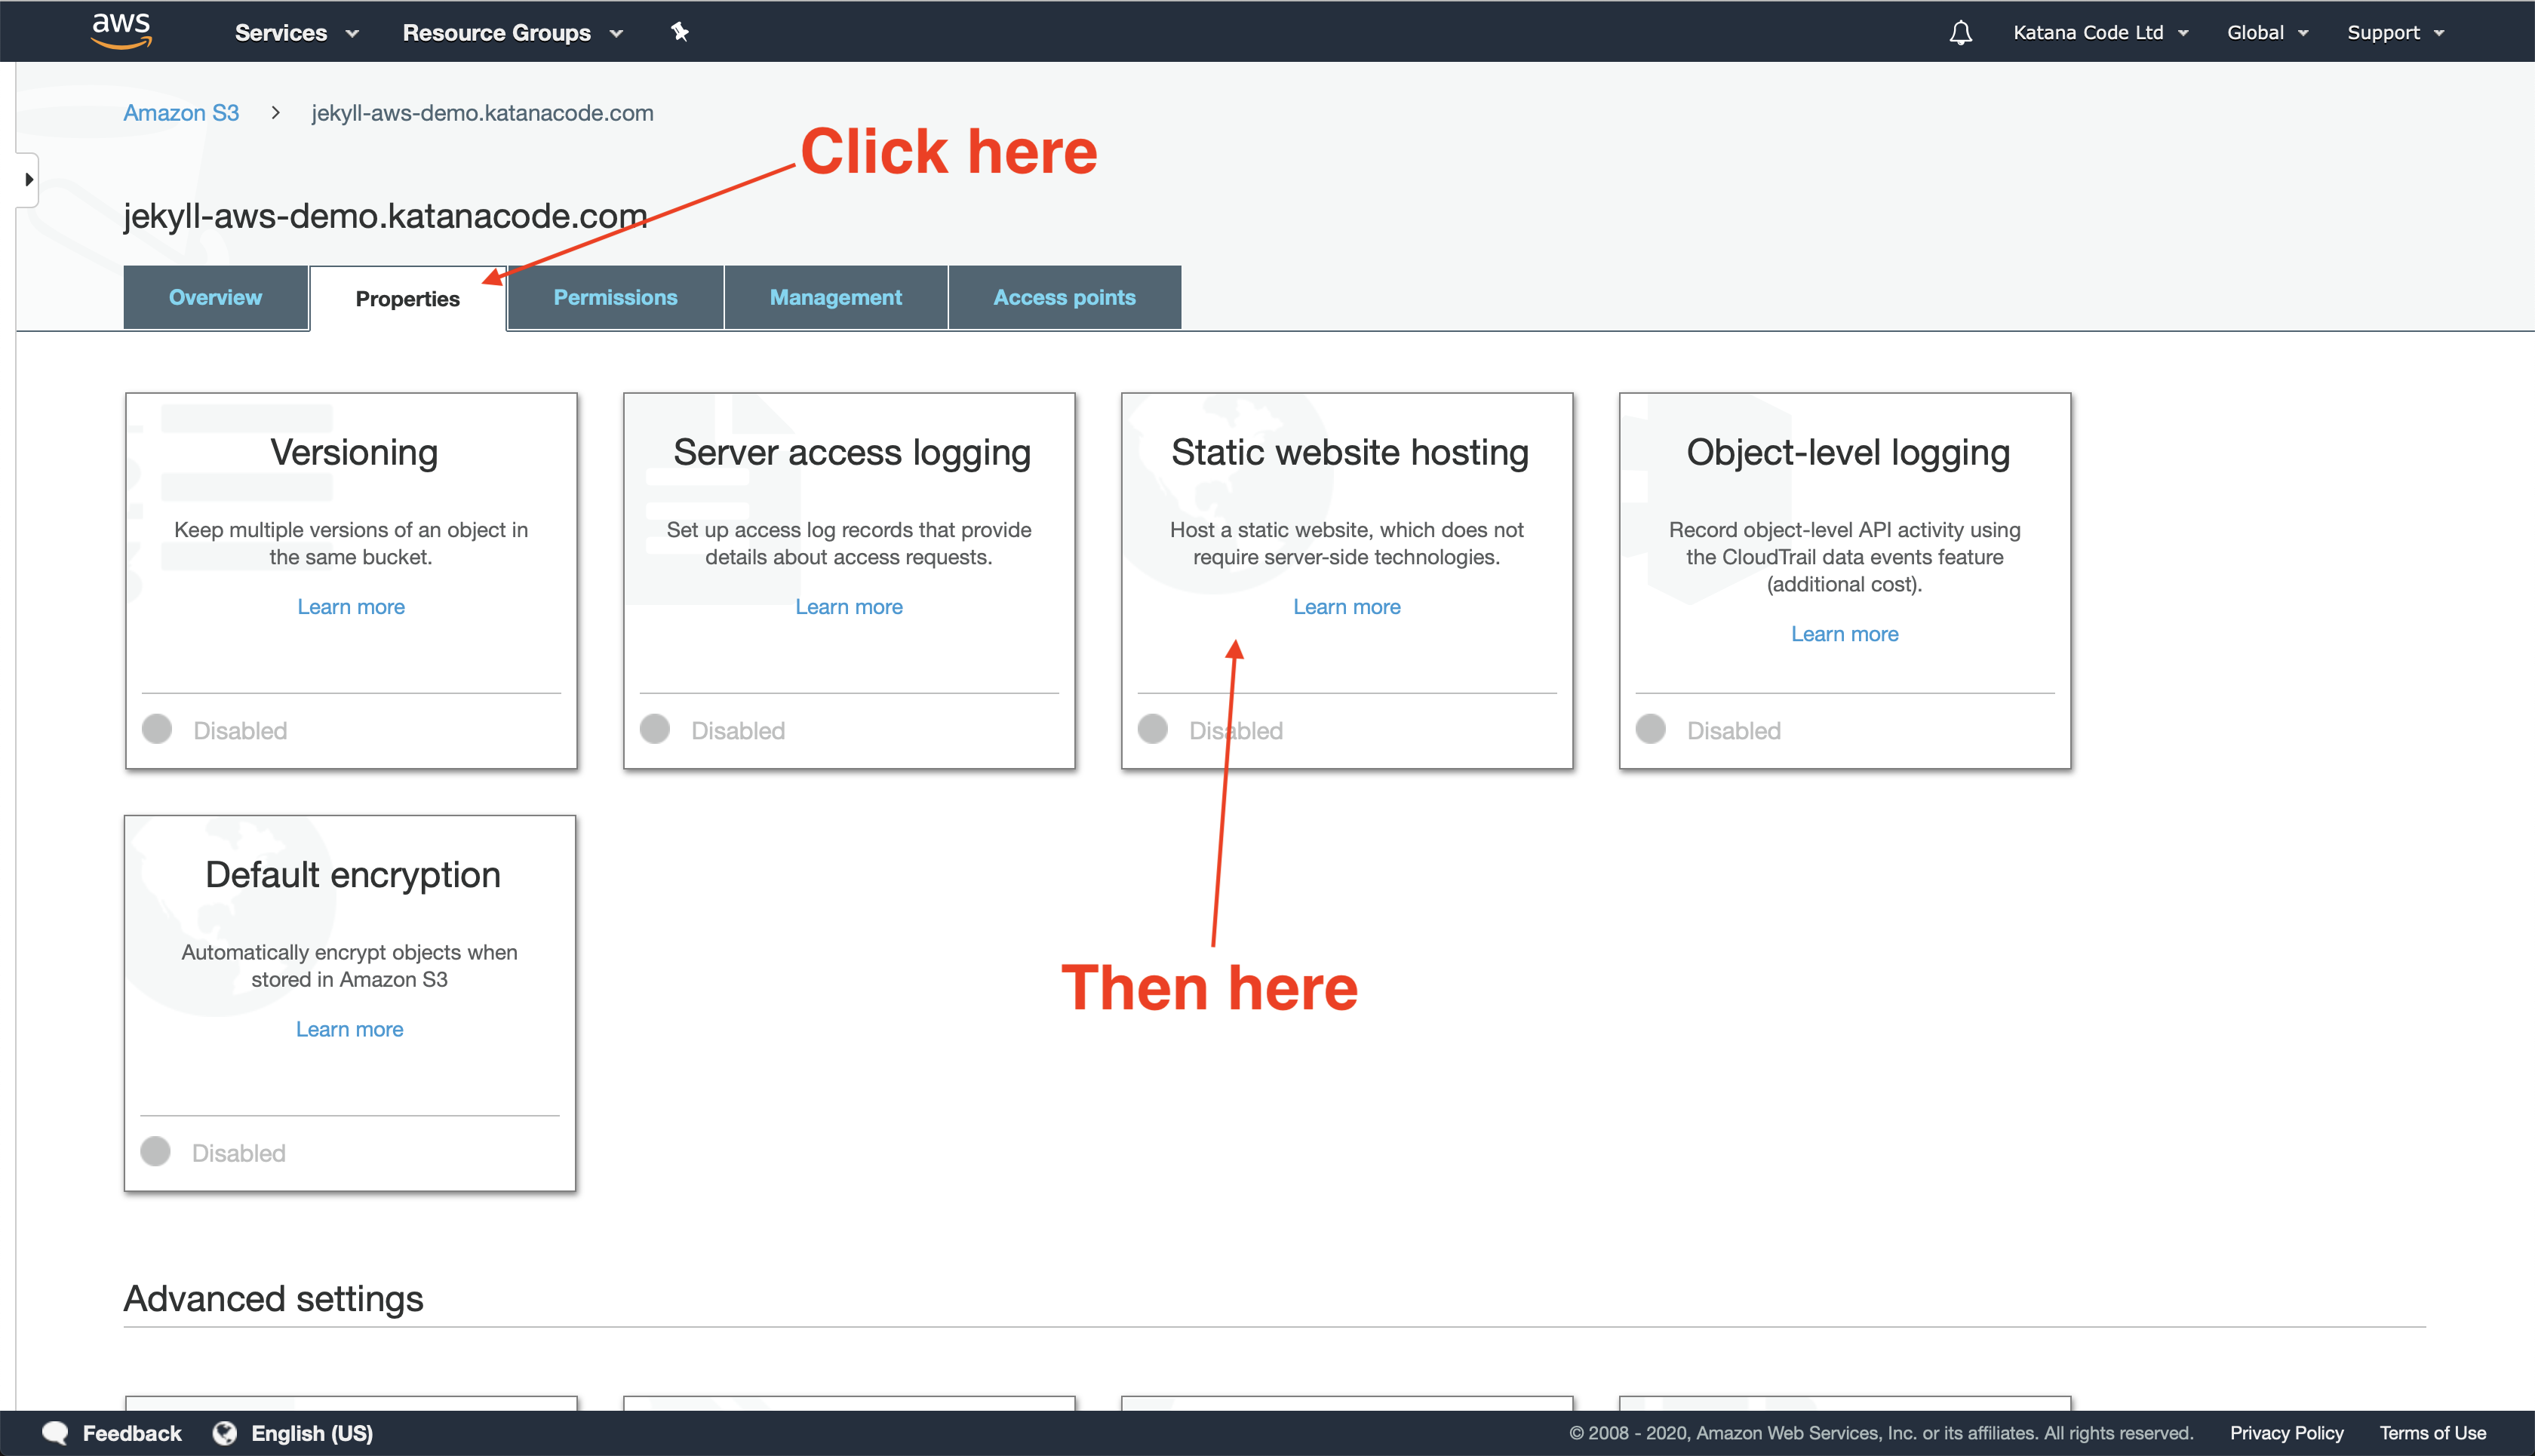
Click on the radio button labelled “Use this bucket to host a website” and fill in the form fields that appear. The default values index.html and error.html should be fine for now—It’s unlikely that your index file will have a different name. You’ll want to configure an error file on your page to handle cases like 404 Page Not Found errors. By default, this is called error.html, but you can name it something else if you’d prefer.
Click the Save button, and your bucket should now be (almost) set up and ready to serve your static pages. There’s just one more bucket configuration we need to change, and that’s to create a “Bucket Policy” that allows public GET requests to the objects within our bucket. In other words, we need to tell AWS that members of the public may access our site’s files.
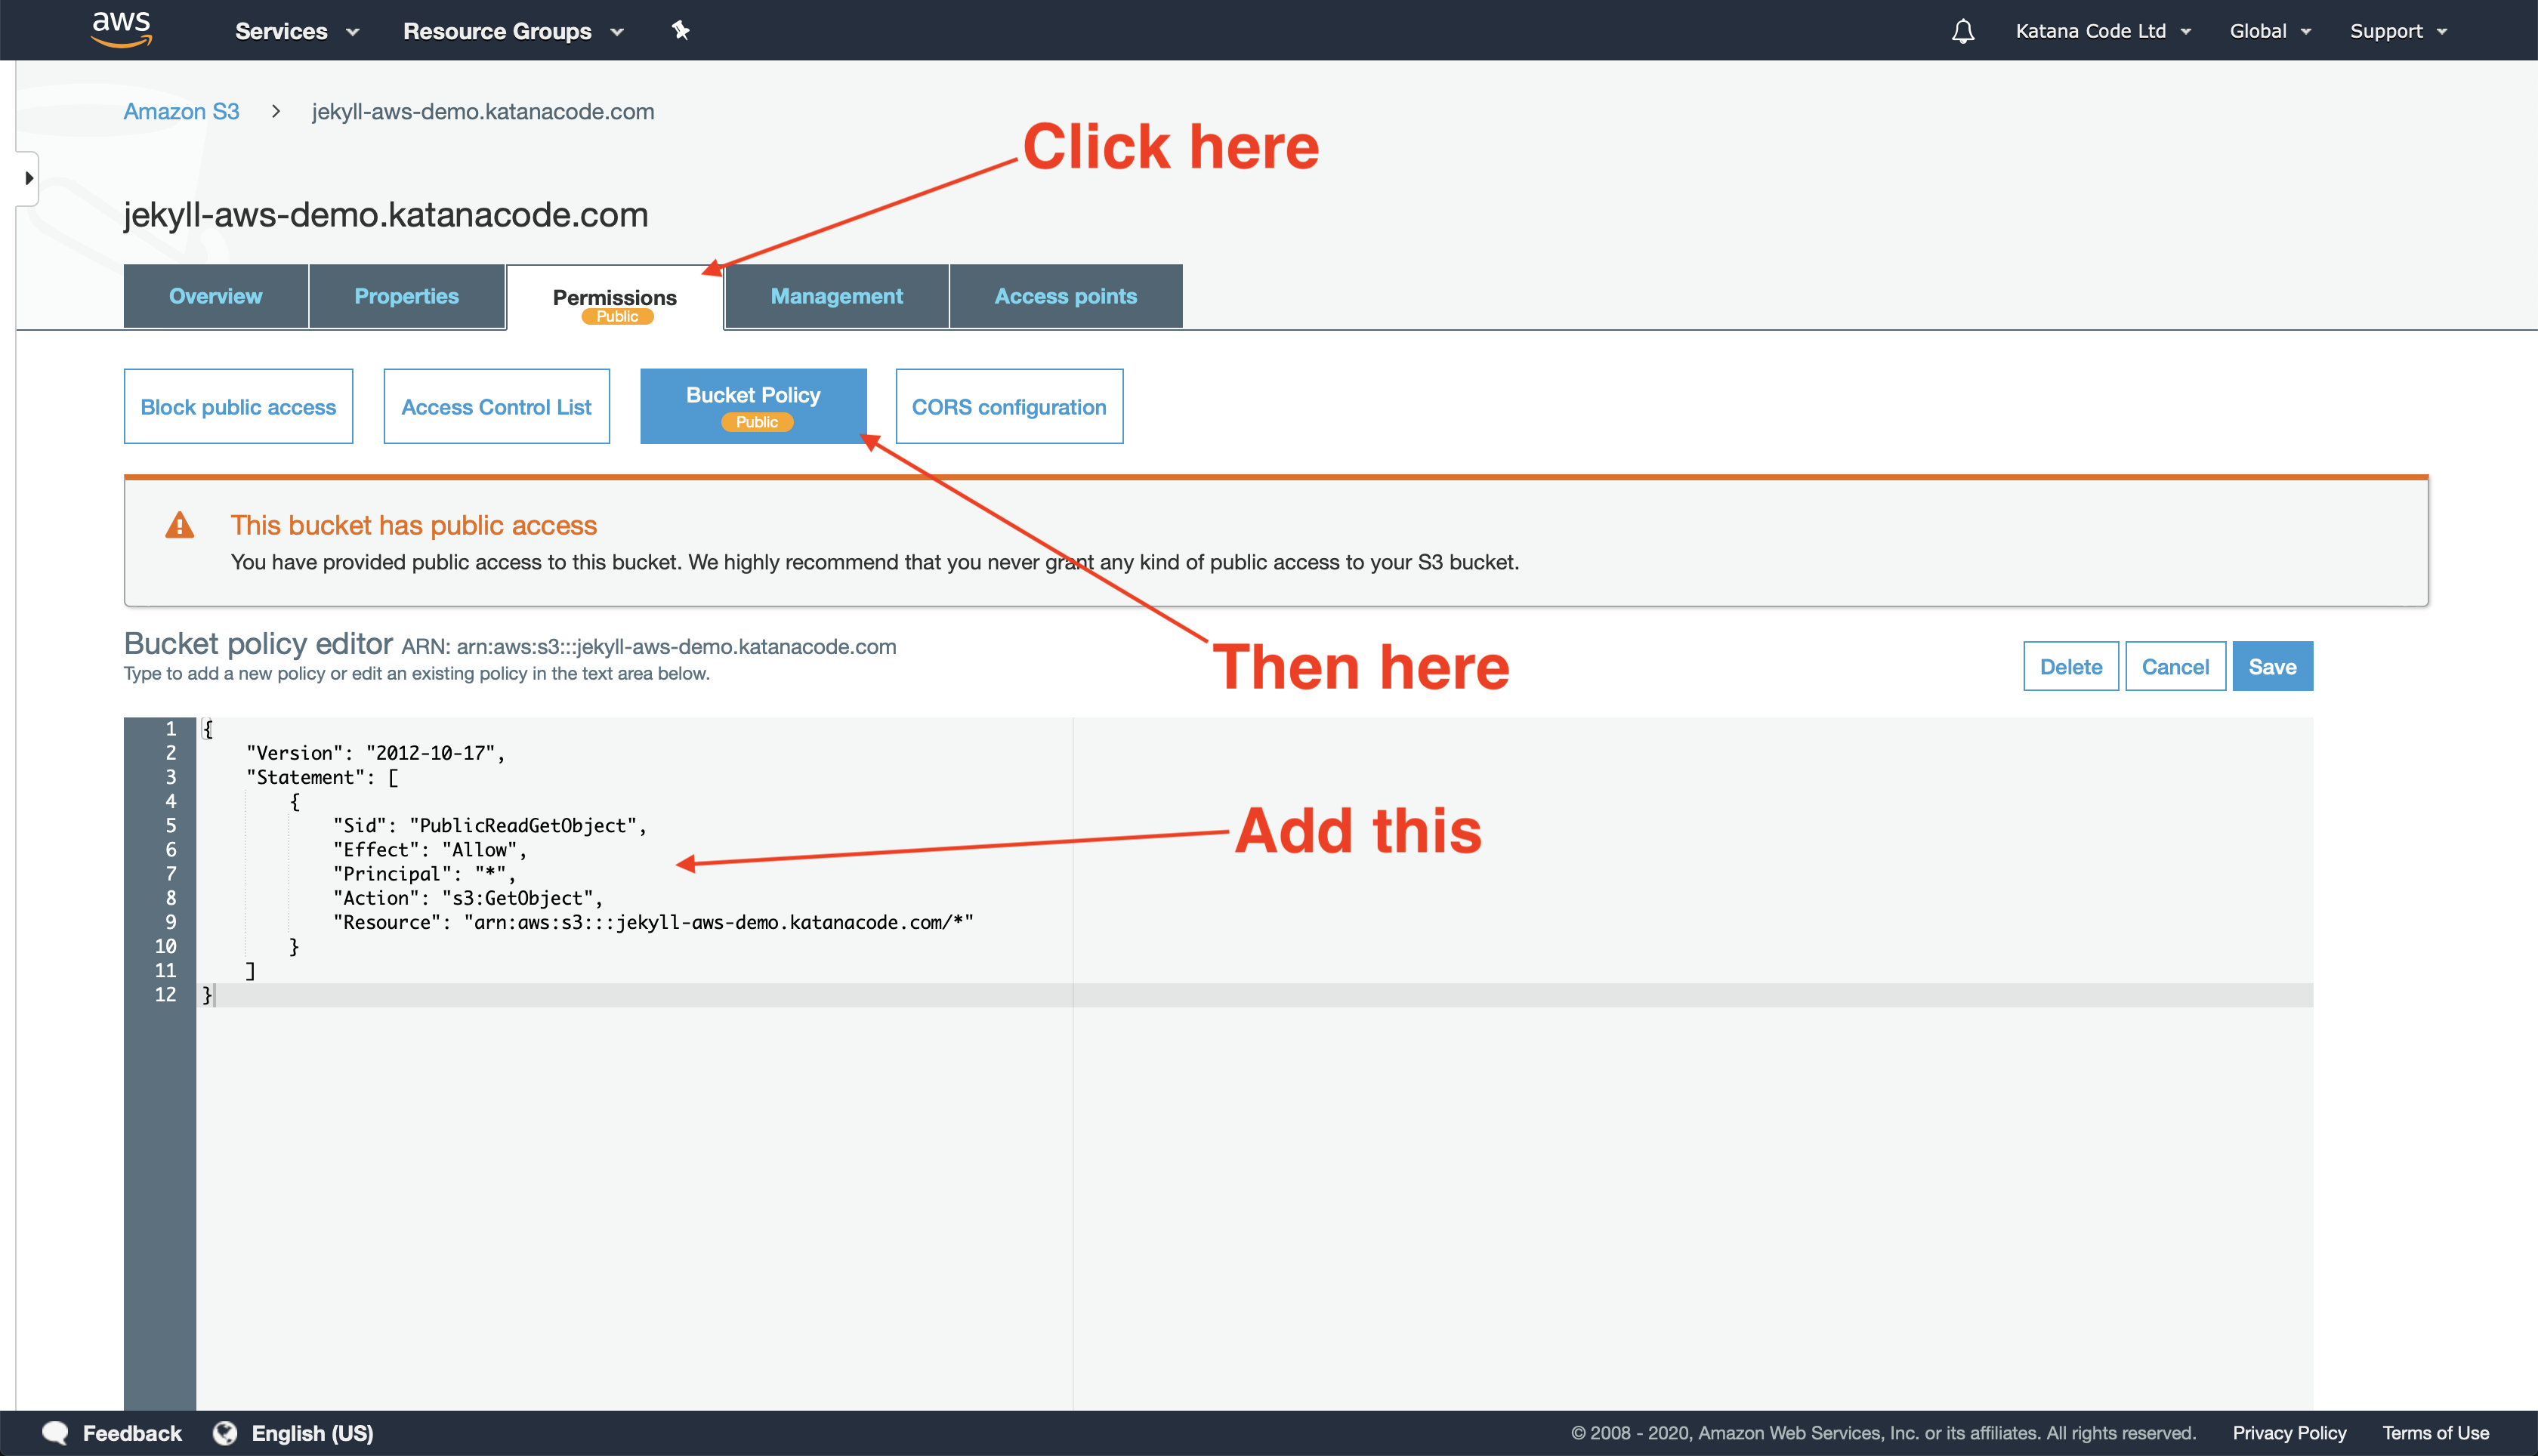
Here’s the code from the Bucket Policy. I’ll explain what it means below…
{
    "Version": "2012-10-17",
    "Statement": [
        {
            "Sid": "PublicReadGetObject",
            "Effect": "Allow",
            "Principal": "*",
            "Action": "s3:GetObject",
            "Resource": "arn:aws:s3:::[your-bucket-name]/*"
        }
    ]
}
This Policy Statement is how we tell AWS that we want to allow all GET requests on objects (files) within the Resource named “arn:aws:s3:::[your-bucket-name]/*” (our bucket). This should permit people to view the content of our website, but not add, remove, or modify any of the files without the proper access.
Test that it works!
Now we need to test that the steps we’ve just implemented have worked, and our bucket is configured properly to serve static files.
To do this, we’re going to create an index.html file and manually upload it to the bucket.
In your favourite text editor, create a file named index.html, and edit it with the following:
<h1>Whew! It works</h1>
Save this file (it doesn’t matter where), and then upload it to your bucket by clicking on the “Upload” button.
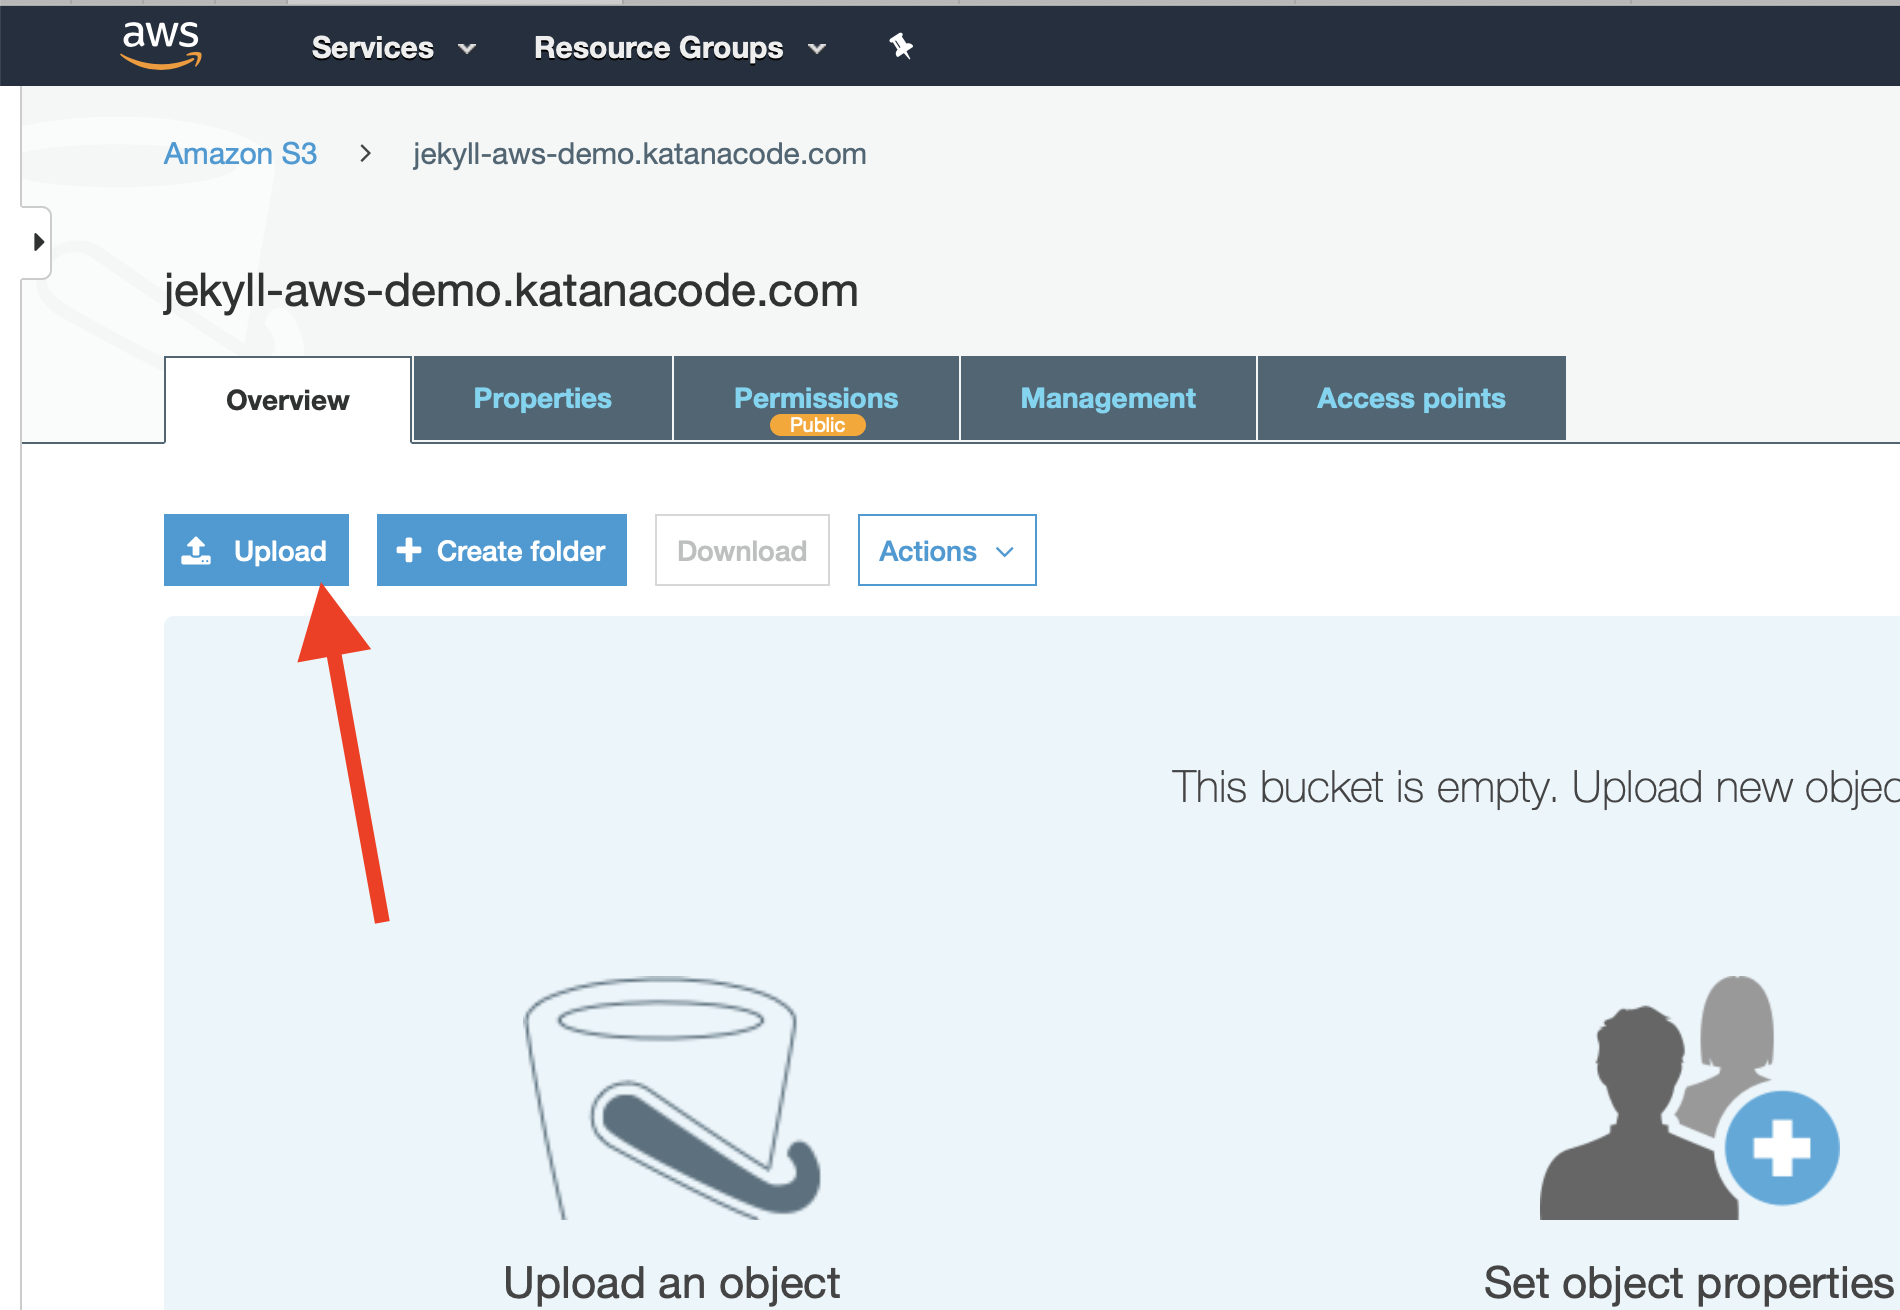
It’s fine to tap the “Next” button here and use AWS’s default settings for uploading this file.
Once your file has been uploaded, you should be able to access it via its AWS URL. This will be unique to your own settings, but should be in the format of: [bucket name].s3-website.[aws region].amazonaws.com. In my case, my bucket name is jekyll-aws-demo.katanacode.com and my region is eu-west-2, so the URL of my website is: http://jekyll-aws-demo.katanacode.com.s3-website.eu-west-2.amazonaws.com
When I visit that URL http://jekyll-aws-demo.katanacode.com.s3-website.eu-west-2.amazonaws.com, I can see that it’s working because my “Whew! It works” index file is loading!
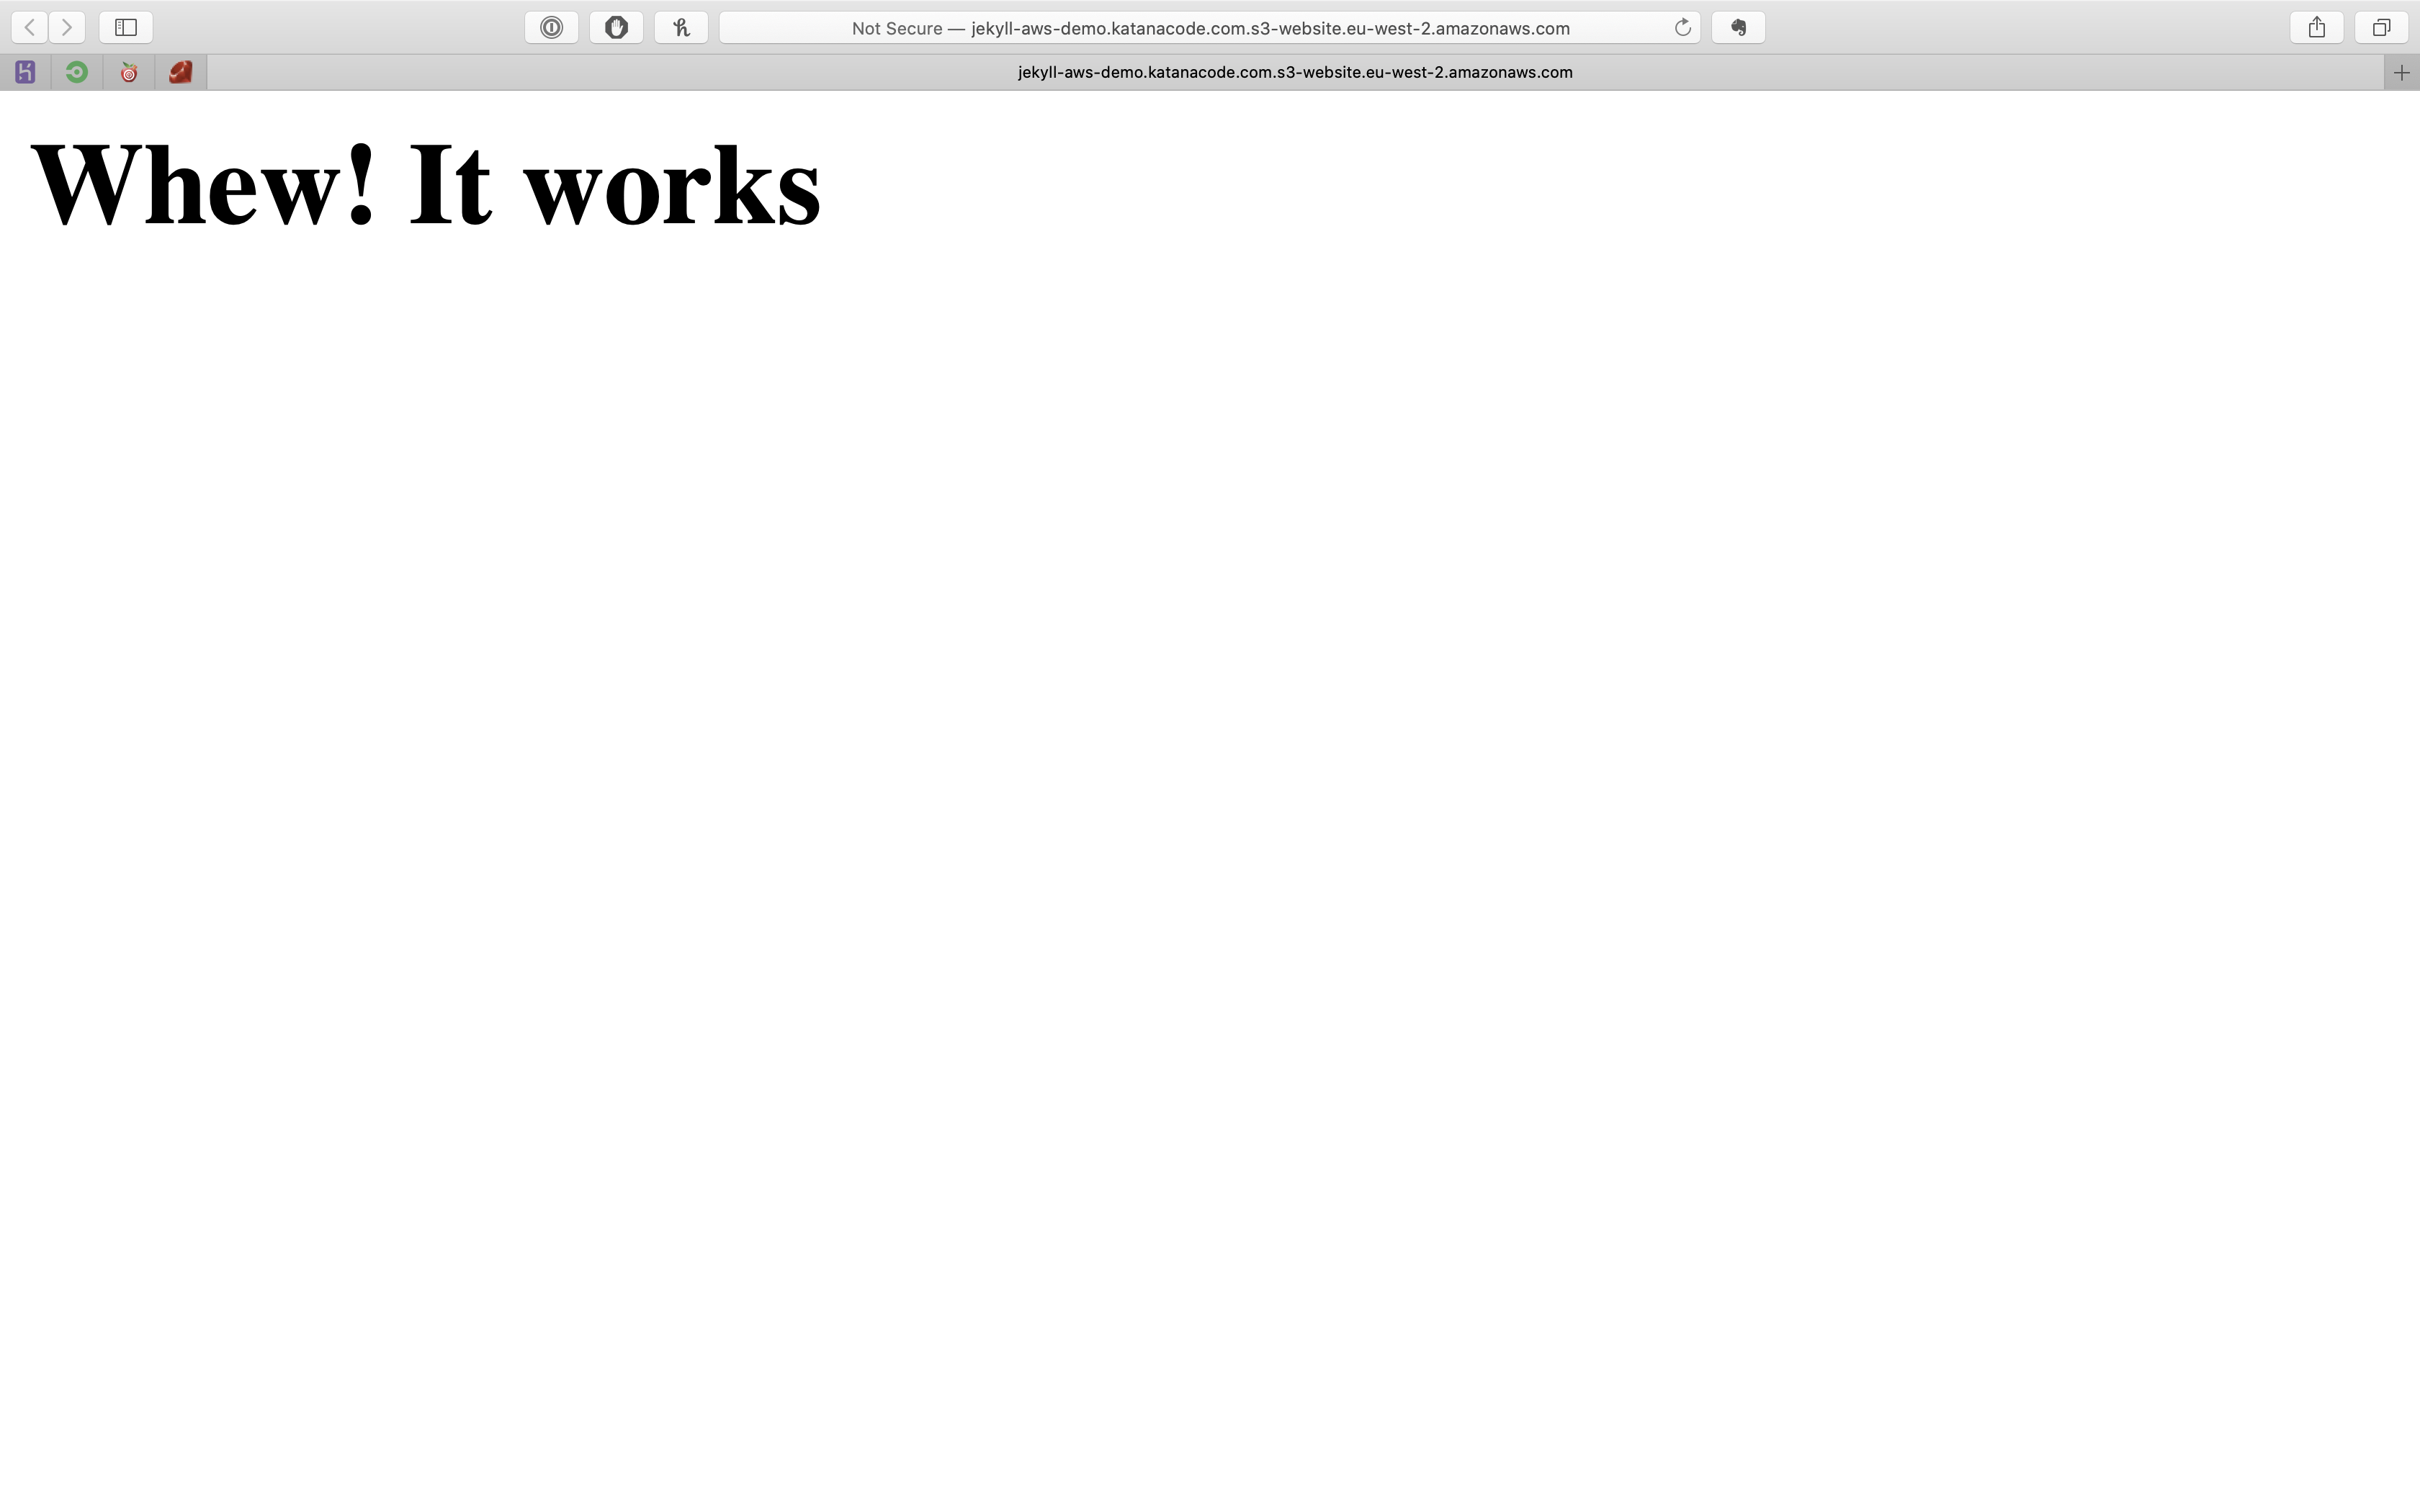
Note: AWS doesn’t support the “https” protocol (we’ll fix that later), so make sure you’re using “http” for now.
Setting up permissions to upload your site
We’ve set a policy for the public to read files from our site, and now we can see that AWS is serving static files from our newly created bucket. But we also need to set some permissions that allow us to programmatically upload, edit, and remove files from our bucket so we may make changes to our site.
The best way to do this is to create an IAM policy and assign this policy to an AWS IAM user account. To do this, click on the services tab and choose the IAM option from the list of services.
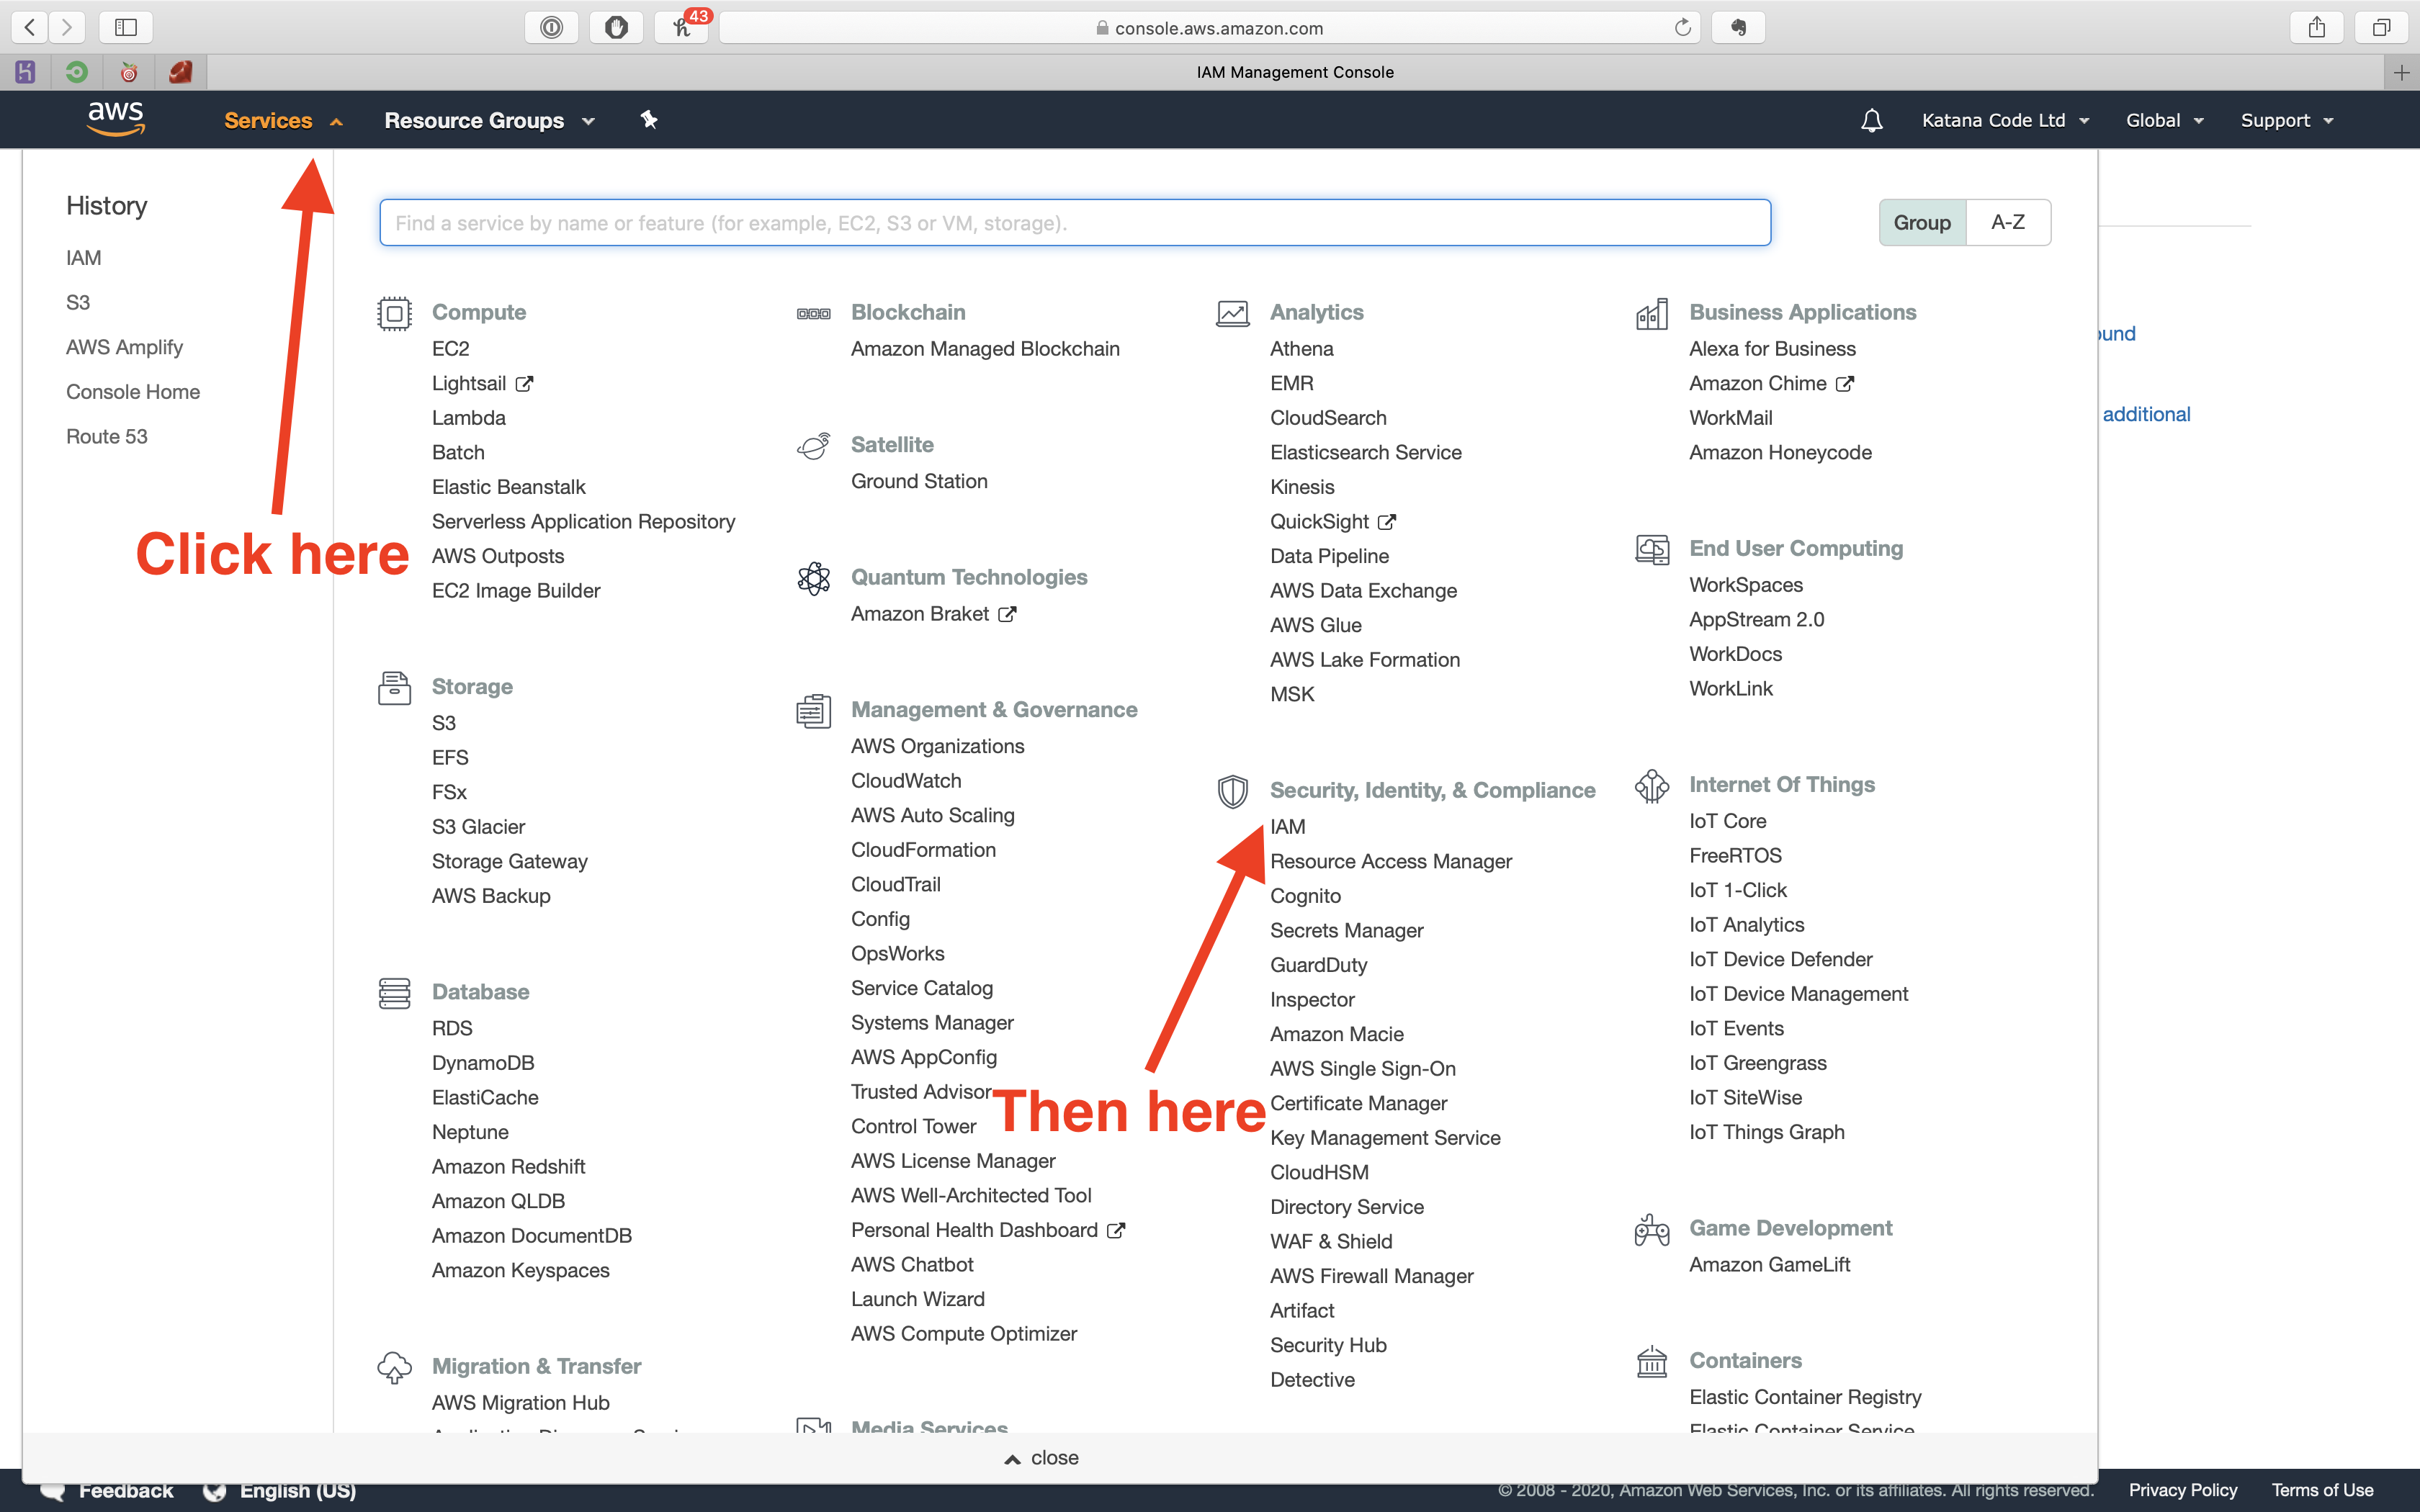
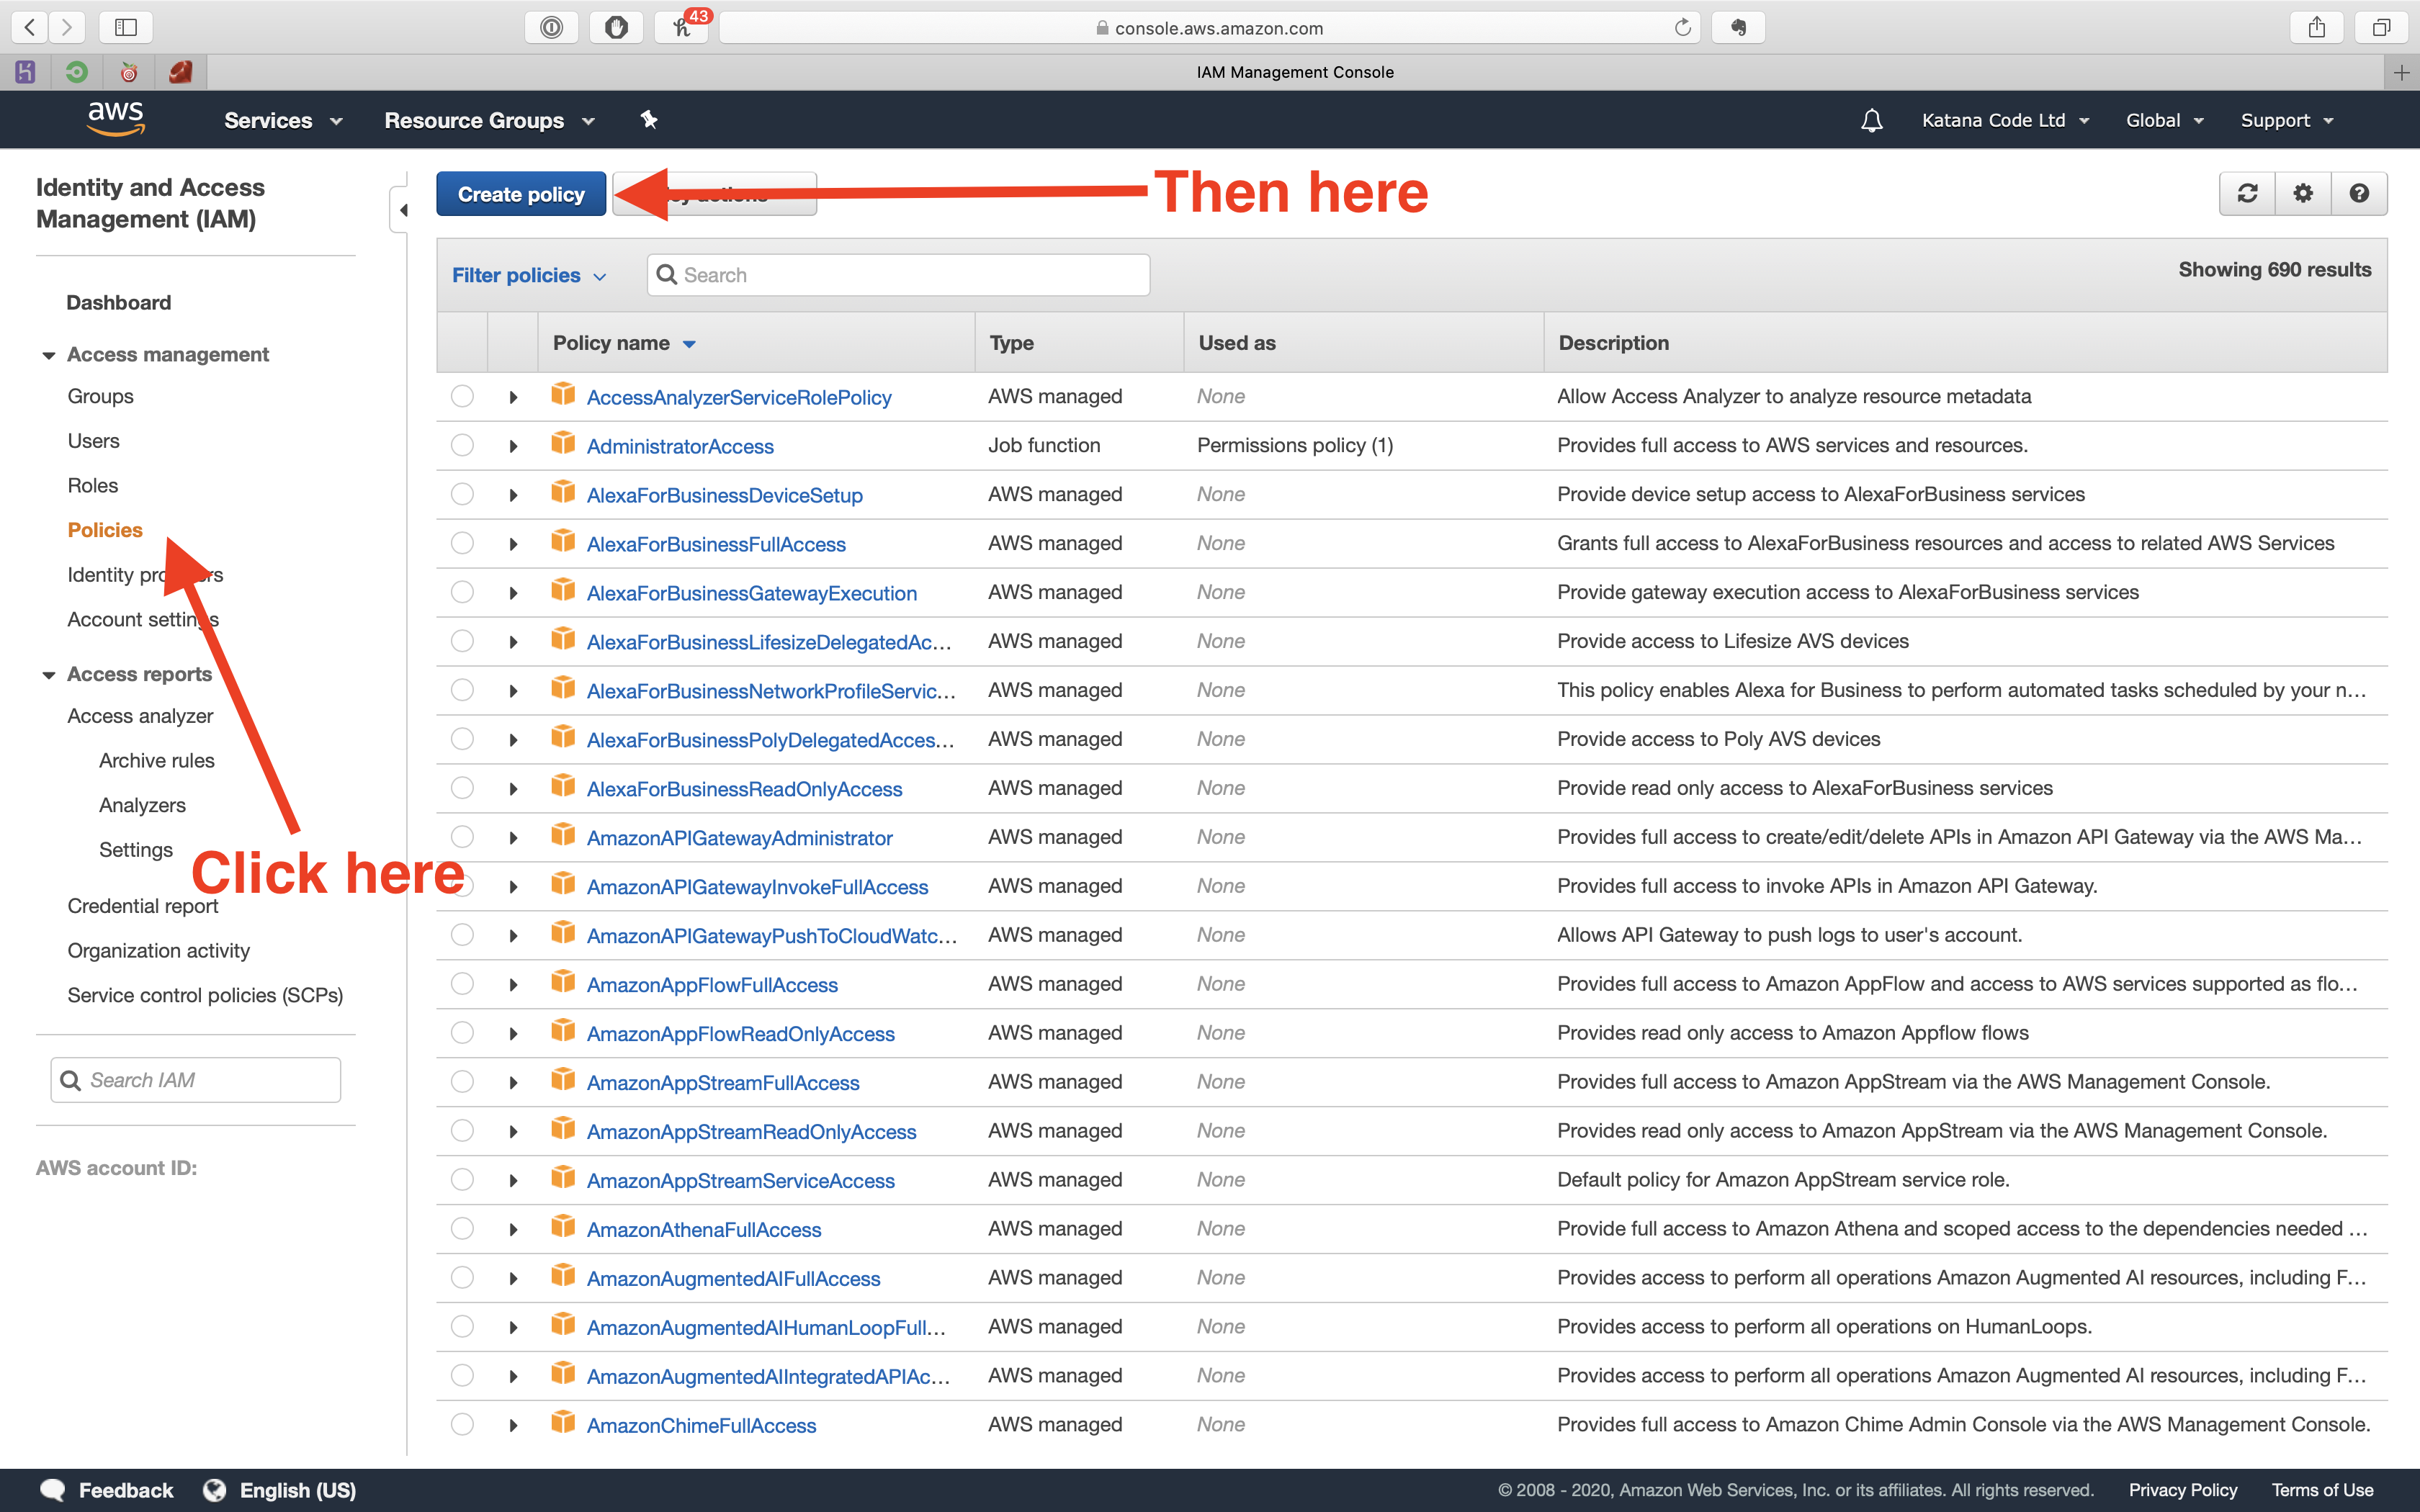
First, we need to create a policy. Do that, by clicking on the “Policies” tab, and then clicking the “Create policy” button.
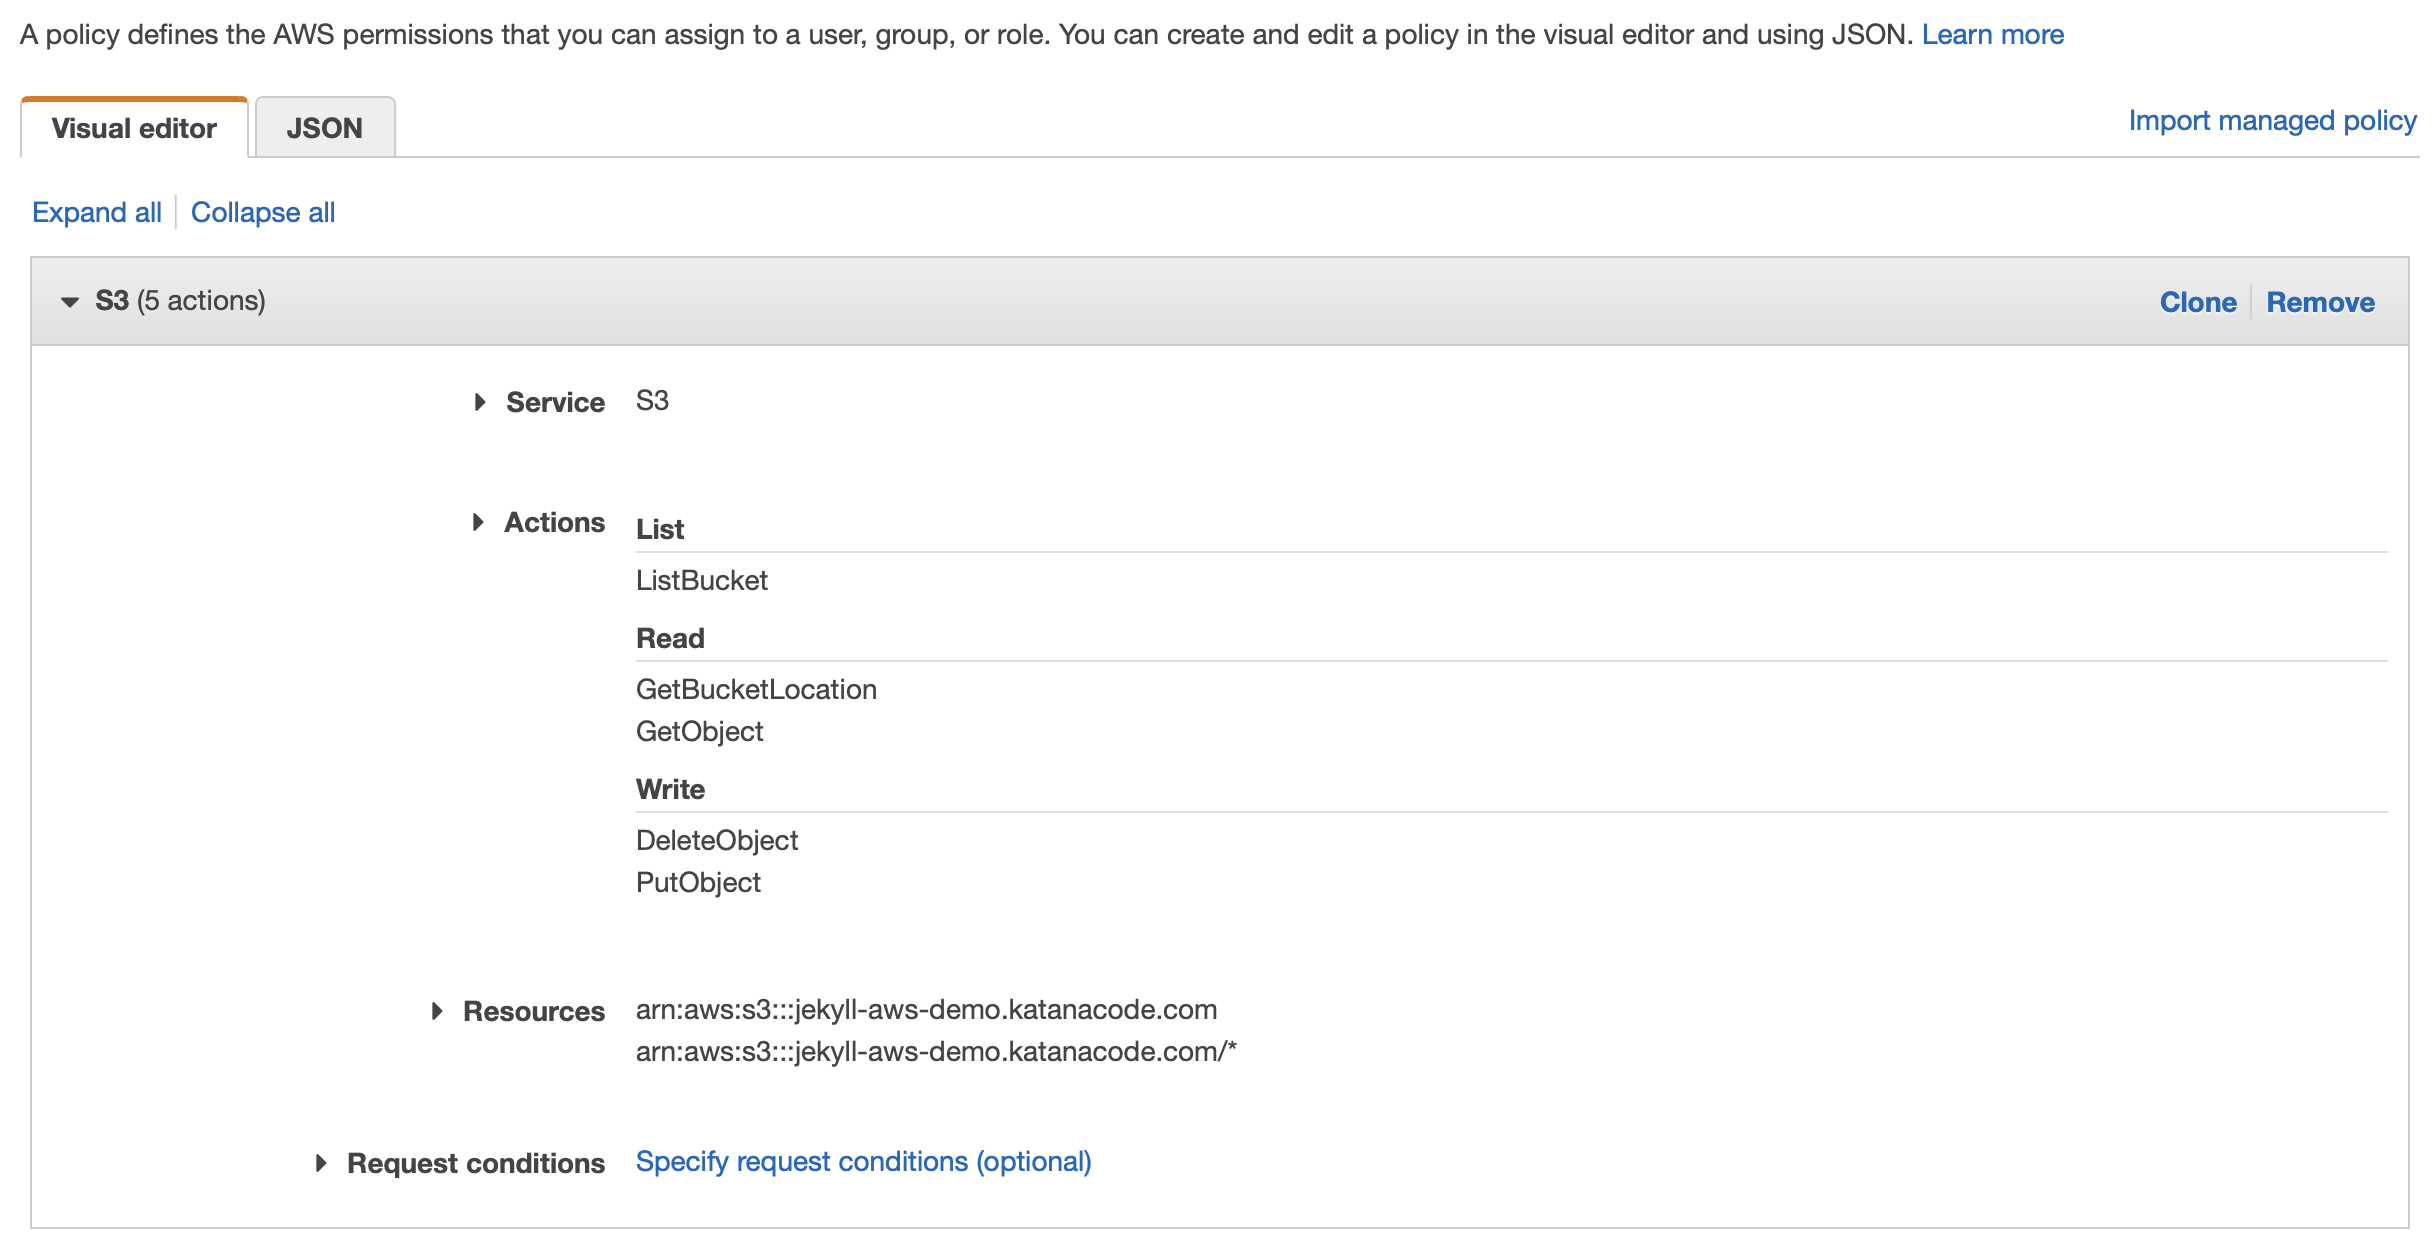
Click the Service tab, and type “S3” to specify that we want our policy to allow S3 access. You’ll then be able to choose permissions from a long list of options in the Actions tab. As a rule, we want to limit the permissions to only those we require. This will help keep our site, and the other services we use more secure. The only boxes you need to check for this policy are the following:
- List > ListBucket
- Read > GetBucketLocation
- Read > GetObject
- Write > DeleteObject
- Write > PutObject
Next, expand the Resources tab and specify the bucket name. This should be the name of your bucket, which you should remember, will be the same as the domain of your website. Lastly, specify the object name as “*”. By setting these values, we’re telling AWS that the permissions we’re asking for should only apply to this bucket and any of the objects inside it.
If you’ve set all that up correctly, it should look something like this:
Click “Review policy” and give your policy a name and helpful description. I’ve called mine “jekyll-demo-policy”.
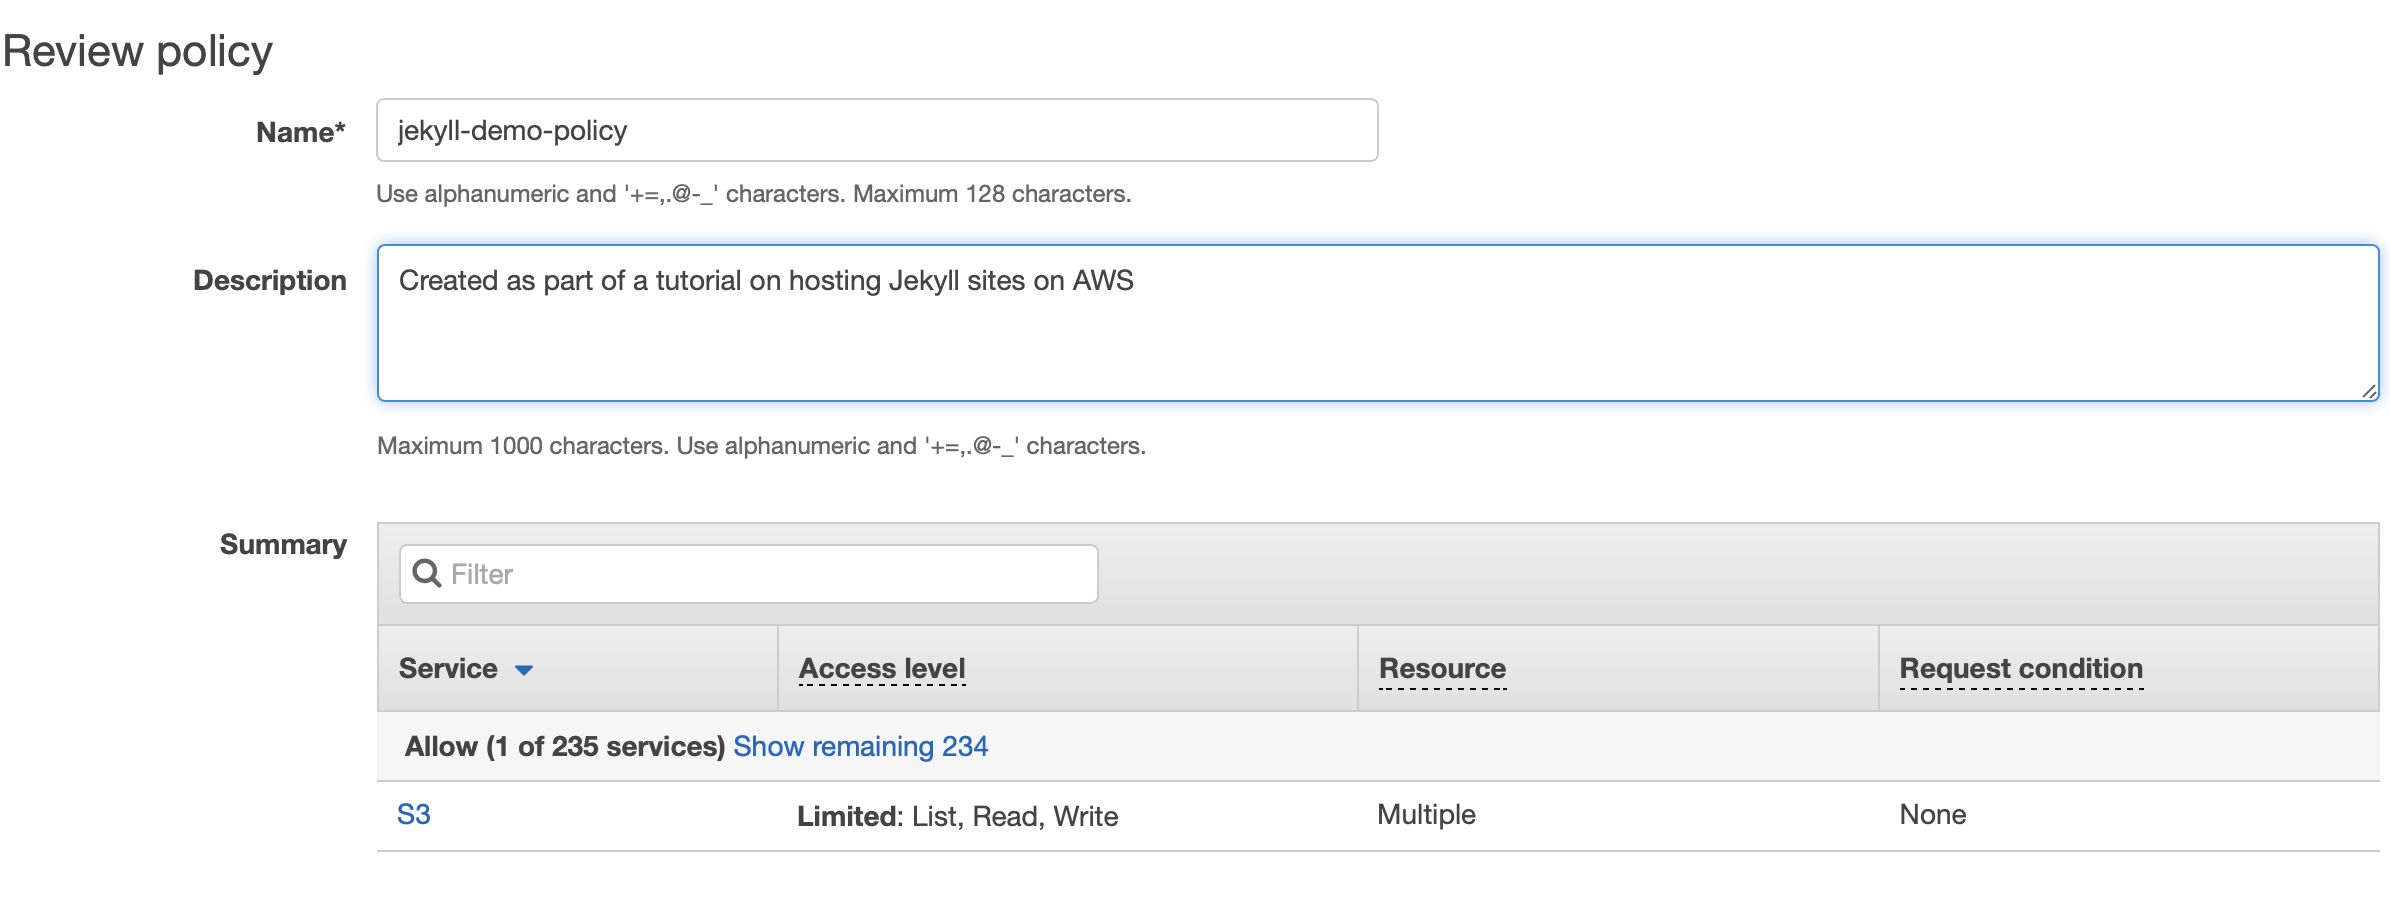
Click the “Create policy” button to finalise completion of your policy.
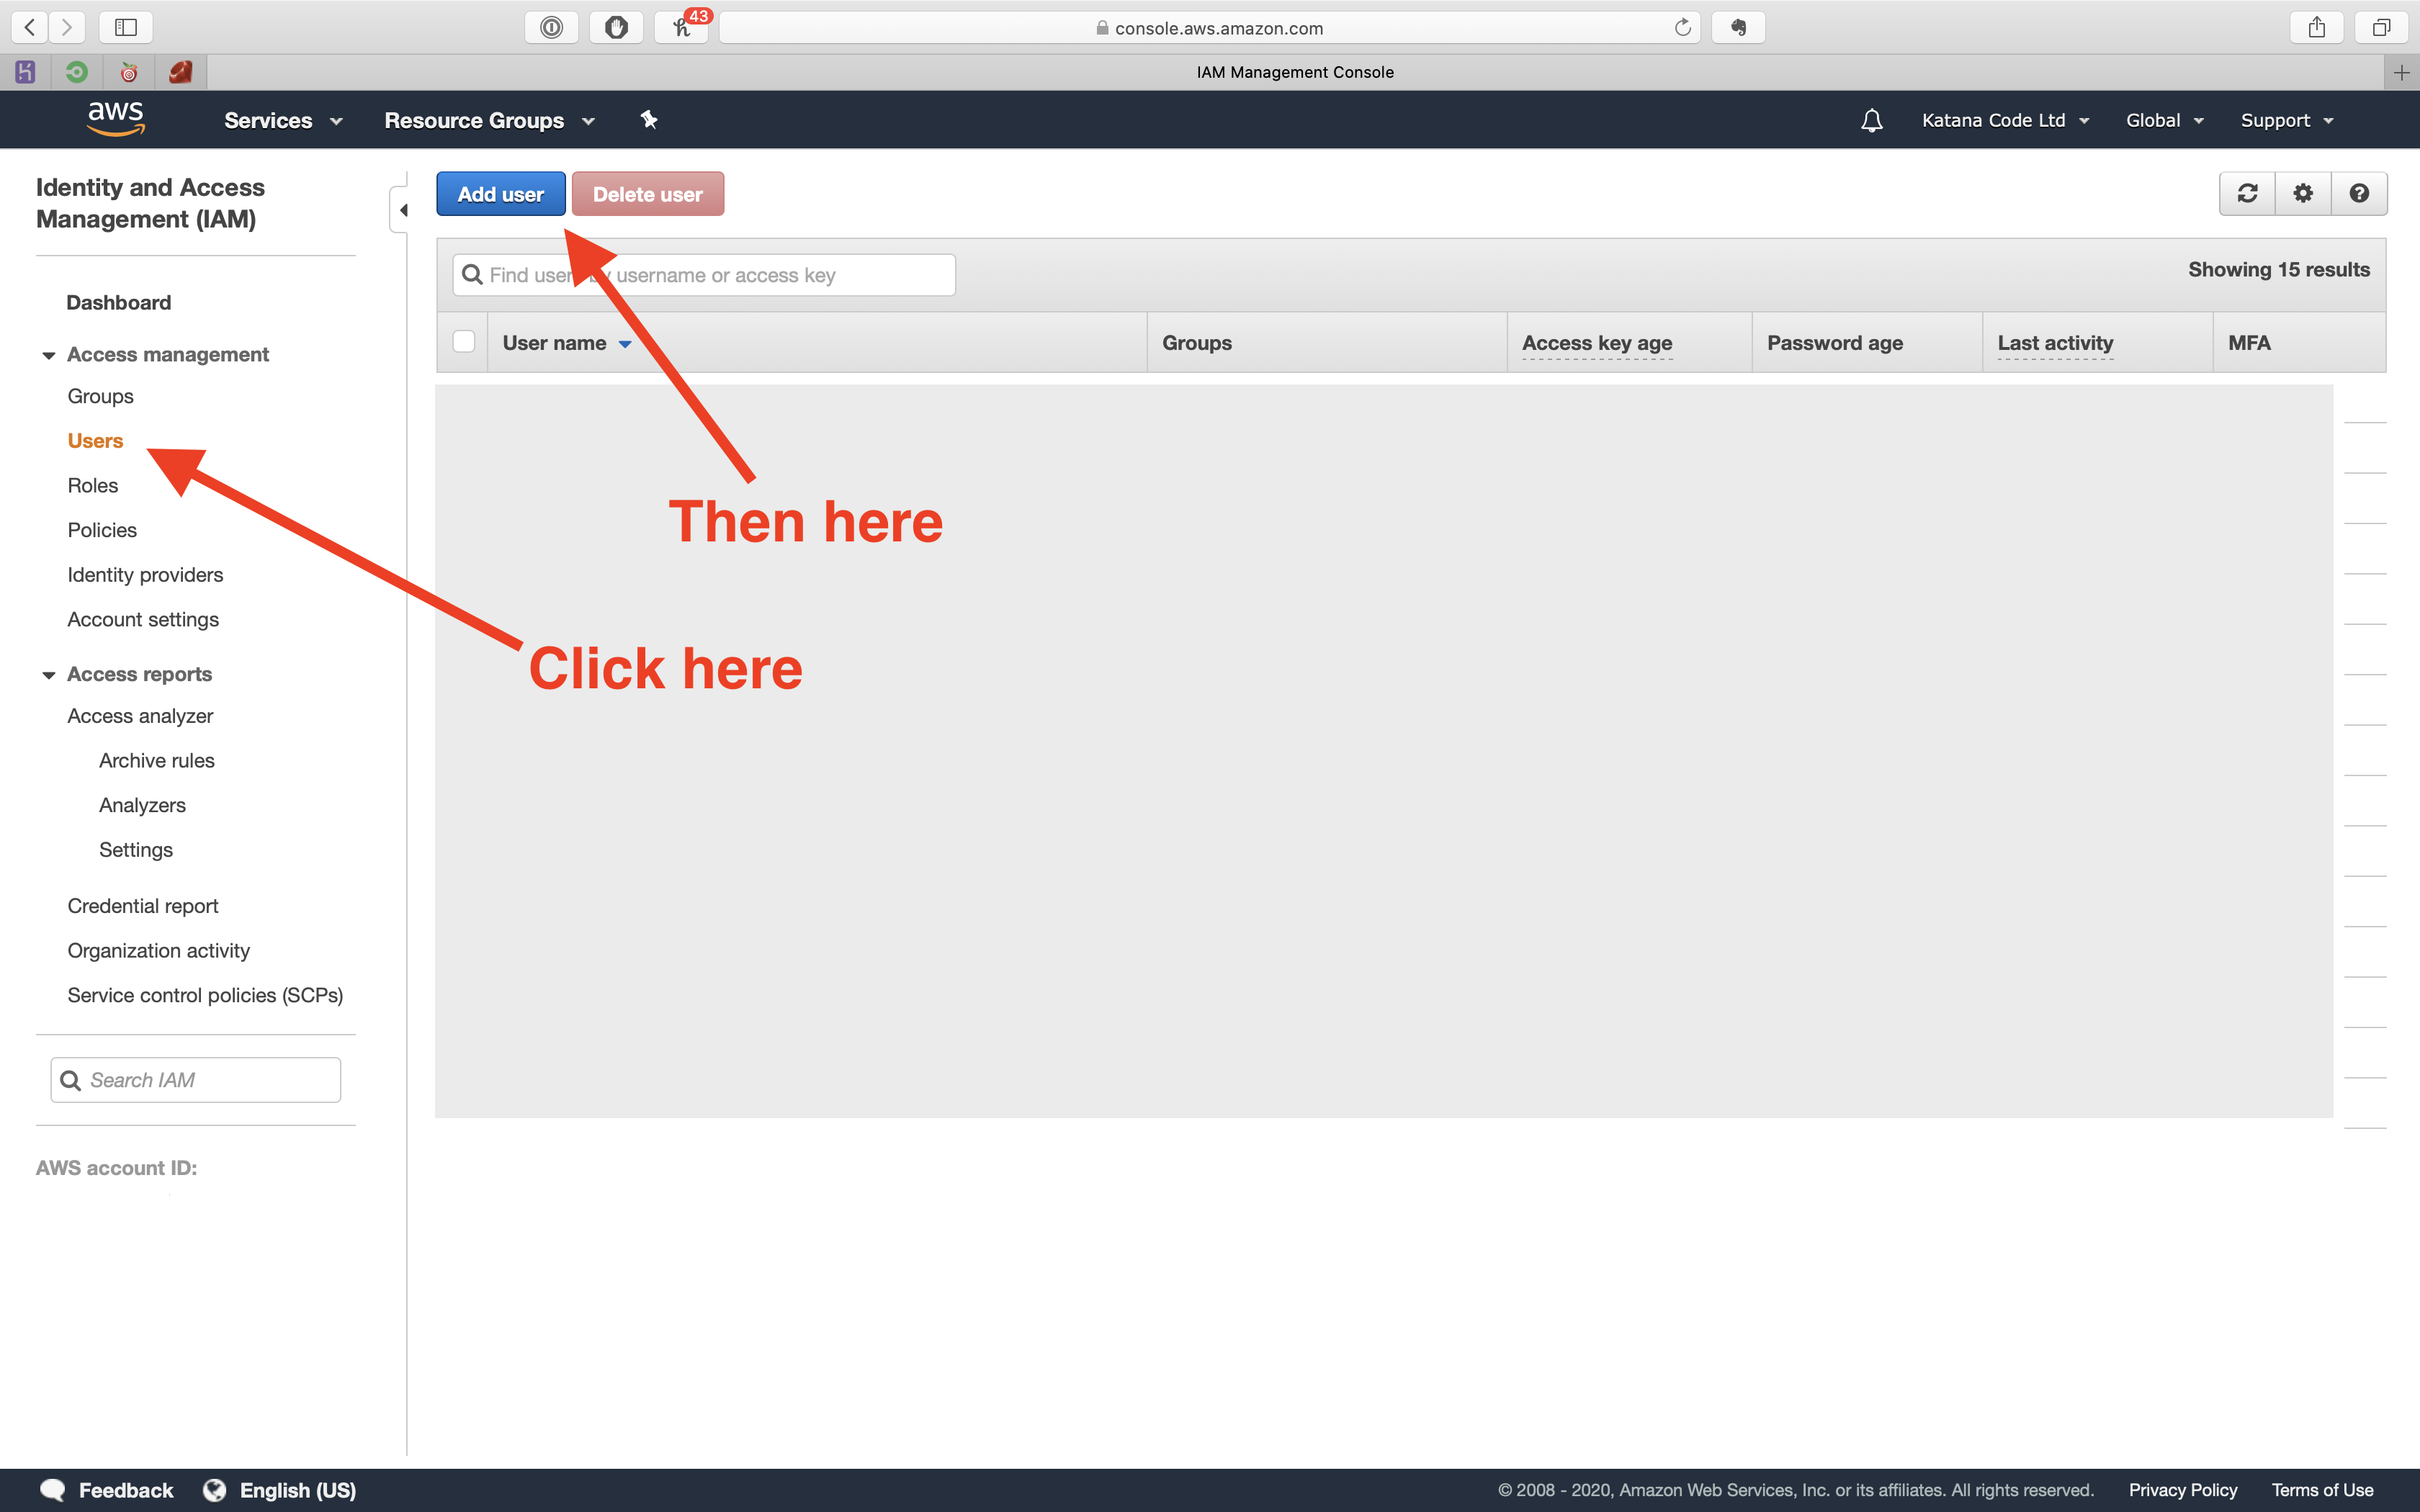
Now, we need to create a User, so that we can generate an access key and secret. These will allow us to authenticate ourselves and access our bucket so we can make changes to our website programmatically.
Click the “Users” tab, and then the “Add user” button.
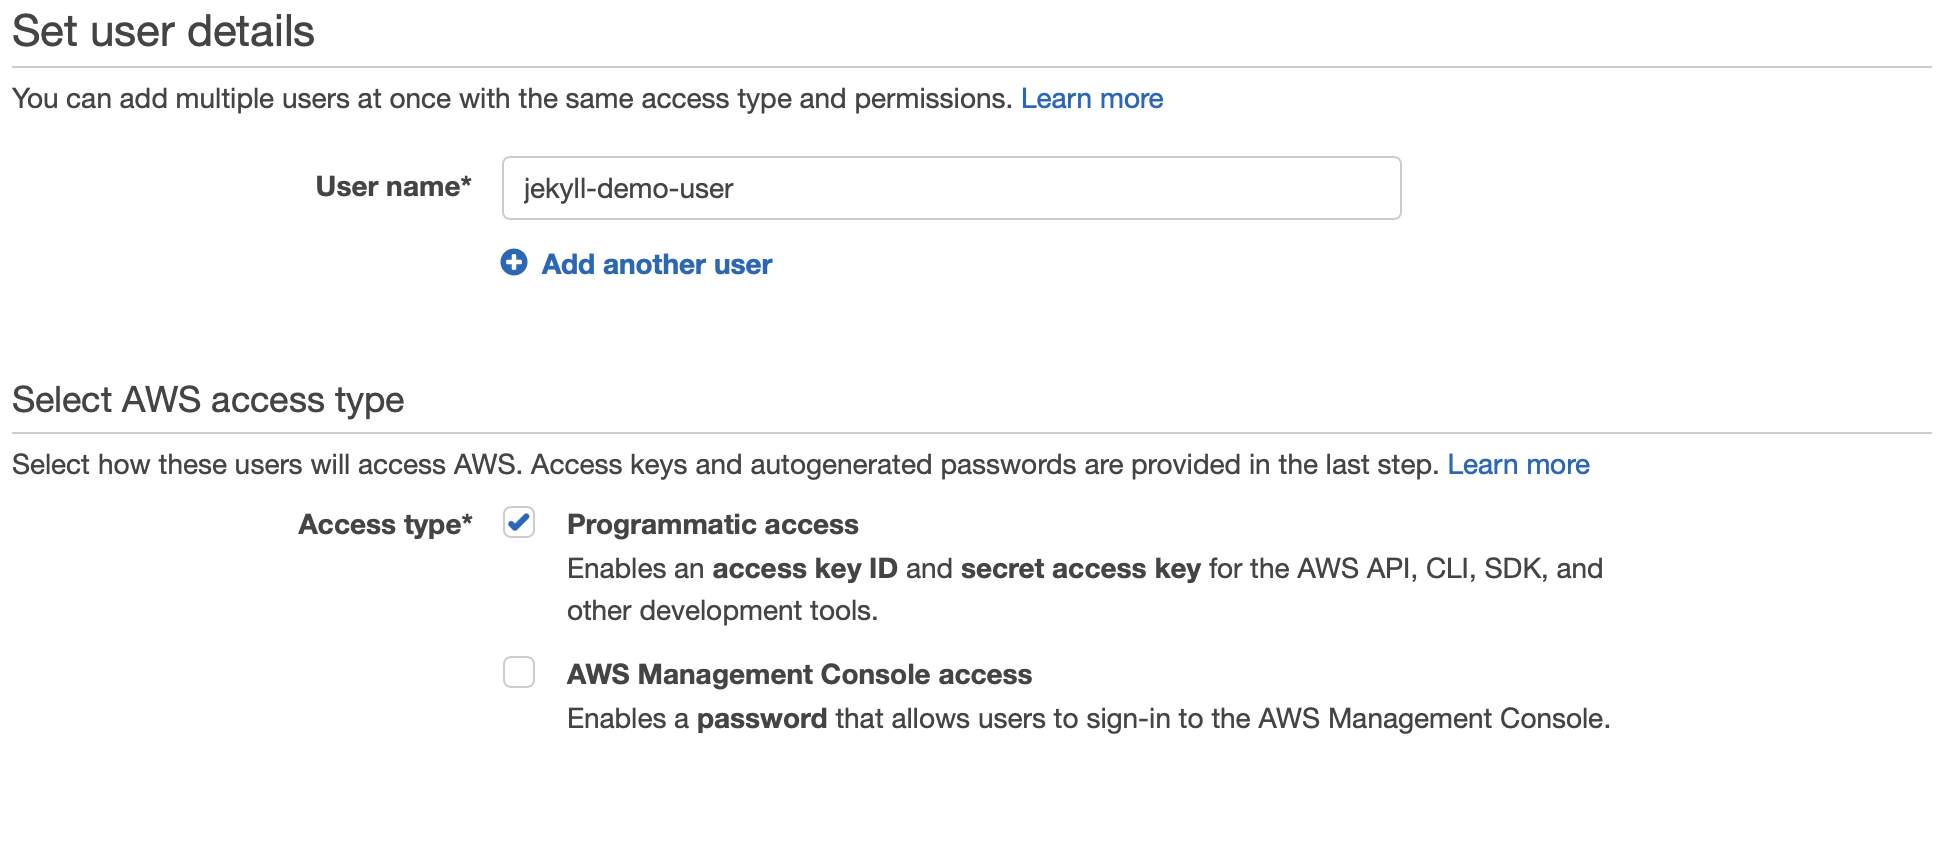
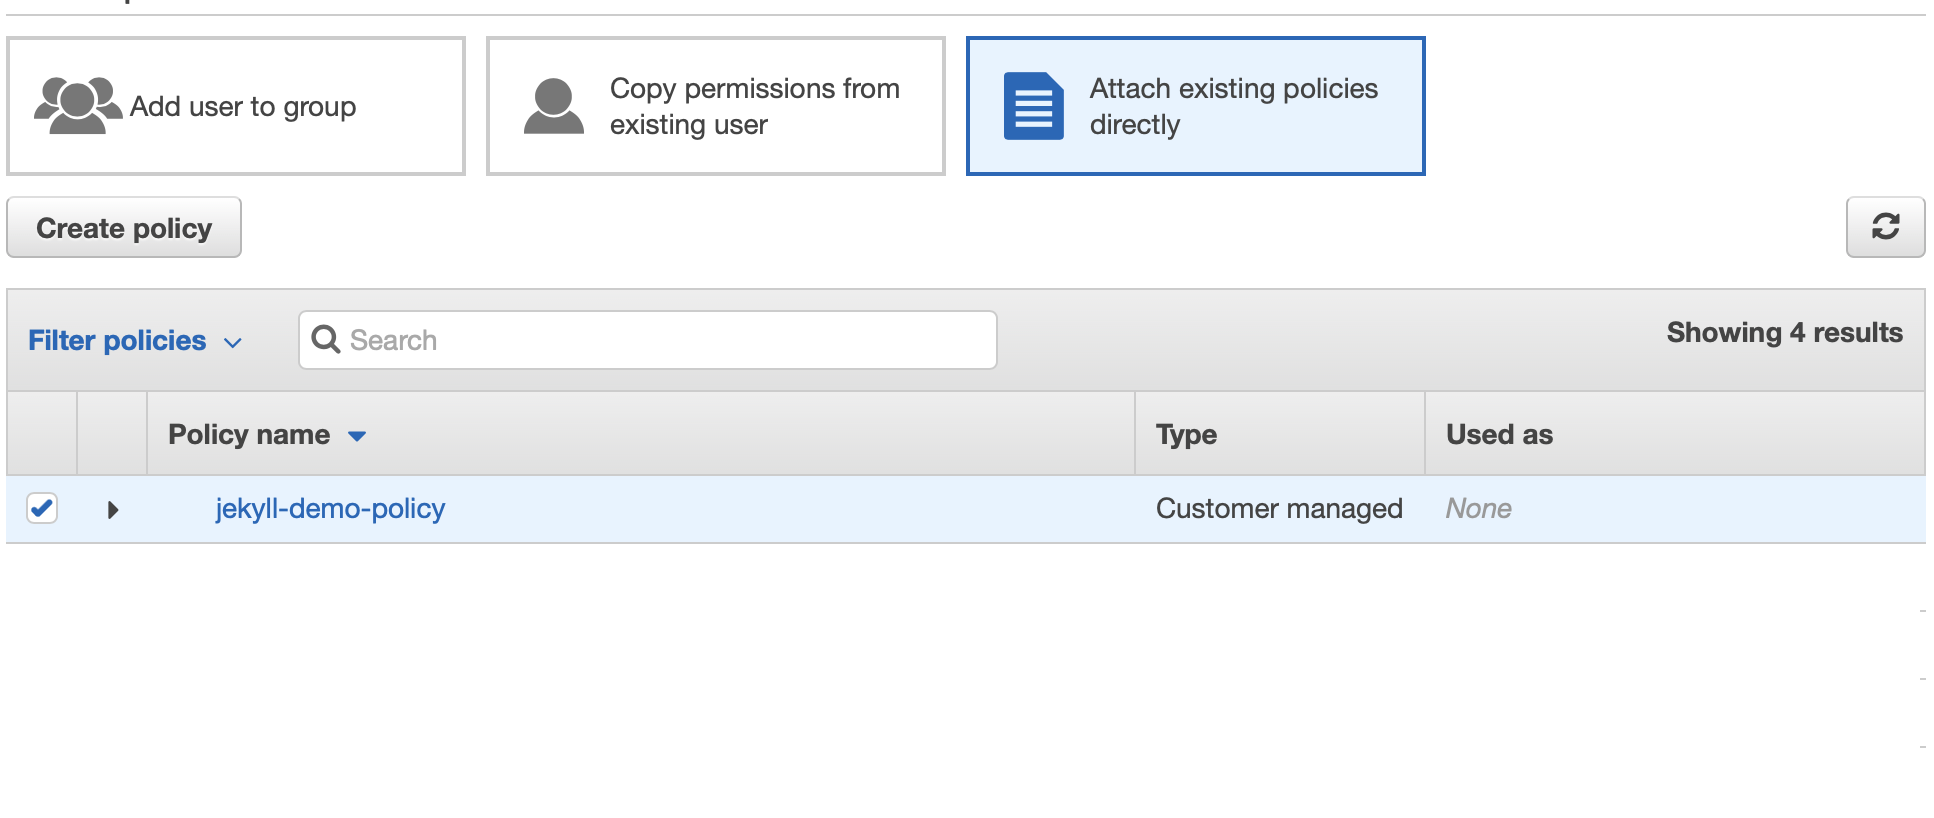
Give your user a name (I’ve called mine “jekyll-demo-user”) and choose Programmatic access for the Access type. Then click the “Next: Permissions” button.
Here, you should choose the option to “Attach existing policies directly”, and filter the list of available policies to only include “Customer managed” (the policies you own). This way we can directly assign the new policy we just created with the user we’re creating, without having to create permission groups etc.
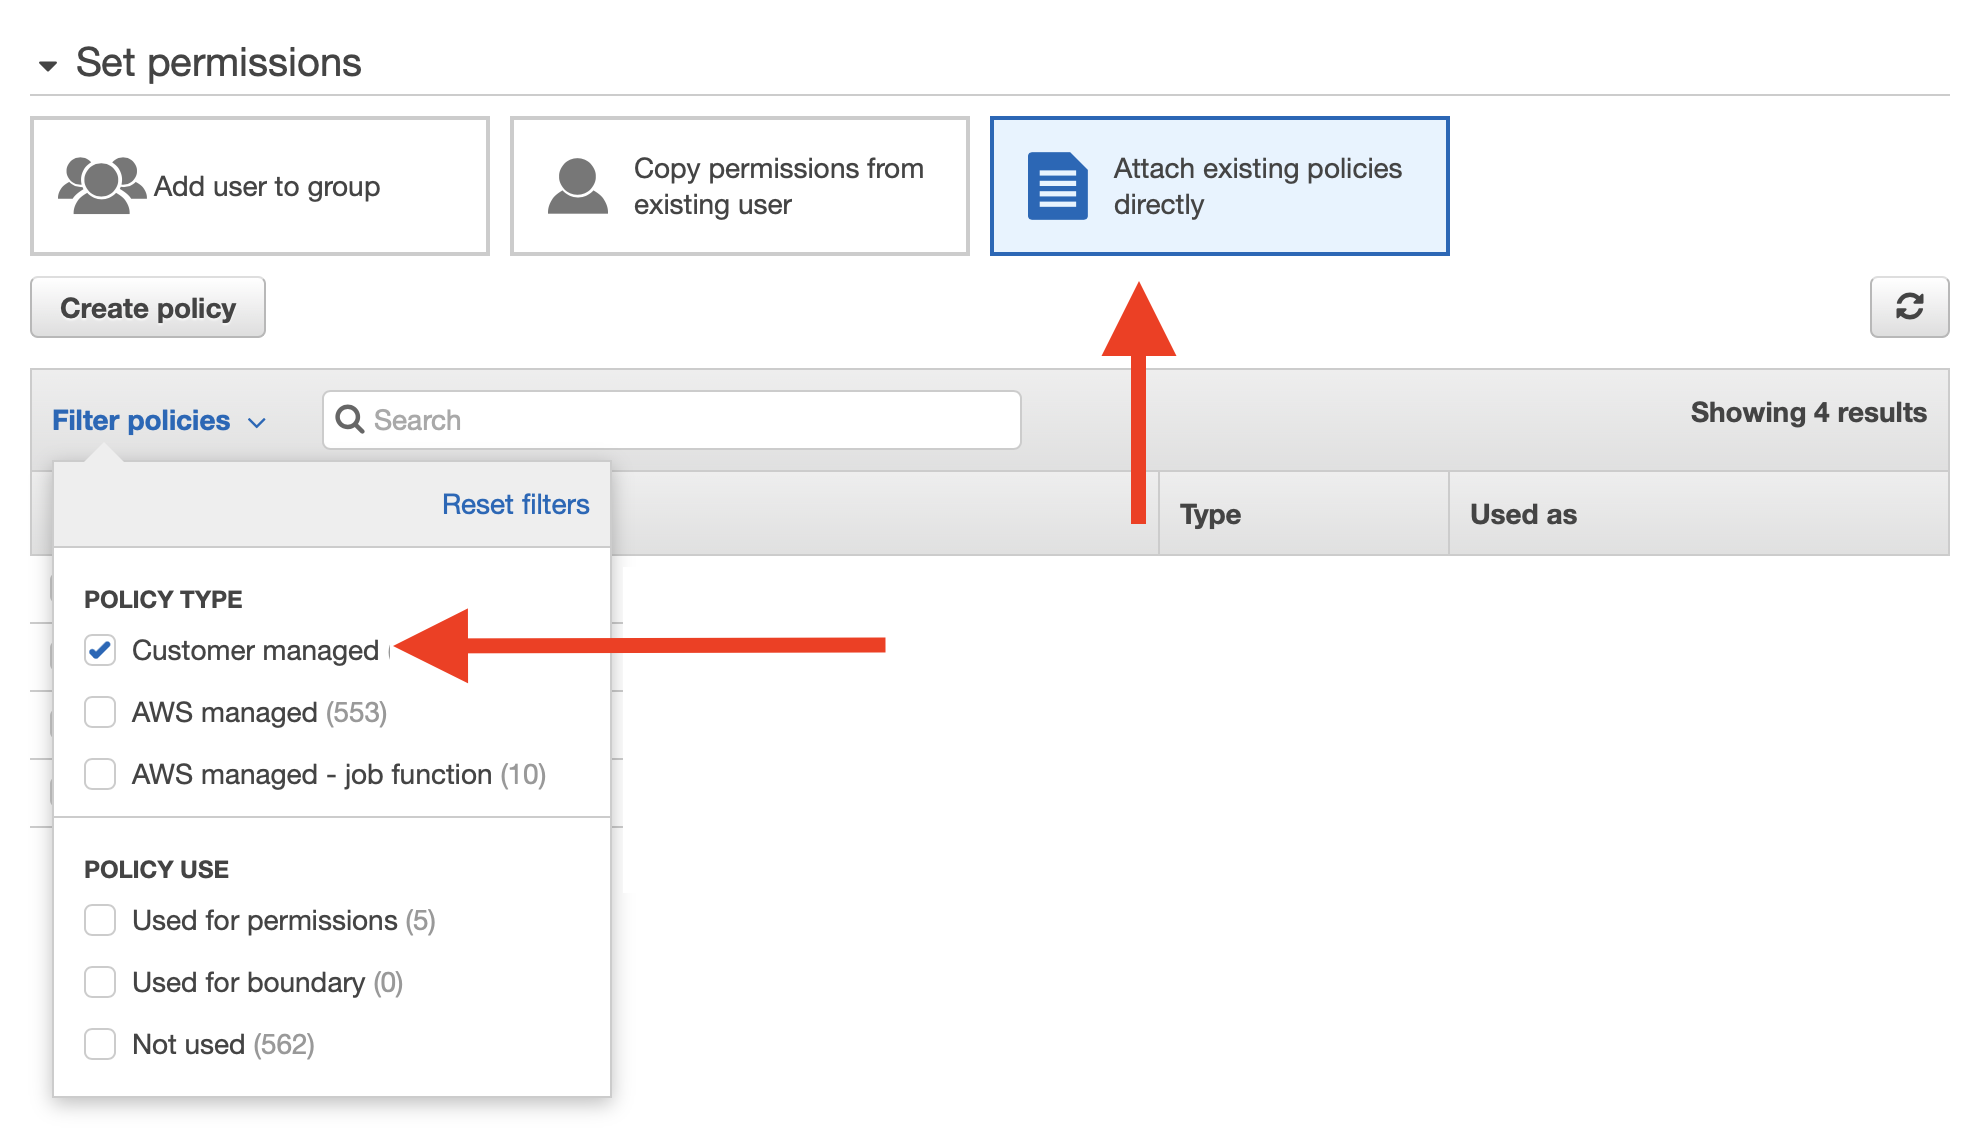
From there, you should see your own, newly created policy in the list. Check the checkbox next to that item, and click “Next: Tags”.
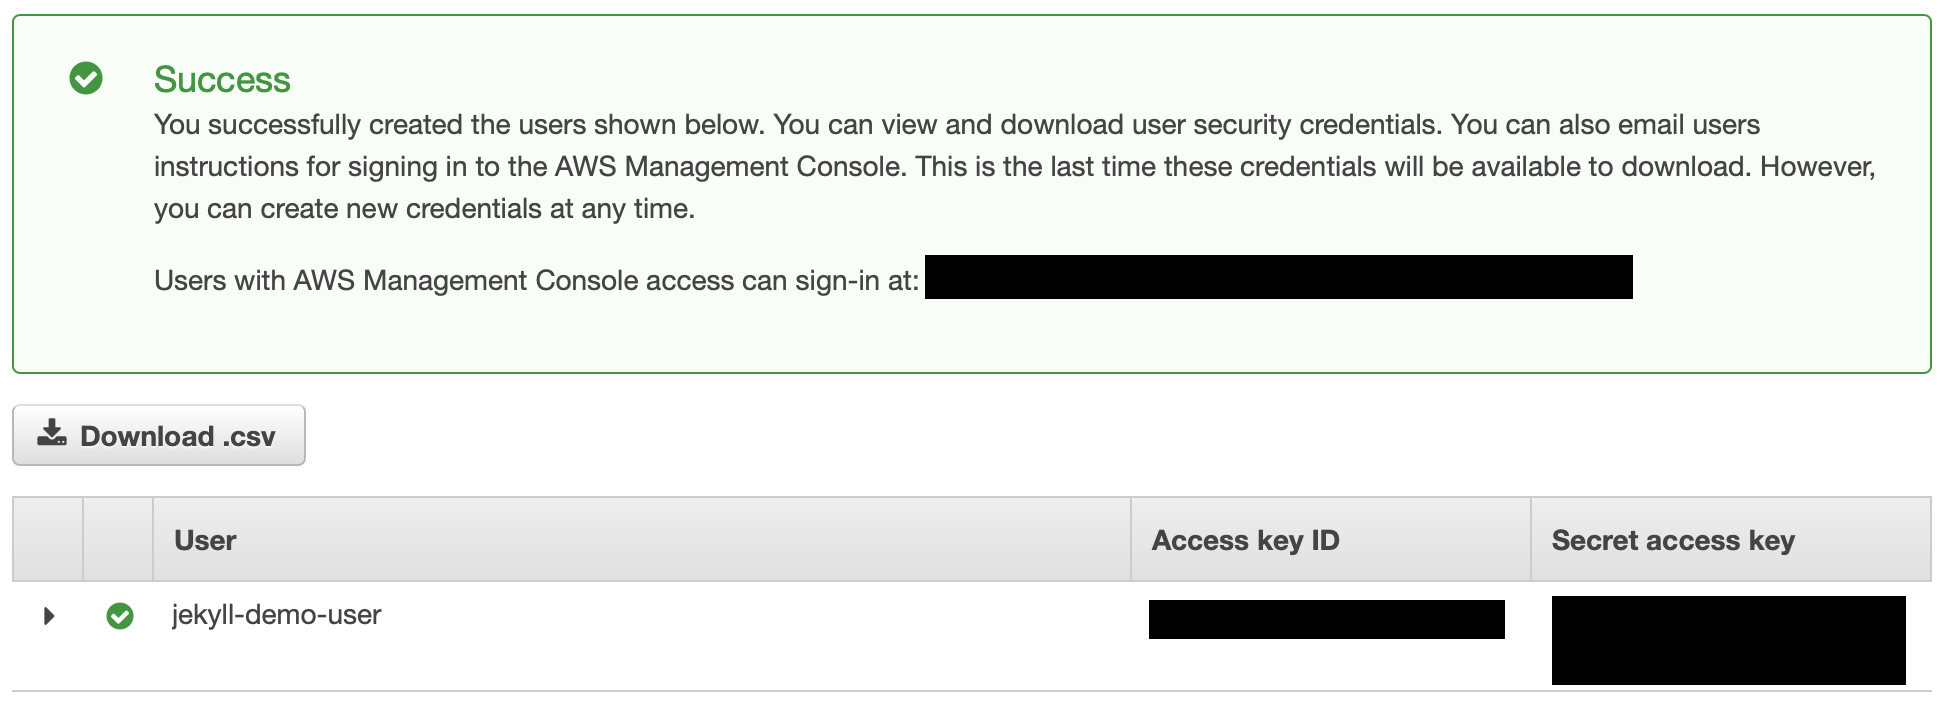
We don’t need to add any tags here, so just click the “Next: Review” button to move on to the final screen. Make sure the details there look correct, and if you’re happy, click the “Create user” button.
Copy the Access key ID and Secret access key, and store these someplace safe. You won’t get the chance to view that secret access key again, so it’s important you don’t lose it. Also, make sure to protect these credentials, and do not share them with anyone you do not trust!
Now we can test our credentials are working using the AWS CLI, which is a tool that lets us communicate with the AWS API straight from the command line. If you don’t already have this installed, head over to the AWS CLI page now and follow the installation instructions.
Assuming you have the AWS CLI installed, let’s try uploading our Jekyll site to our bucket!
Uploading a Jekyll site to bucket using S3 Sync
The AWS tool we’re going to use for uploading out site to our S3 bucket is s3 sync.
The full syntax is aws s3 sync [origin] [target] [options].
First, in order to make the next few steps a bit easier, let’ss set our newly created access key and secret access key as environment variables in our bash terminal. You might want to create a profile on your local machine and store them long term. If so, the instructions for doing so can be found here.
export AWS_ACCESS_KEY_ID=[your access key id]
export AWS_SECRET_ACCESS_KEY=[your secret access key]
export AWS_DEFAULT_REGION=[your bucket region]
So in my case, I would type:
# I've hidden parts of my key ID and access key for security
export AWS_ACCESS_KEY_ID=AKIA54LT4OEXXXXXXXXX
export AWS_SECRET_ACCESS_KEY=ZYe4cF3ydDfaNPe8XXXXXXXXXXXXXXXXXXXXXXXX
export AWS_DEFAULT_REGION=eu-west-2
Now, assuming you’re in the root directory of your Jekyll site, you should be able to upload the whole site to your S3 bucket by running the following two commands:
# Make sure the site is built in _site
jekyll build
# Upload the site files
aws s3 sync _site s3://your-bucket-name
If that works, you should see a list of the files that have been uploaded from your local _site directory to your S3 bucket:
jekyll-demo(master) ✗:aws s3 sync _site/ s3://jekyll-aws-demo.katanacode.com
upload: _site/404.html to s3://jekyll-aws-demo.katanacode.com/404.html
upload: _site/about/index.html to s3://jekyll-aws-demo.katanacode.com/about/index.html
upload: _site/assets/main.css to s3://jekyll-aws-demo.katanacode.com/assets/main.css
upload: _site/feed.xml to s3://jekyll-aws-demo.katanacode.com/feed.xml
upload: _site/index.html to s3://jekyll-aws-demo.katanacode.com/index.html
upload: _site/jekyll/update/2020/07/24/welcome-to-jekyll.html to s3://jekyll-aws-demo.katanacode.com/jekyll/update/2020/07/24/welcome-to-jekyll.html
upload: _site/assets/minima-social-icons.svg to s3://jekyll-aws-demo.katanacode.com/assets/minima-social-icons.svg
upload: _site/assets/main.css.map to s3://jekyll-aws-demo.katanacode.com/assets/main.css.map
Finally, you can check that the files are being served properly by going back to your bucket’s public URL: http://[your bucket].s3-website.[your region].amazonaws.com
You should no longer see “Whew! It works”, and instead you should see your own site.
Setting up CircleCI
Now that we are able to update the contents of our bucket with a single command, we have the opportunity to delegate this task to an automation service like CircleCI. The benefit of this is not only that we can save ourselves a bit of time and effort deploying, but also that we can run additional checks (such as linters), and schedule nightly builds (see why later).
If you don’t already have an account with CircleCI, you can set up a free account here.
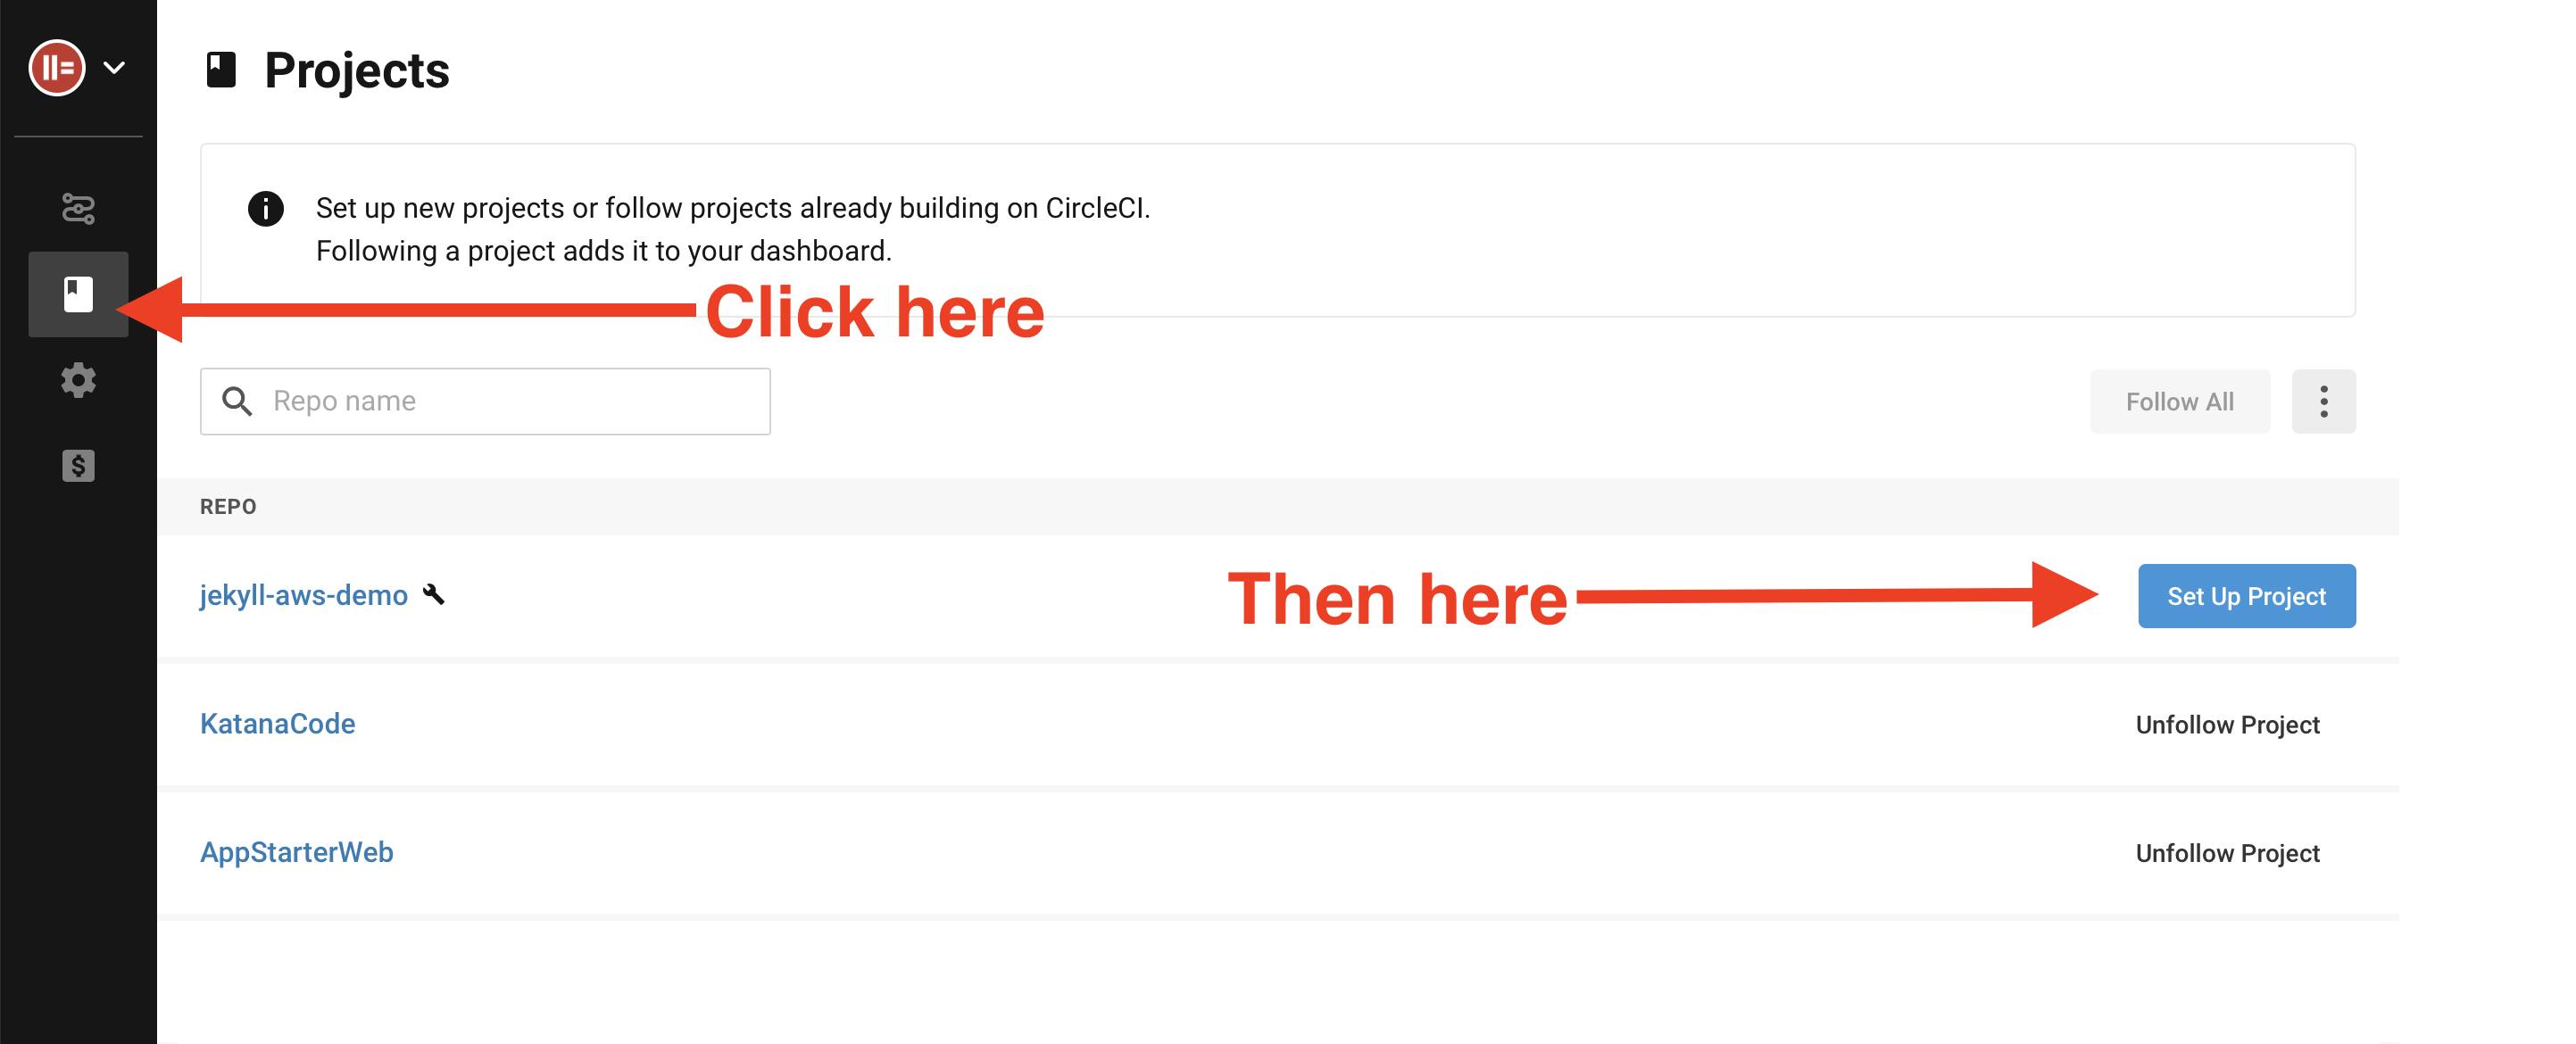
Once you’ve signed up or signed in to your CircleCI account, click the “Add Projects” button and choose your Jekyll website’s git repo from the list.
CircleCI will then give us two options. For our project to build properly on CircleCI, our repository needs to have a config.yml at .circleci/config.yml with instructions for how to create the environment and build the site. CircleCI offers to add a boilerplate config file for us, or we can choose to add one of our own config files. Click “Add manually” so we can add our own config file.
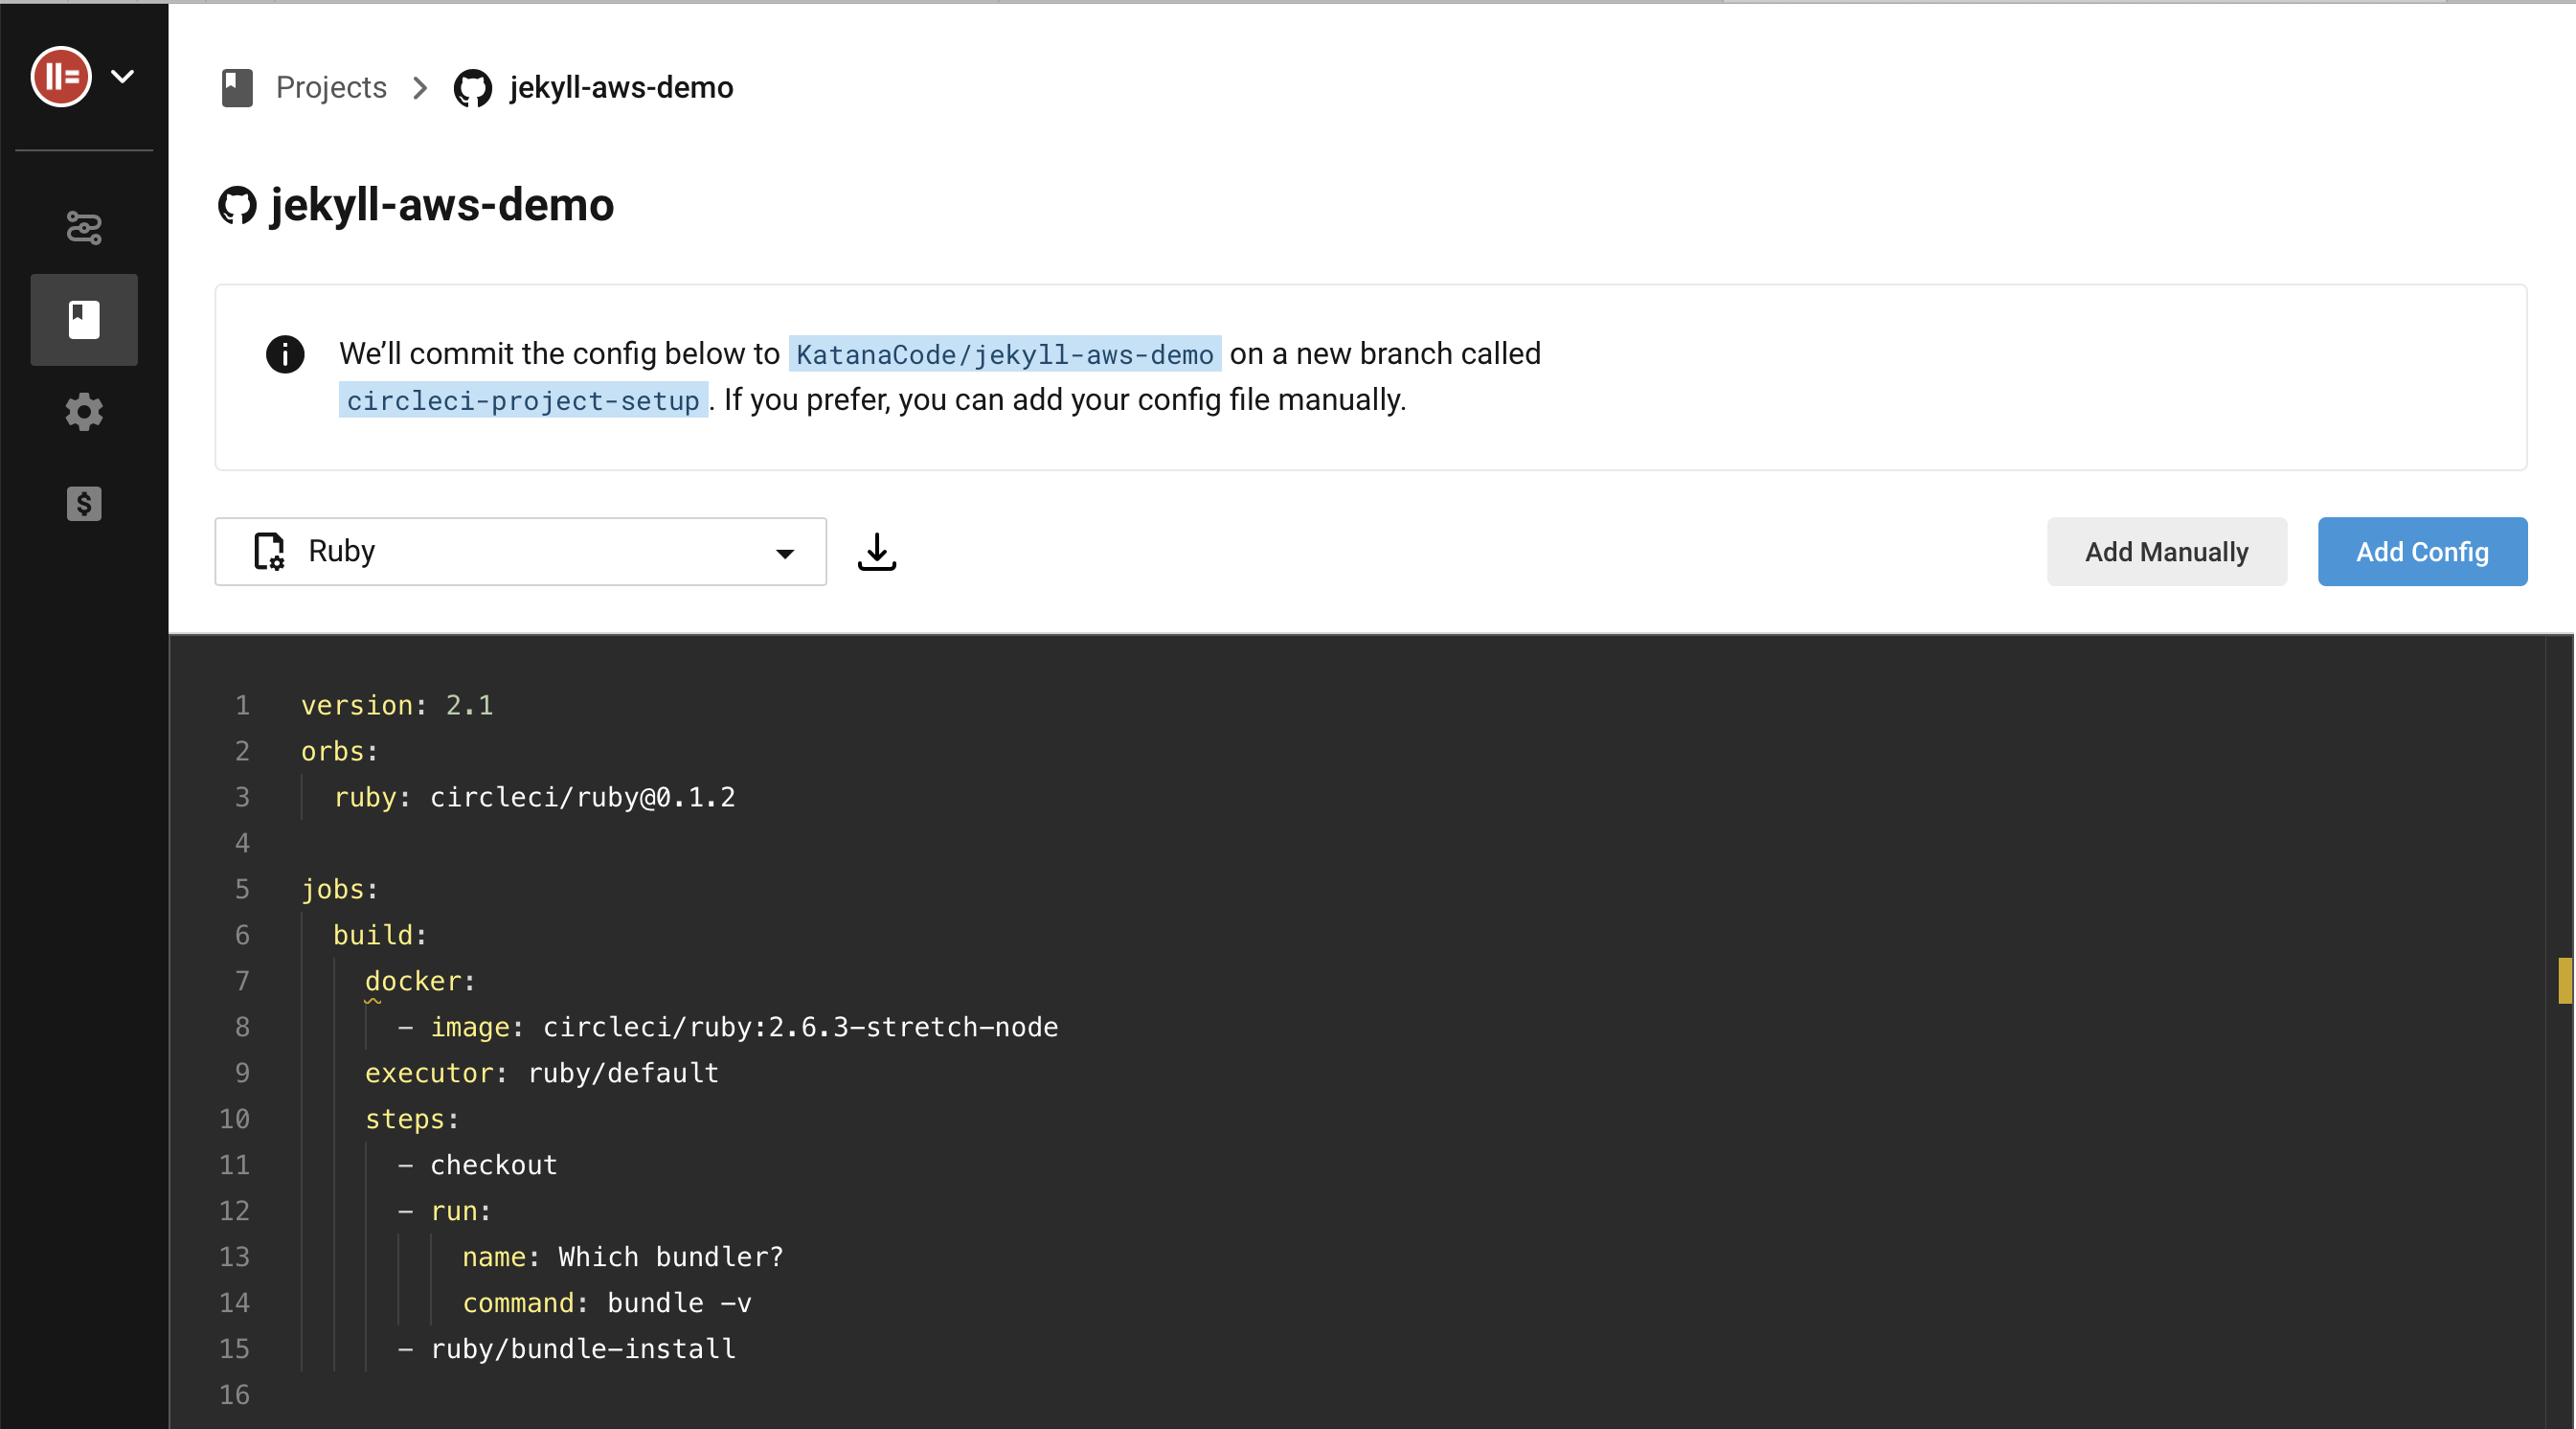
Click “Start building”.
Now, in your favourite text editor, copy and paste this YAML code, then save it in your site’s repository as .circleci/config.yml. (Don’t forget the “dot” at the start of the directory name).
##
# Define commands to be used more than once here:
references:
  container_config: &container_config
    working_directory: ~/www/
    docker:
      - image: circleci/ruby:2.6.6-node-browsers

##
# CircleCI config starts here...
version: 2.1

orbs:
  # Install the AWS CLI orb...
  aws-cli: circleci/[email protected]
  # Install this Bundler orb...
  bundle: toshimaru/[email protected]

##
# Here we define two jobs. One to build the website files, and another one to deploy to
# our AWS S3 bucket.
jobs:
  build:
    <<: *container_config
    steps:
      # Pull code from GitHub
      - checkout
      # This might be required to make sure we have the correct version of Bundler
      # installed.
      - run:
          name: "Bundle fix"
          command: gem update bundler
      # Install missing gems and cache them for future builds
      - bundle/bundle-install
      # Cache the repo code for the deploy job.
      - save_cache:
          paths: .
          key: repo-{{ .Branch }}-{{ .Revision }}

      # Build the jekyll site into the _site directory.
      - run:
          name: "Build site"
          command: bundle exec jekyll build --trace --lsi --strict_front_matter --profile
      # Save the built Jekyll site to the cache for the deploy job
      - save_cache:
          paths:
            - ./_site
          key: jekyll-site-{{ .Branch }}-{{ .Revision }}

  deploy:
    <<: *container_config
    executor: aws-cli/default
    steps:
      # Load the repo code from cache
      - restore_cache:
          keys:
            - repo-{{ .Branch }}-{{ .Revision }}
            - repo-{{ .Branch }}
            - repo-

      # Load the Jekyll site from cache
      - restore_cache:
          keys:
            - jekyll-site-{{ .Branch }}-{{ .Revision }}
            - jekyll-site-
      # Install AWS CLI tools
      - aws-cli/install
      # Deploy our code to our AWS bucket
      - run:
          name: "Deploy to S3"
          command: aws s3 sync _site "s3://$AWS_BUCKET_NAME" --delete

workflows:
  version: 2
  build-and-deploy:
    jobs:
      - build
      - deploy:
          requires:
            - build
          filters:
            branches:
              only:
                - master
If you have some experience with CircleCI, then this should hopefully make sense to you. But if not, I’ll try to summarise what’s included here.
The references: block defines some reusable mixins that are used across more than one job. In this case, we’re defining the directory name for our repo, and the docker image we are using to build our site within.
The orbs: block defines some Orbs for the Amazon AWS CLI and for Bundler. Orbs are CircleCI’s way of sharing code between projects and the open source community.
The jobs: block is where we define the steps that CircleCI will implement each time we push our a new Git commit. In our case, we define a job that builds the site, and another job that deploys the code to AWS.
Lastly, the workflows: block is where we define a workflow or a collection of jobs that run together. Here we’ve said that build should run on every new git commit, and build and deploy will both be run when a new commit is pushed out to the master branch.
By configuring our project this way, we can push out new code on our feature branches without having to worry about it being prematurely deployed to our live site. Only code merged into the master branch will be deployed.
Adding environment variables in CircleCI
You’ll probably see that the first workflow in your CircleCI dashboard has failed. That’s fine. In this case, it’s because we haven’t included the config.yml file yet. But there’s one more thing we have to do before we push our changes into master and run the deploy job. Without this next step, our CircleCI workflow will still fail.
Remember the Access Policy we created on our AWS account so we can restrict who may upload and edit files in our bucket? Well, we need to tell CircleCI about those credentials in order for AWS CLI tools to work on CircleCI. To do this, click on the “Project Settings” button, and then choose “Environment Variables”.
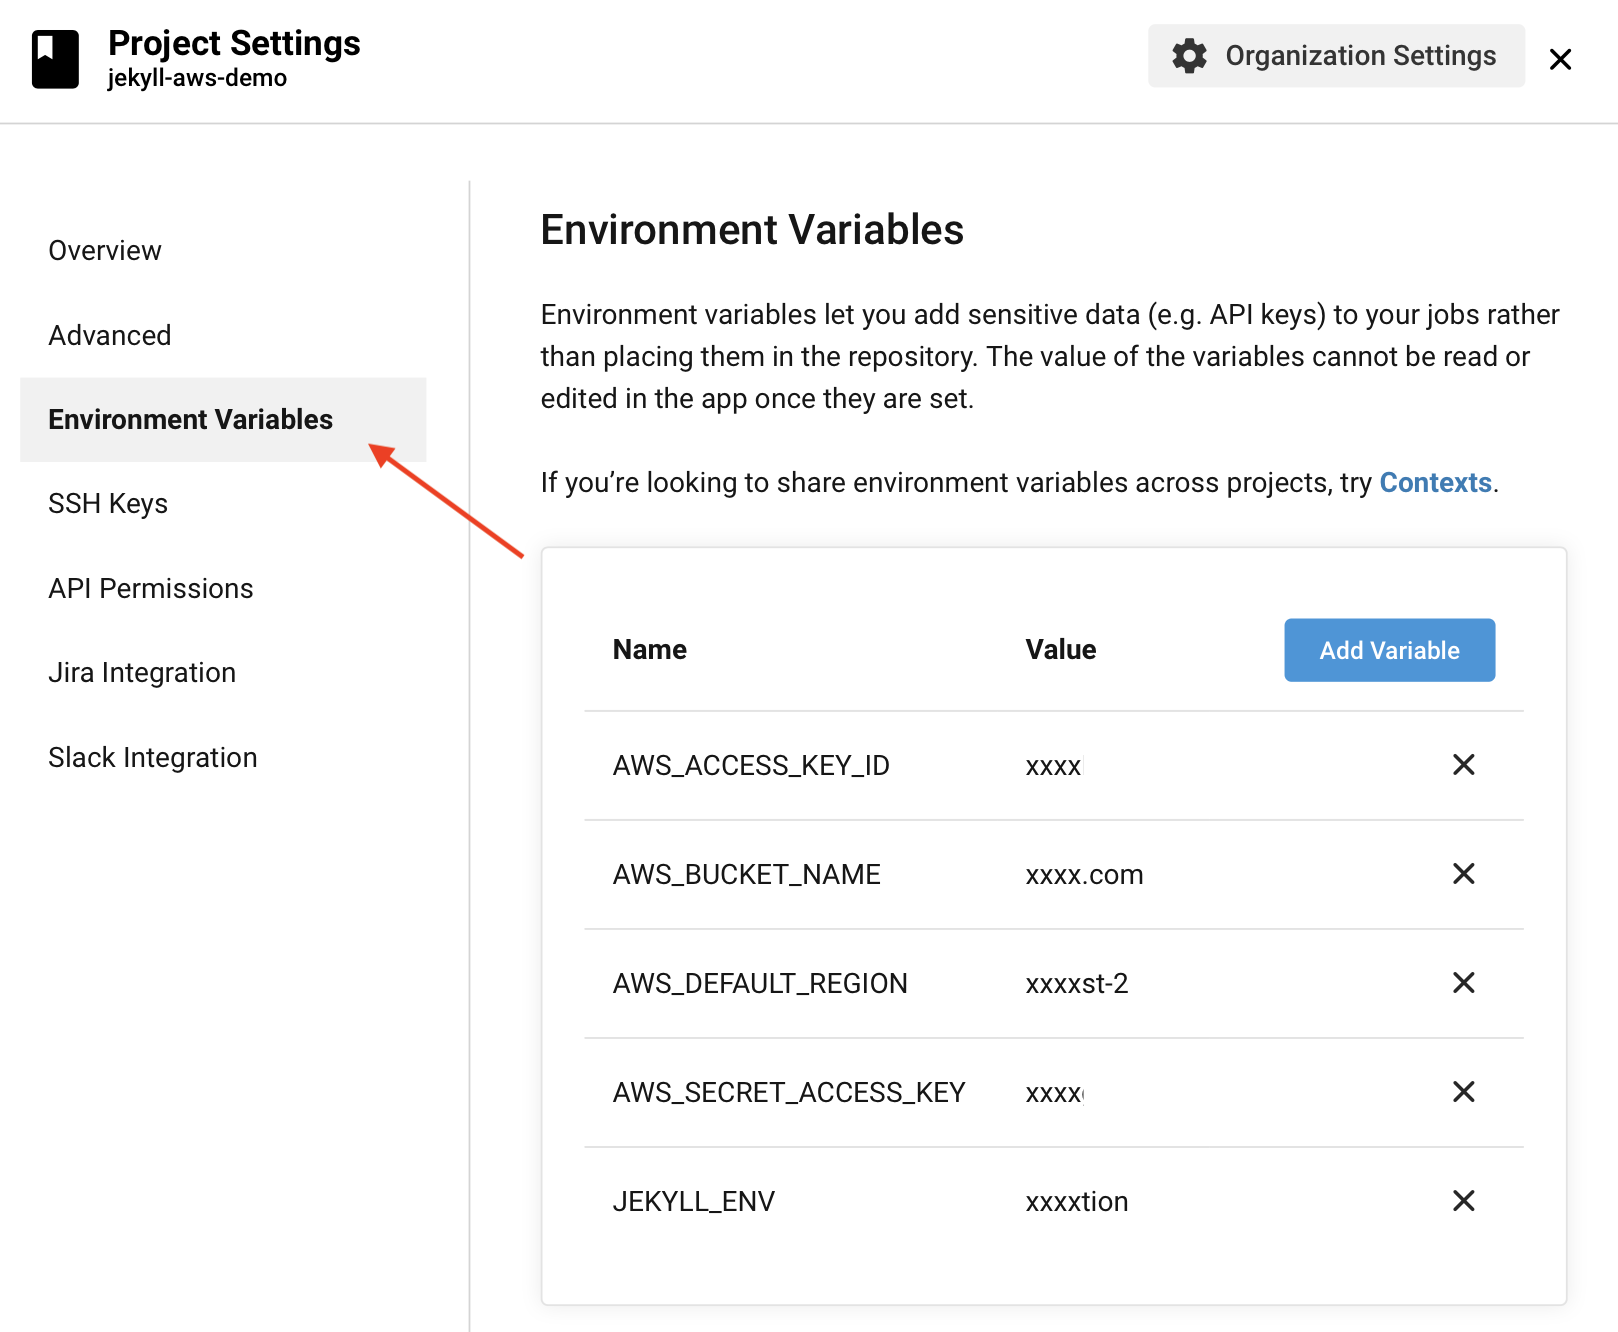
Define each of the following variables with the appropriate values as described below:
JEKYLL_ENV = 'production'
AWS_ACCESS_KEY_ID = "[Your Access Key ID]"
AWS_SECRET_ACCESS_KEY = "[Your Secret Access Key]"
AWS_BUCKET_NAME = "[Your bucket name]"
AWS_DEFAULT_REGION = "[Your AWS region (e.g. 'eu-west-2')]"
Now, all we have to do to trigger a build and deploy is to commit our config.yml file to our master branch and push the changes out to GitHub.
$ git add .circleci
$ git commit -m "Add CircleCI config.yml"
$ git push origin master
In your CircleCI dashboard you should, after a few seconds, see a successful and build deploy workflow.
Improve performance with CloudFlare
So far, we have a static website that we can build and upload to AWS S3 with just a single git commit. I’m sure you’ll agree this is a very useful workflow for productivity. But there are a couple of things we need to complete before we can relax.
We still can’t view our website at our chosen domain yet, and we are still downloading content from AWS S3 each time we visit our site. This can be expensive over time, since AWS charges per download bandwidth.
To resolve both of these issues, we prefer to use a service called CloudFlare. CloudFlare is a CDN or Content Delivery Network that acts as a cache layer between our visitors and our AWS Bucket. It’s also a great tool for adding some additional security, including SSL, and for managing DNS records. And it’s FREE!
If you don’t already have a CloudFlare account, head over to this page and sign up. Once you’ve signed in, follow the online instructions for adding a new domain. This will be different depending on your own setup and domain provider, but CloudFlare should guide you through that process.
Once your domain is set up, click on the “DNS” tab, and create a new CNAME record for your domain. The name of the CNAME should be the domain we want people to visit in their browser, and the value should be our AWS URL we used earlier (the one that looks like this: [bucket name].s3-website.[aws region].amazonaws.com).
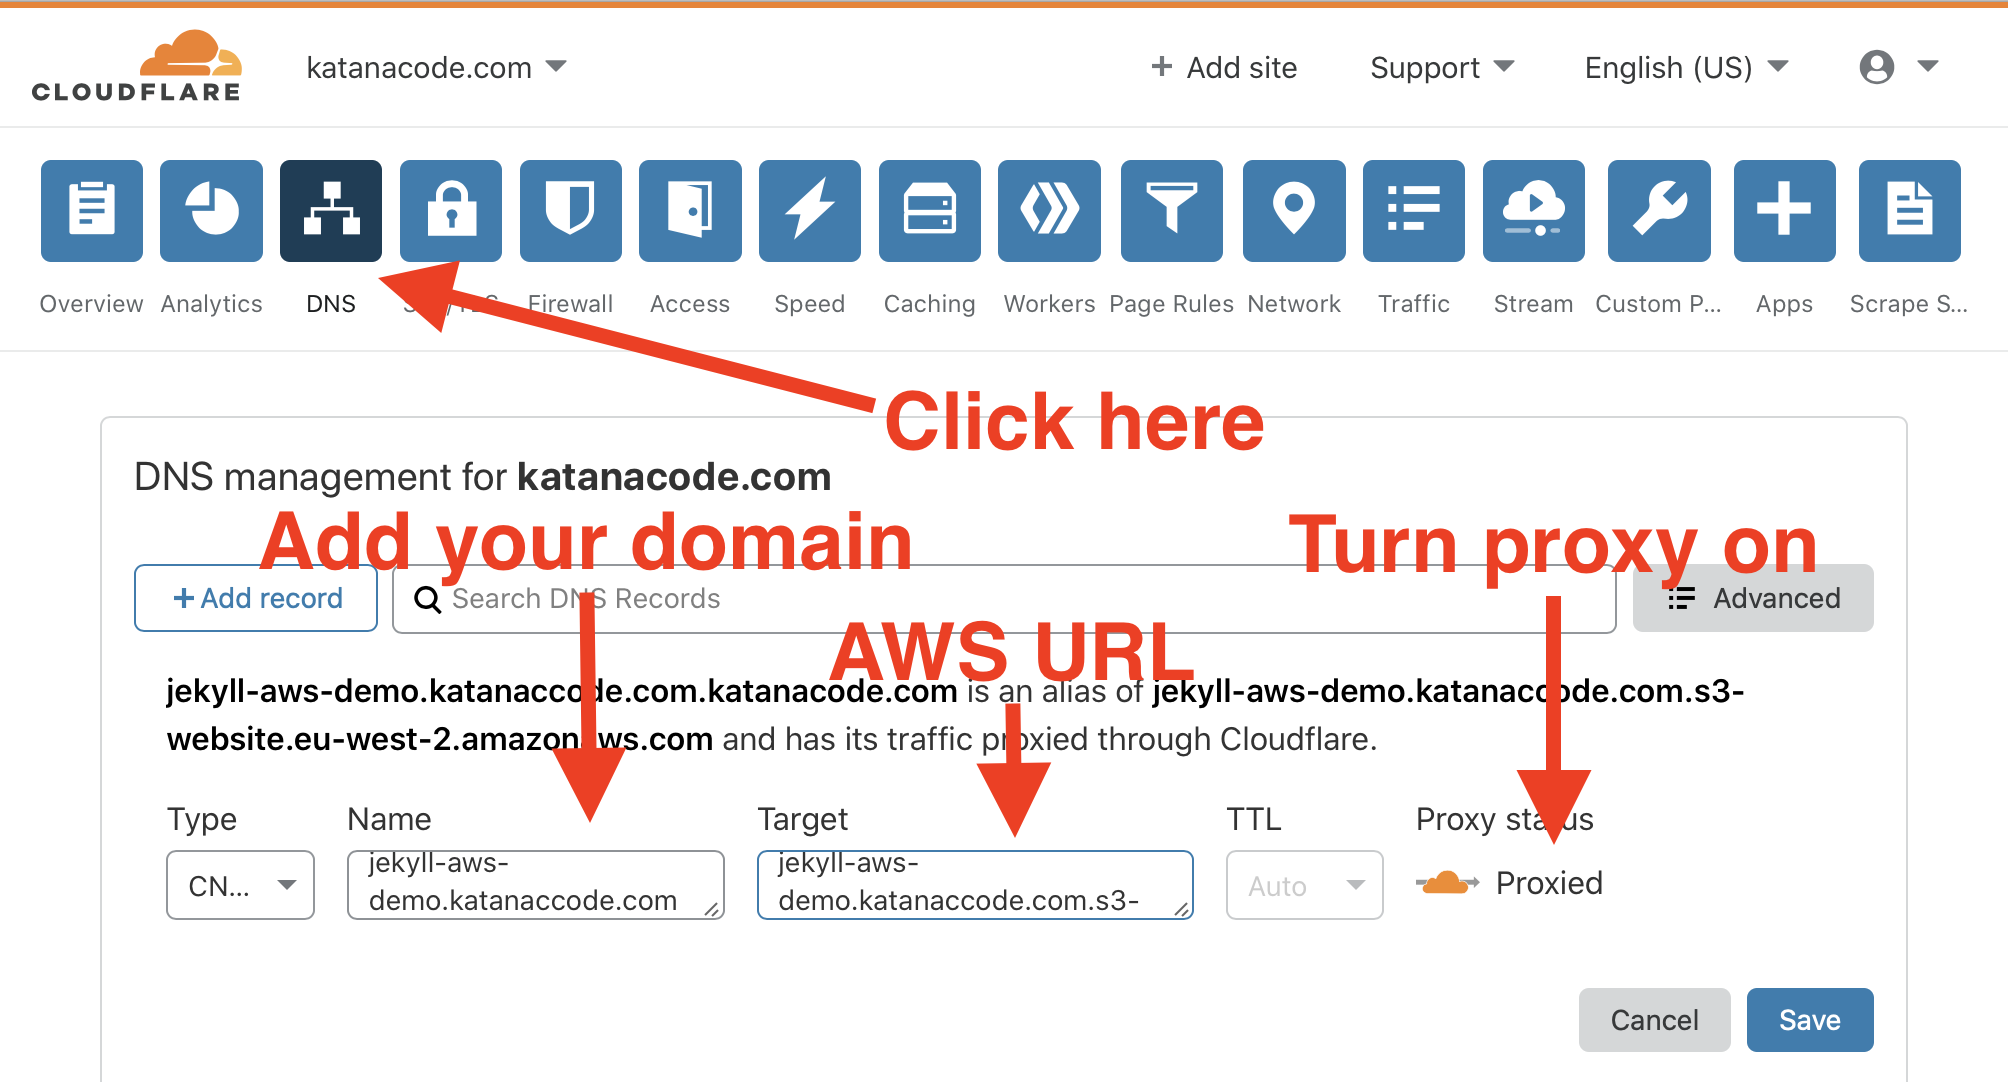
Now, when you visit your domain you should hopefully see your website loading as expected!
http://jekyll-aws-demo.katanacode.com.
Adding SSL
Remember earlier, I said that AWS doesn’t support SSL (“https”) by default? Well, as an optional extra, we can also head over to the SSL/TLS tab and turn on “Flexible” encryption.
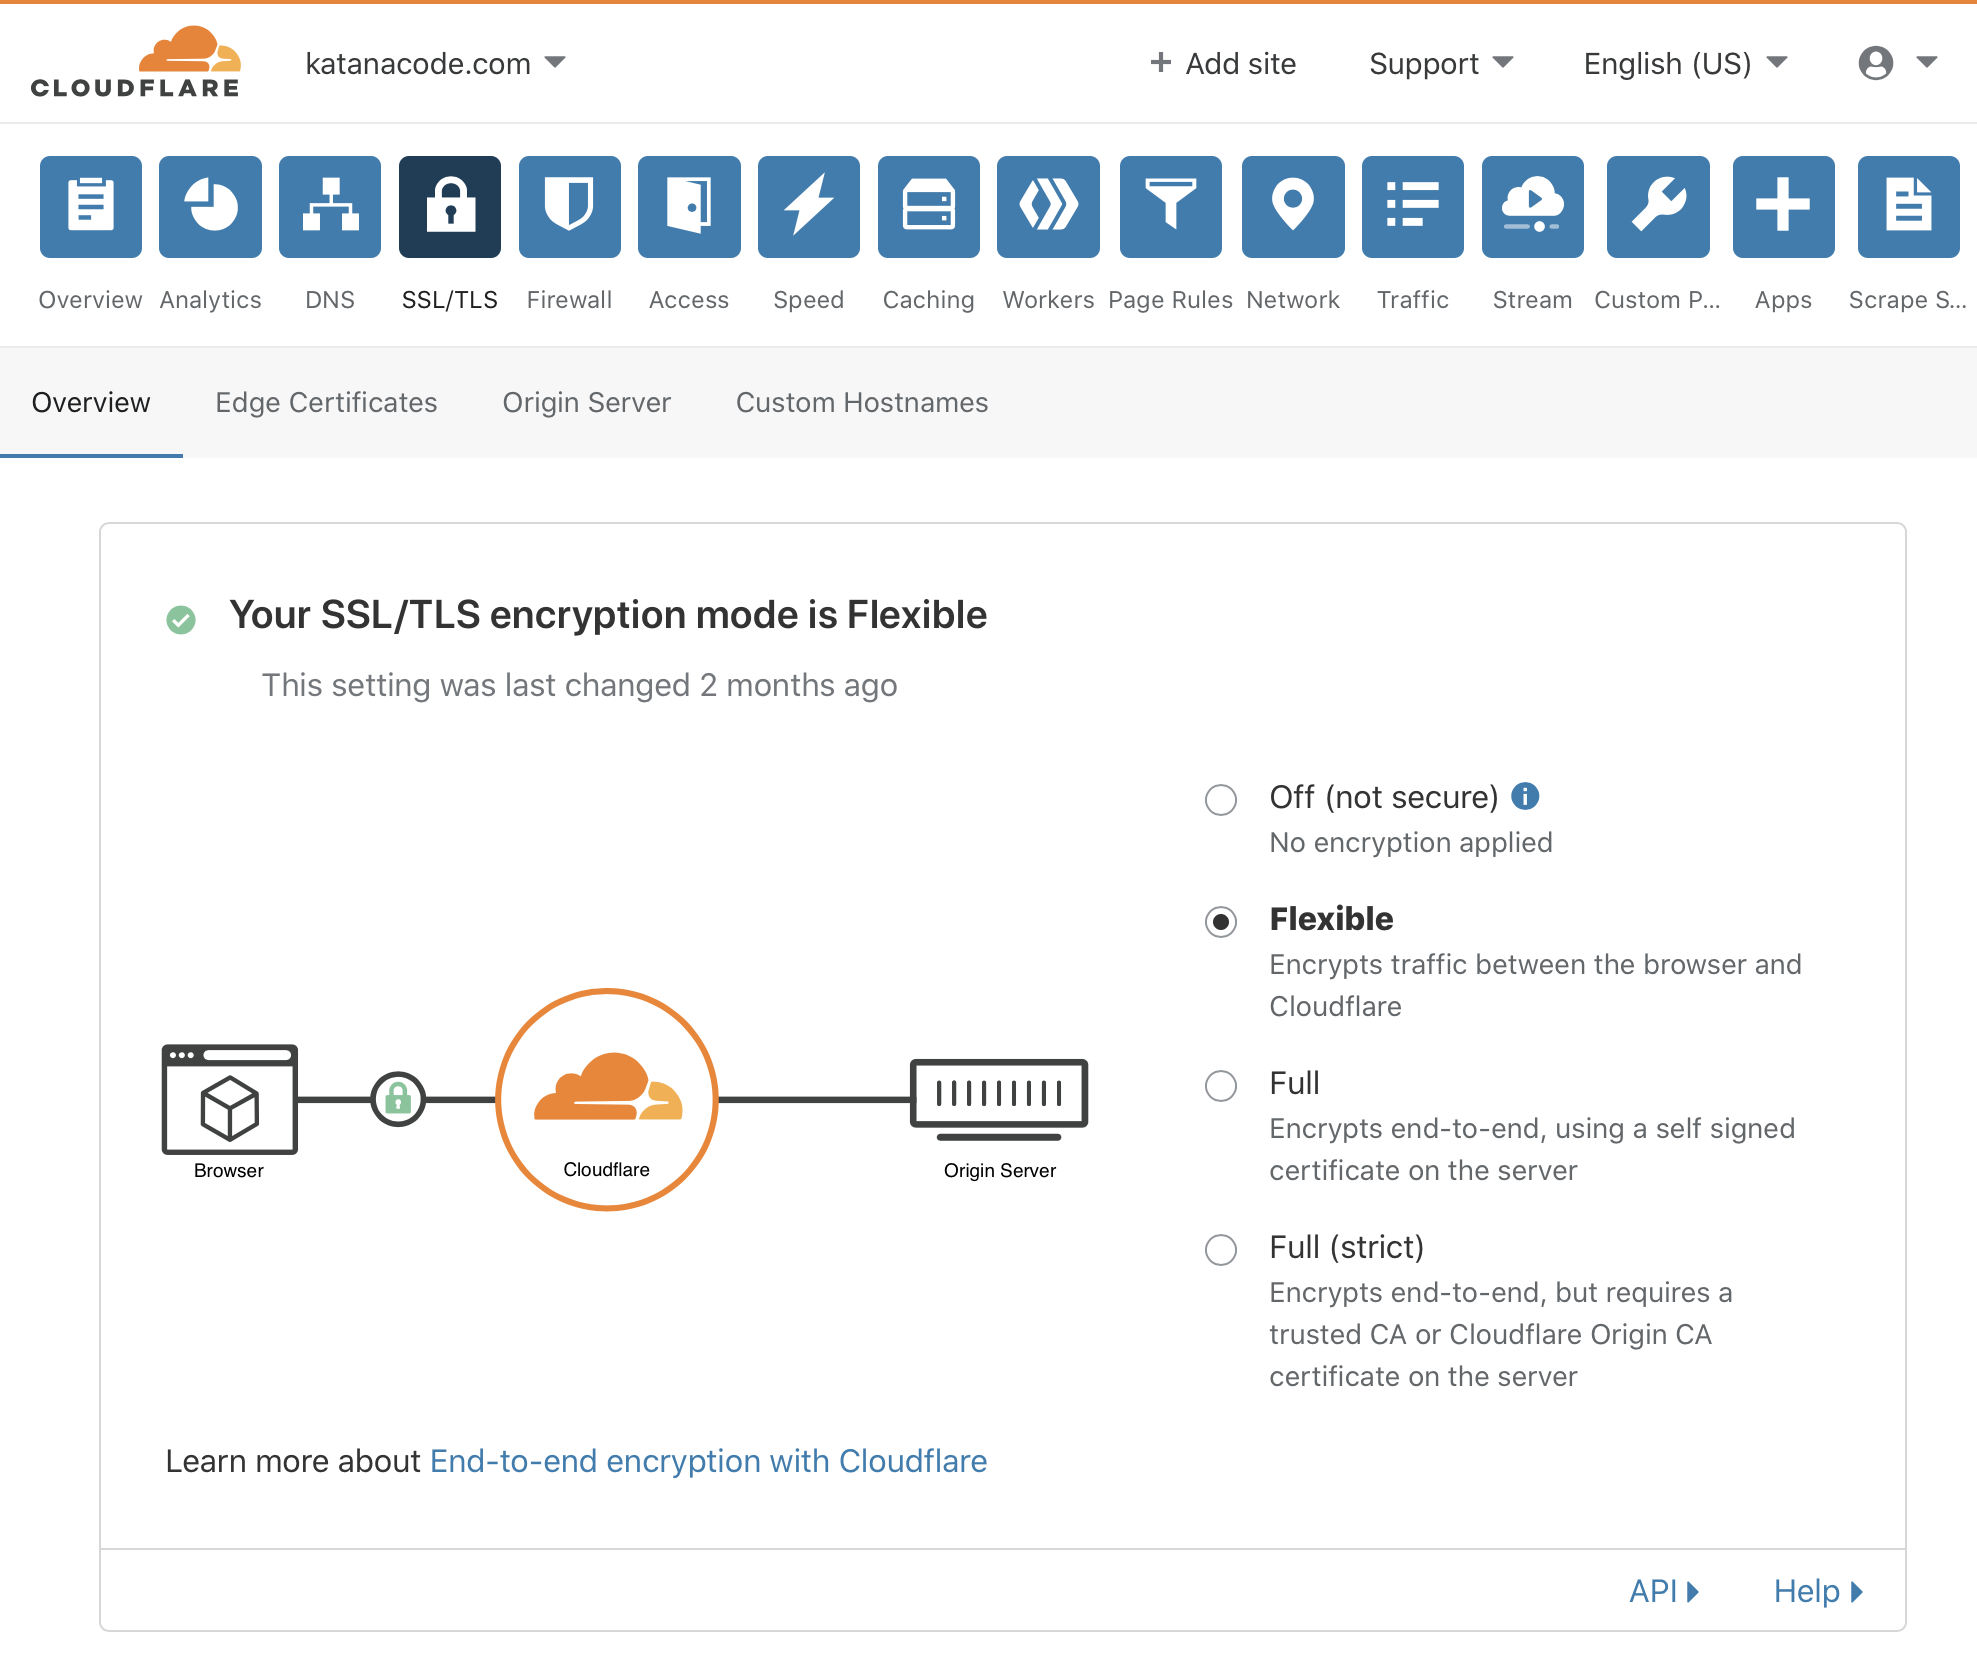
This allows us to offer SSL secure browsing for our visitors, without the need for us to buy and configure our own SSL certificates
You can check that it’s working by visiting your domain, but this time using the “https” scheme at the start (e.g. https://your-domain.com).
Cache purging
So let’s recap on what we’ve achieved so far. We’ve configured Amazon Web Services to host our static website in a super-low-cost S3 bucket. Next, we configured CircleCI to automatically update our site each time we push changes out to our master git branch. And then, we configured CloudFlare to cache our site’s HTML, Javascript, CSS, and image content, to reduce the time it takes for our website to load, and also keep the AWS costs low by reducing bandwidth.
There’s only one thing left for us to do. Can you guess what it is? If you said we need to automatically purge the CloudFlare cache with each deploy, you guessed right!
CloudFlare’s caching is an incredibly helpful service, but from time to time we’ll make changes to our website, and when we do, we don’t want the CloudFlare cache to continue to serve visitors the old, stale versions. There are a few different ways to avoid this problem, but the quickest and simplest solution is to simply purge everything in the CloudFlare cache and start afresh. Since we’re not going to be doing this too often, it shouldn’t have any negative impact on how quickly your website loads.
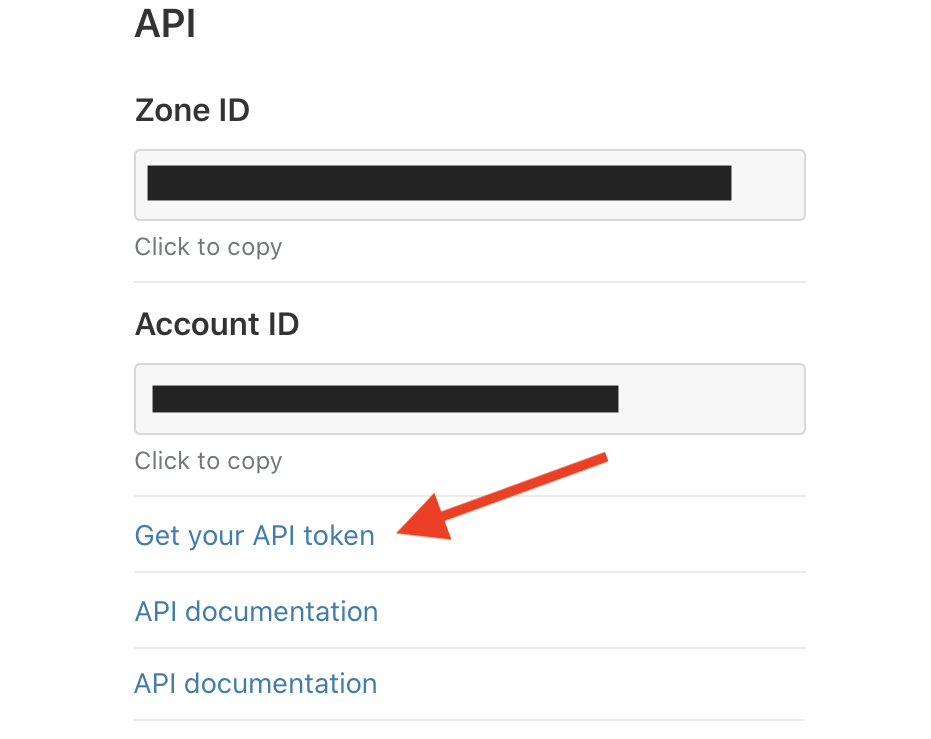
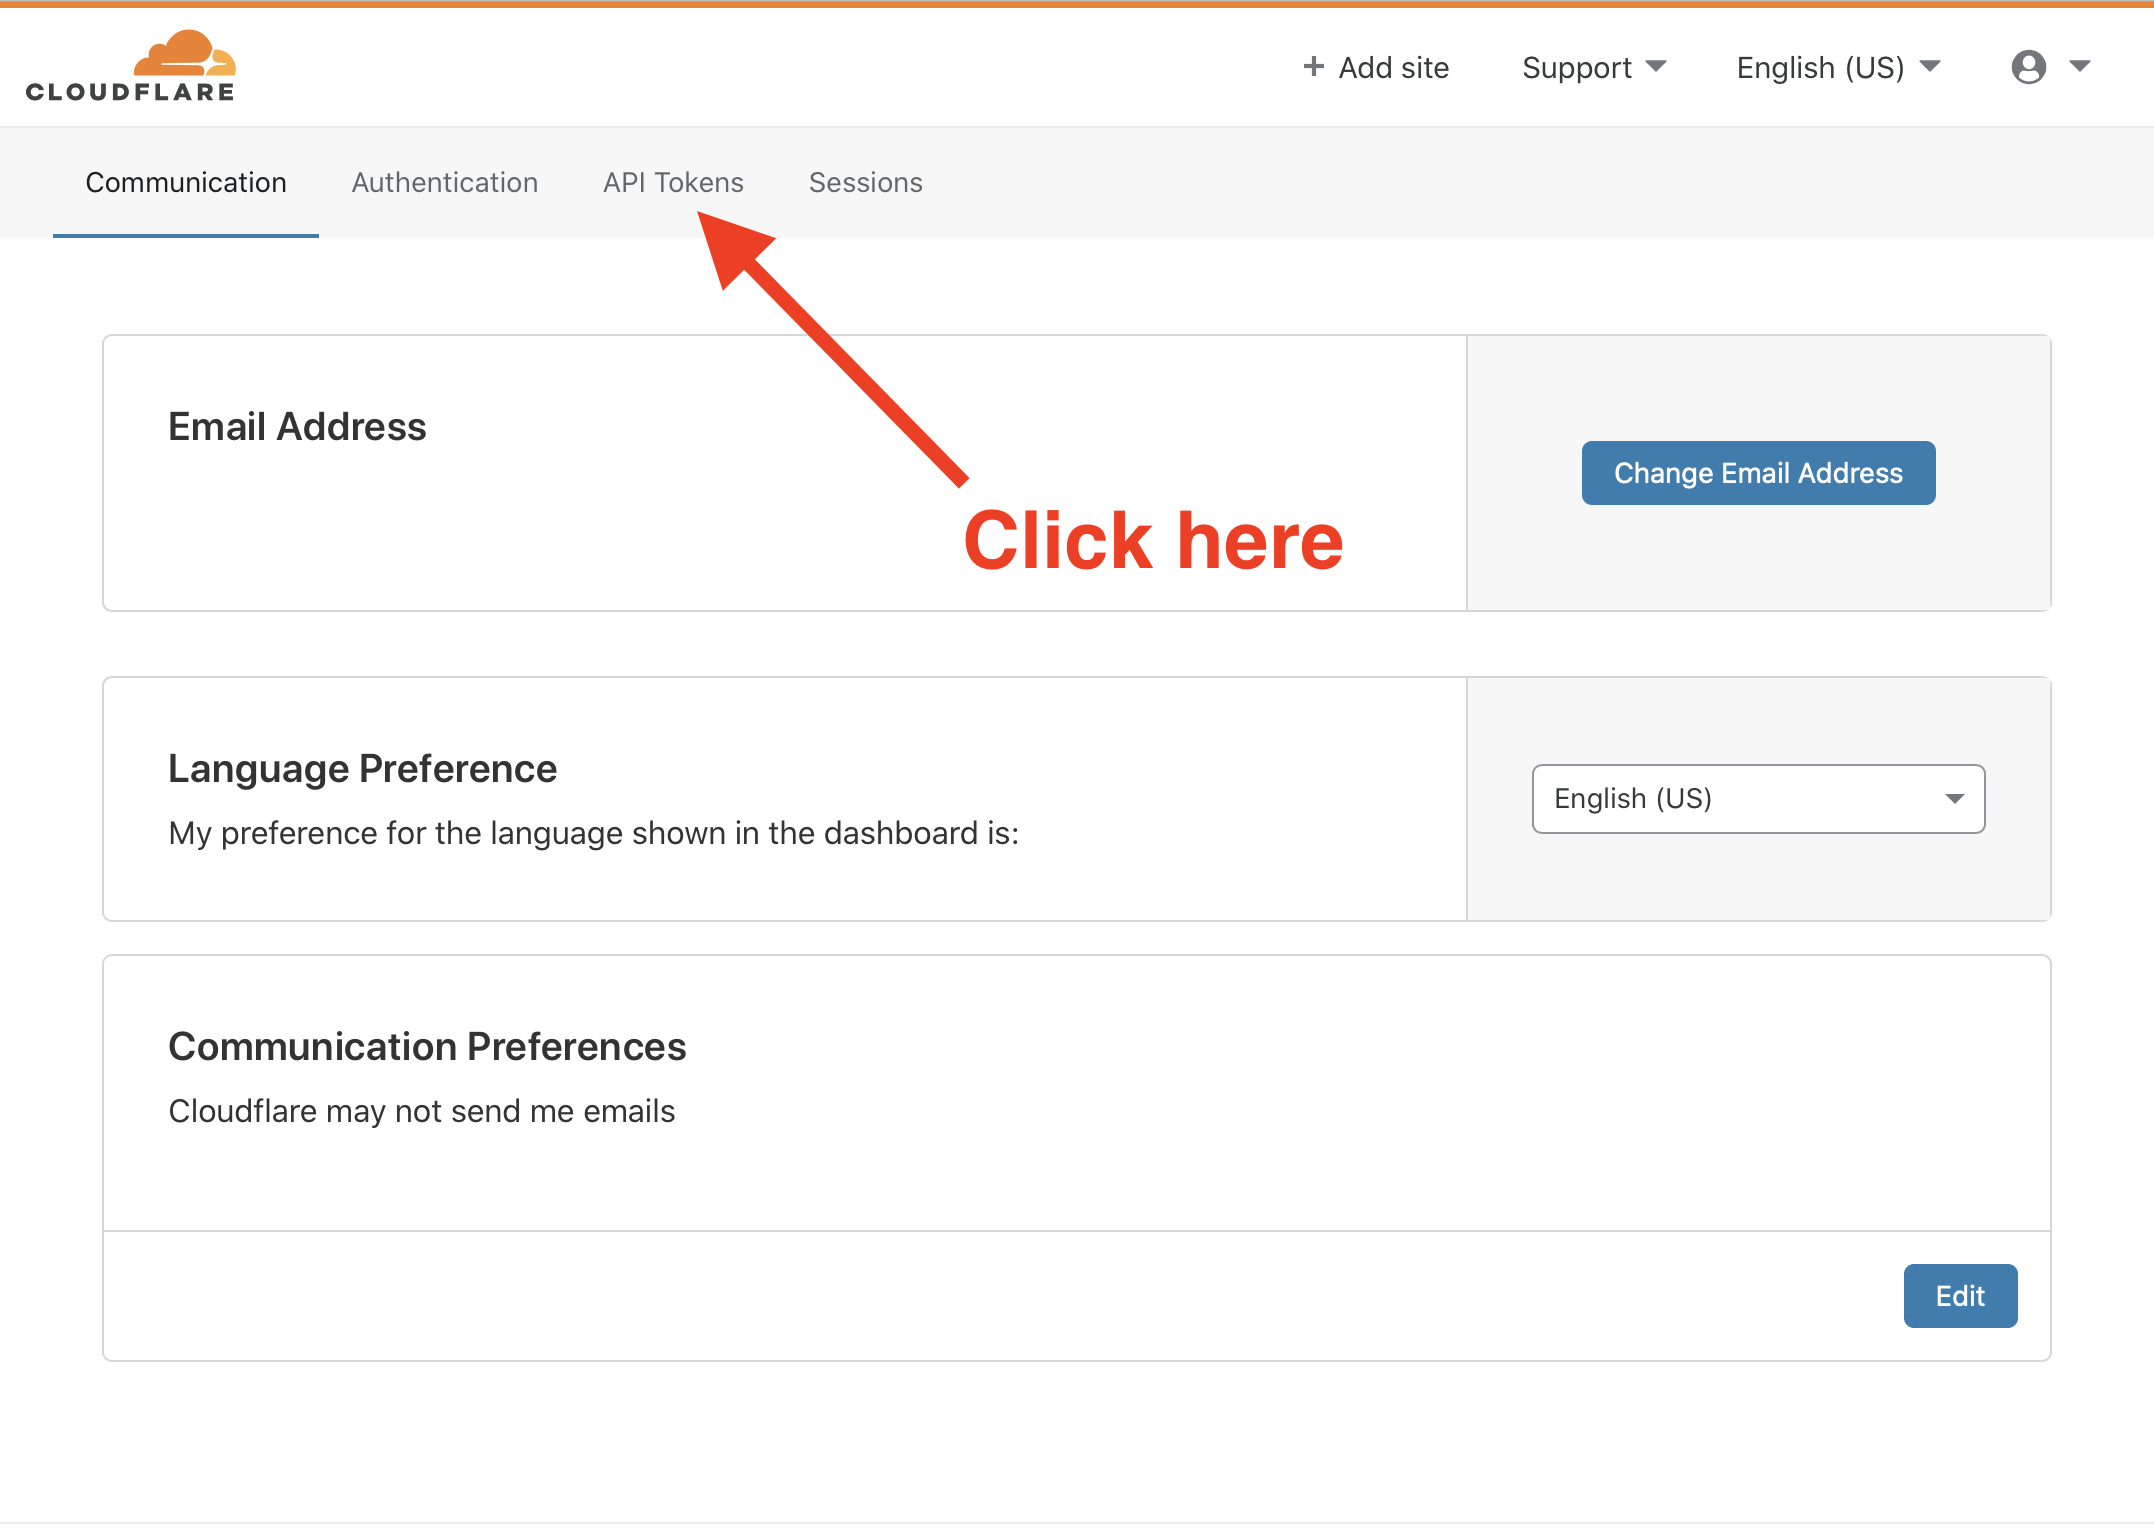
To automatically purge the CloudFlare cache, we first need a CloudFlare API token. You can get your token by clicking on the Overview tab in the CloudFlare Dashboard.
Down the right-side column, you should see a heading that reads “API”. Under there, copy your Zone ID, and keep a note of it—we’ll need that in a few minutes. Next, click the link that says “Get your API token” and proceed to the next page.
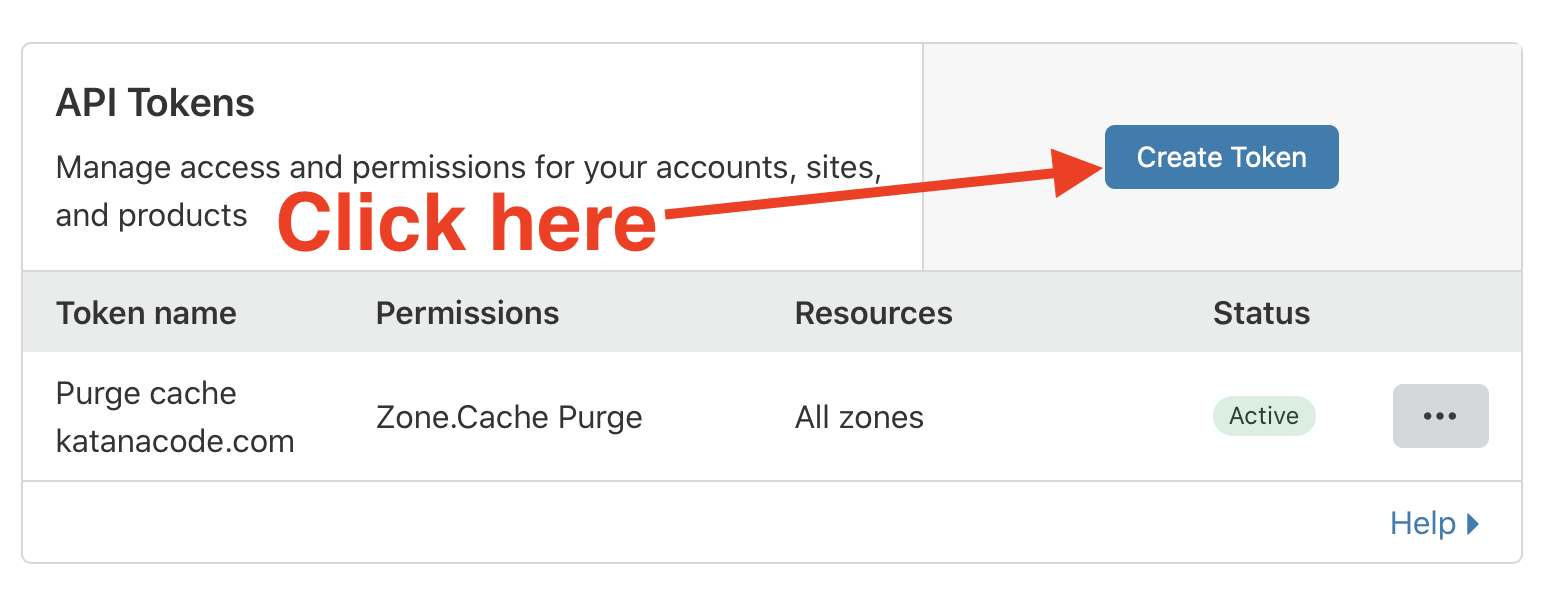
Ignore the various API token templates, and instead click the option to “Create Custom Token”
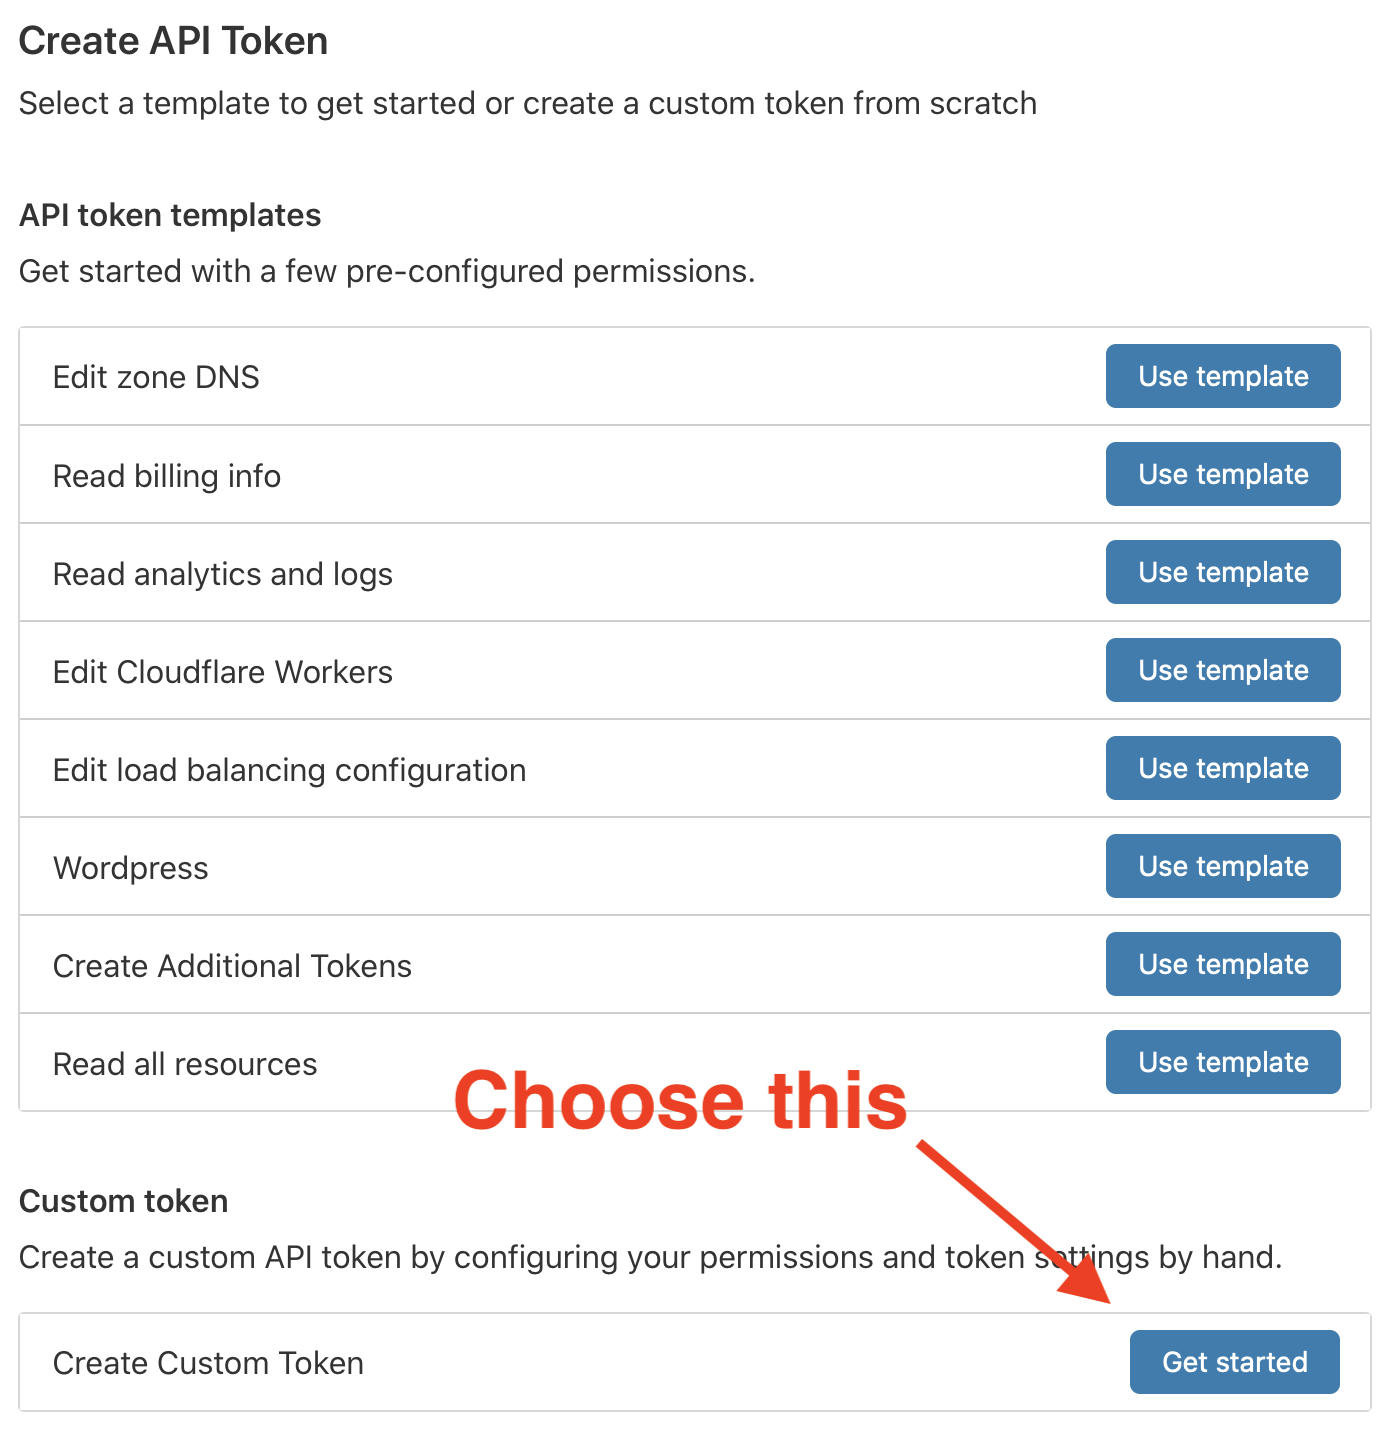
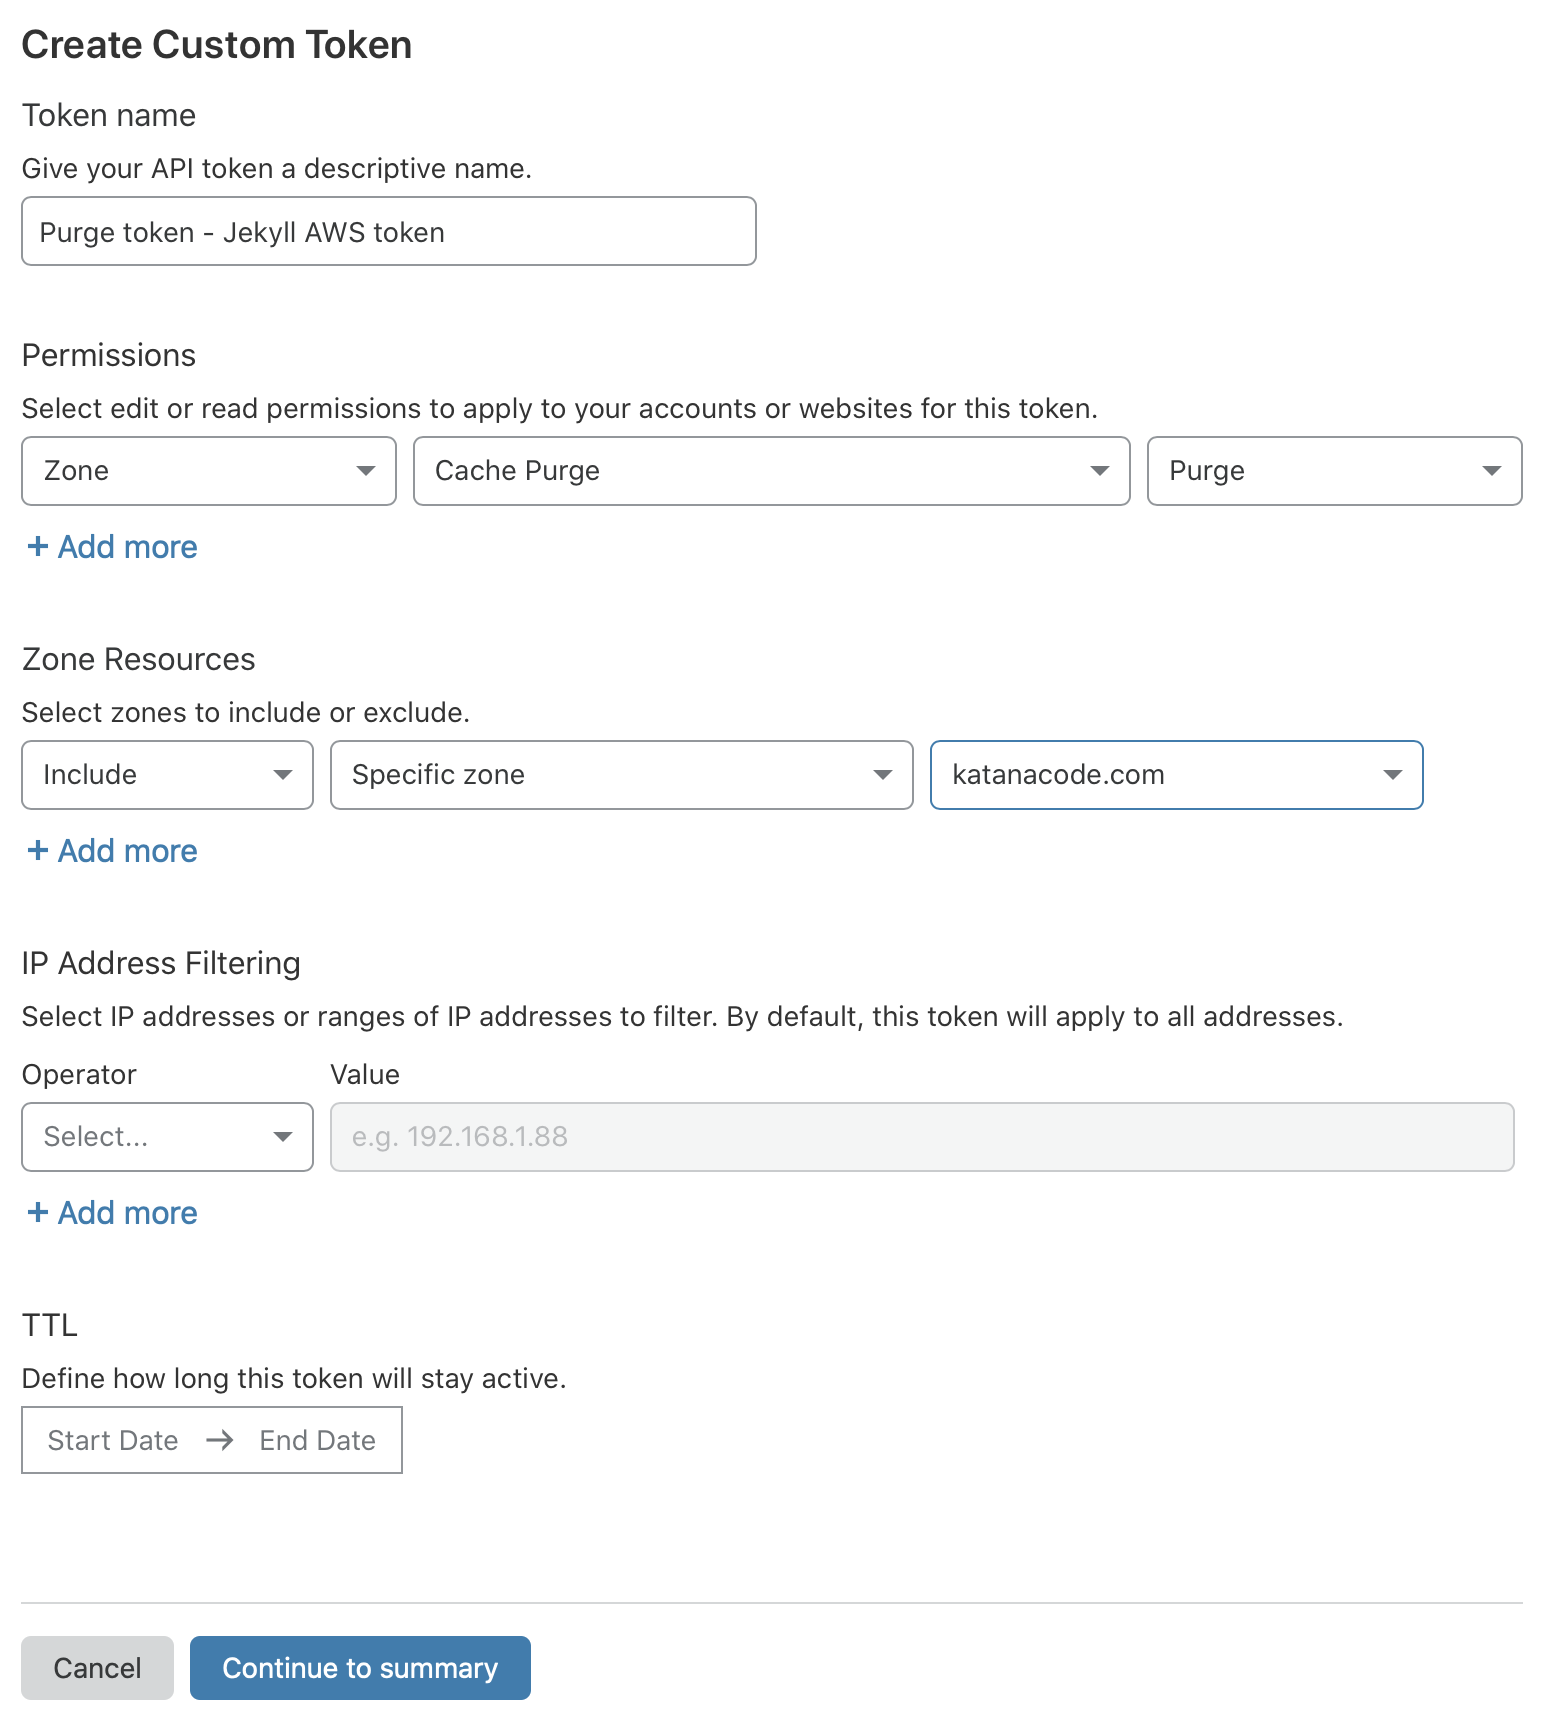
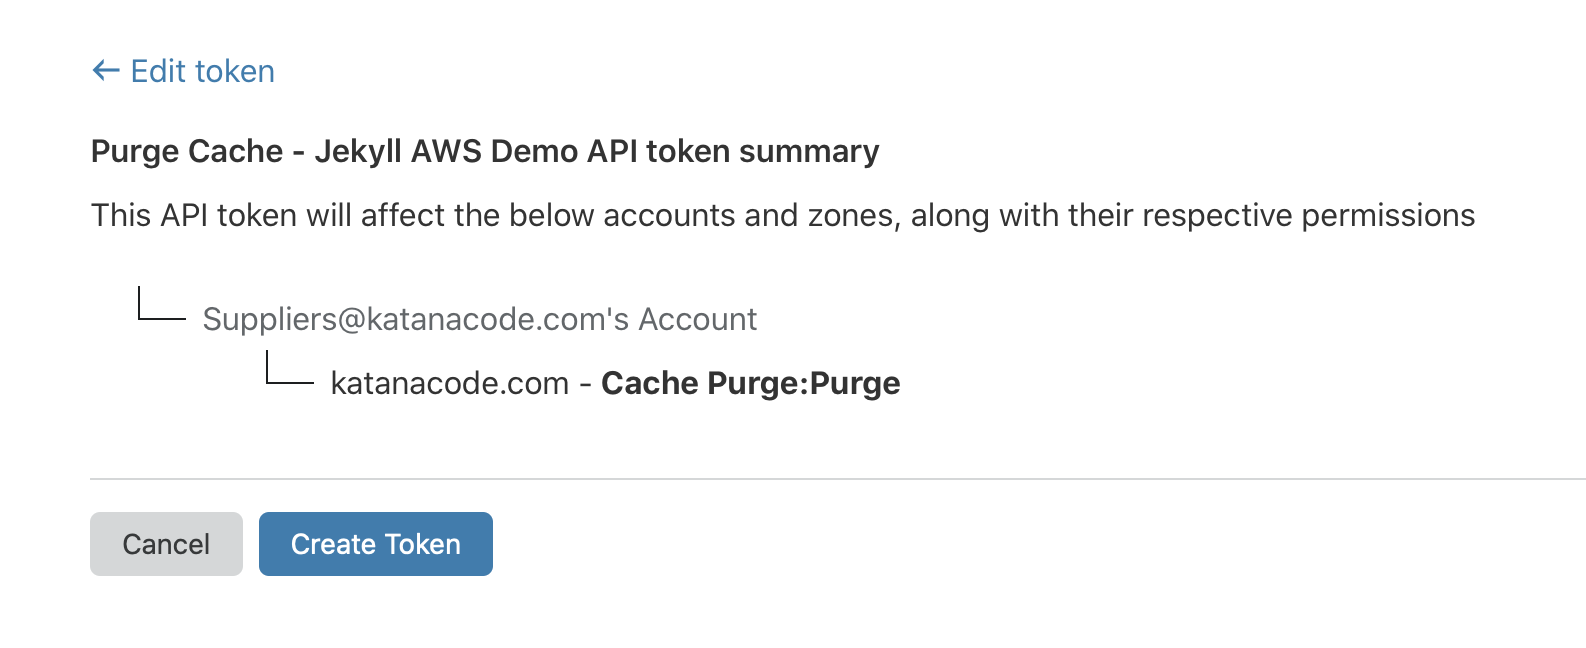
On this page, we’ll configure the API Token for our new website. Give it a name that makes sense to you (I chose “Purge Cache - Jekyll AWS Demo”), and choose “Zone” > “Cache Purge” > “Purge”.
This means we’re permitting requests with this API token to purge the cache on the specified zone (domain), and it’s the one and only permission we’re applying to this token.
Choose the “Zone” that matches your domain name, and click “Continue to summary”.
Copy your API Token code that’s shown on screen.
To test our API Token, CloudFlare gives us a bash snippet we can execute in our own Bash Terminal. Mine looks like this:
curl -X GET "https://api.cloudflare.com/client/v4/user/tokens/verify" \
     -H "Authorization: Bearer ngVpOCV-dk4xSbQXZ3MQrhfmEUCzofJXXXXX" \
     -H "Content-Type:application/json"
When I run that, CloudFlare responds with a JSON response that looks like this. I can see from the "status" that it worked!
{"result":{"id":"d839d692bb4c6794b61022595523s7df","status":"active"},"success":true,"errors":[],"messages":[{"code":10000,"message":"This API Token is valid and active","type":null}]}
Purge CloudFlare cache from a CircleCI job
To use this as part of our deploy workflow, we need to add an extra step to our CircleCI setup.
First, go back to the Project Settings in CircleCI and set a new environment variable, just like we did with JEKYLL_ENV and AWS_ACCESS_KEY_ID. This time, we want to name it CLOUDFLARE_API_TOKEN and set its value as the API Token we just created in CloudFlare.
Add another environment variable called CLOUDFLARE_ZONE and set this to the Zone ID we noted down earlier.
Finally, we need to add one last step to our deploy sequence in our config.yml file to tell CircleCI to purge the CloudFlare cache after we redeploy our site. Add the following step in the deploy: job block:
# This step was already here...
- run:
    name: "Deploy to S3"
    command: aws s3 sync _site s3://$AWS_BUCKET_NAME --delete
# This step is new...
- run:
    name: "Purge CloudFlare cache"
    command: >
      curl -X POST "https://api.cloudflare.com/client/v4/zones/${CLOUDFLARE_ZONE}/purge_cache" \
        -H "Authorization: Bearer ${CLOUDFLARE_API_TOKEN}" \
        -H "Content-Type: application/json" \
        --data '{"purge_everything":true}'}
Your complete config.yml file should look like this.
Stage and commit these changes on your master git branch, and push them out to GitHub.
$ git add .circleci/config.yml
$ git commit -m "Add CloudFlare Cache Purge to CircleCI"
$ git push origin master
Head back to the CircleCI dashboard and you should, after few seconds of nervous anticipation, see both jobs have passed successfully and your site was redeployed.
And that’s it! Now you can start making changes to your static Jekyll site and publishing them on AWS with a simple git push.
Optional extra: Nightly builds
If you blog a lot and would like to make the most of Jekyll’s ability to hide posts until a specified publish date, you might want to configure CircleCI to automatically build and redeploy your website once per day. With this configured, you can schedule blog posts for a specific date, and let CircleCI do the rest.
Getting this to work is easy, simply add one more block to the CircleCI config.yml workload:
workflows:
  version: 2
  build-and-deploy:
    # ...
  nightly:
    jobs:
      - build
      - deploy:
          requires:
            - build
    triggers:
      - schedule:
          cron: "0 0 * * *"
          filters:
            branches:
              only:
                - master
With this in place, CircleCI should now automatically deploy your site each day at about midnight.
Recap
To recap, in this walkthrough we’ve covered how to host a Jekyll website in an AWS bucket. We walked through how to create the minimum permissions necessary to programmatically make changes to our bucket. Next, we configured CircleCI to go through the build and deploy steps for us automatically. Lastly, we configured CloudFlare to act as a CDN and improve the security and performance of our static website.
I hope you find this setup useful. If you have any ideas for how it can be improved, or for cool tasks we could add to our workflow, please feel free to get in touch.
